



Contents: Removal ↓ Installation ↓
Note: The left low beam lamp and the right low beam lamp can be checked using the on-board power supply control unit actuator diagnostics.
Removal
Turn off the ignition and all electrical consumers and turn the key to position 0 (preliminary stop).
Note: Put the ignition key of the remote control in the vehicle interior during removal and installation to avoid locking the doors and self-activation of the functions "Coming Home/ Leaving Home (Arriving Home/ Leaving Home)".
To replace a low beam lamp, it is necessary to dismantle the adjacent parts of the corresponding headlight.
Note: The illustrations show replacing the low beam bulb on the right headlight.
Note: Replacing the left low beam lamp and the right low beam lamp is carried out in the same way.
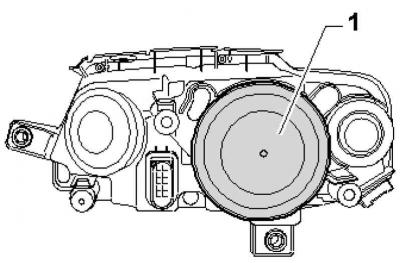
Fig. 7.49. Protective cap
Remove the protective cap 1 (Fig. 7.49).
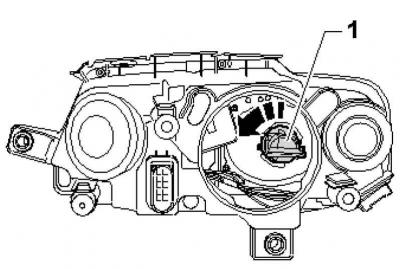
Fig. 7.50. Lamp holder
Unscrew the socket with the low beam lamp 1 in the direction of the arrow and remove it from the headlight as far as the length of the wires allows (Fig. 7.50).
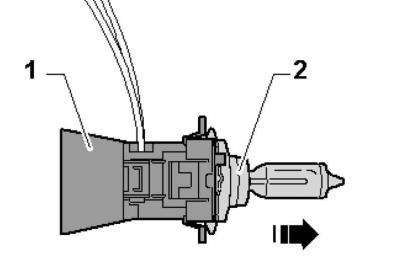
Fig. 7.51. Removing the lamp
Remove low beam lamp 2 in the direction of the arrow from socket 1 (Fig. 7.51).
Installation
When installing the lamp, do not touch its glass surface. Fingers leave greasy marks on the glass of the lamp, which evaporate after turning on the headlights, and the light of the lamp may dim.
Note: When installing, pay attention to the tight fixation of the cap. If water gets inside the headlight, the headlight may be damaged.
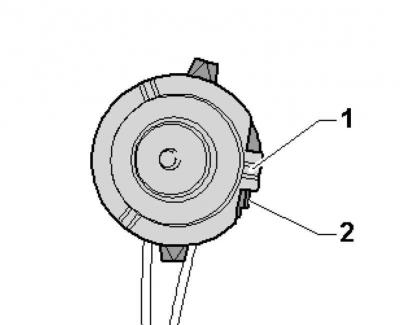
Fig. 7.52. Installing the low beam lamp
Insert the low beam lamp into the socket so that protrusion 1 of the lamp fits against guide 2 of the socket (Fig. 7.52).
Install the socket with the low beam lamp 1 into the headlight and rotate the socket with the low beam lamp in the direction of the arrow (Fig. 7.50).
Replace the cap.
Check the operation of the headlight, including all its functions.
Check the headlight settings and adjust if necessary.
Visitor comments