
Radiator cap check
The cooling system is under pressure.
The cap of the expansion tank is equipped with a spring selected in such a way that the seal closes the cooling circuit and opens it when the pressure reaches 1.2-1.5 atm. Due to the expansion of the liquid, the additional pressure causes the boiling point to rise.
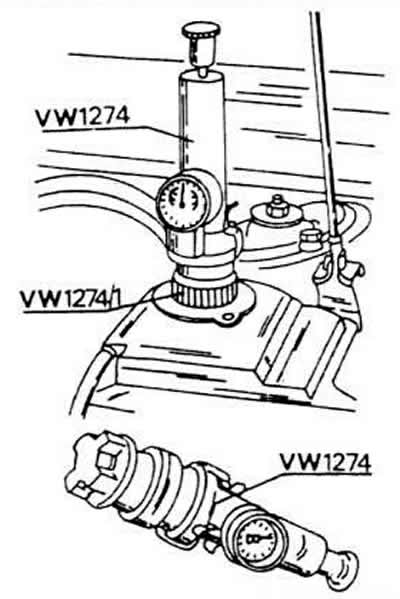
To check the cap, you need a control pump to supply coolant. Screw the pump into the cap and manipulate it until the valve opens. This should happen at the above pressure.
With the same evacuation pump, you can similarly check for leaks by integrating the pump into the liquid filling connection or into the expansion tank.
Bring the pressure to 1 atm and check that the pressure gauge shows this pressure for at least 2 minutes. If this does not happen, there is a leak in the cooling system, which can be easier to identify when the cooler is under pressure (coolant outlet at the leak).
Removal and installation of a radiator
Radiator, electrically driven fan. the fan driven by the V-belt and other parts of the cooling system are shown in the figure. The thermostat switch, which is used when the fan is running, is screwed on the lower left side of the radiator.
When removing the radiator, fan motor, additional fan and other parts near the radiator, you must first disconnect the battery, since when the ignition is on, the fan lines are under electrical voltage. The radiator is removed as follows.
Empty the cooling system. The sealing cap of the expansion vessel is unscrewed. so that the water can flow out better.
Remove the front shock absorber.
Remove all air lines to the radiator.
Disconnect the lines from the connecting pins of the thermostat switch and the fan motor.
Loosen the upper and lower water hose clamps. The hoses are disconnected from the radiator and pressed to the side, and they should not break at the same time. Also disconnect the hose between the radiator and the expansion vessel. The hoses are fixed either with spring clamps or with screw clamps. Screw clamps can be used for installation.
Both headlights are removed like this. as described in the relevant section.
Both fastening bolts on the upper side are unscrewed; fasteners are removed. Pay attention to that. how they are installed. Carefully pull the radiator forward out of the vehicle. At the same time, pay attention not to damage the honeycomb cells of the radiator.
Both coolant hoses can be removed at the same time by pulling out the connecting pipes.
If this is required, then the radiator casing and the corresponding fan casing are unscrewed from the common casing.
Remove the V-belts between both fans. Individual fasteners can be seen on the wiring diagram for installing the radiator.
The radiator is installed in the reverse order of removal. The cooling system is filling up. After installation, the headlights are put in place.
Checking the radiator fan
If the fan does not turn on flawlessly, the thermostat switch in the radiator wall should be checked first.
The engine is allowed to run until the fan turns on.
Slowly unscrew the cooling water stopper, as steam may escape.
A thermometer is kept in the expansion vessel. The temperature should be between 93-98°C.
If the fan does not turn on, then both cables are disconnected from the thermostat switch and connected to each other. Turn on the ignition. The fan must be running.
If this does not happen, then the thermostat switch is replaced with a new one and the test is repeated.
Checking the temperature sensor of the remote thermometer
The cable is disconnected from the temperature sensor and measurements are made between the terminal and the housing using an ohmmeter. At low temperatures, the resistance is very high. The hotter the engine gets, the less this resistance becomes.
The defect can also take place in the remote thermostat. To quickly check the cable in the way described earlier, disconnect it and keep it on the housing with the ignition on. The ignition is switched on. The arrow of the remote thermometer should move to the position «Heiss» («hotter»). Connect the test lines briefly as described to avoid damaging the remote thermostat or burning the cable lines. After this check, turn off the ignition again.
Visitor comments