
English Русский
Български
Беларускі
Український
Српски
Hrvatski
Română
Polski
Slovenský
Magyar
  |  Articles  |  Sitemap  |  Contacts  |    |
Car maintenance Ford Car maintenance Hyundai Car maintenance Chevrolet Car maintenance BMW Car maintenance Audi Car maintenance Opel Car maintenance AvtoVAZ
VWmanual.ru


Main   Passat   Golf   Polo   Touareg   Tiguan   Sharan   Transporter   Others  
Golf 1 (1974-1984, diesel) Golf 1 (1974-1984, petrol) Golf 2 (1984-1993, petrol) Golf 2 (1984-1993) Golf 3 (1991-1997) Golf 4 (1997-2004) Golf 5 (2003-2008)

Removal the fuel tank (VW Golf 1)

  • Main
  • Golf
  • Golf 1
  • Power unit
  • Fuel system
  • Removal the fuel tank
            0


Thoroughly clean the underside of the vehicle to ensure that no dirt gets into the fuel system.

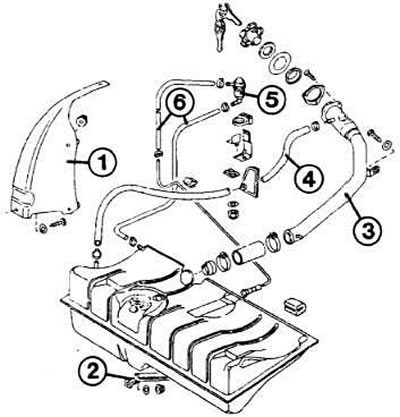
Fuel tank components often include: 1 - lower cover; 2 - tensioning tape; 3 filling nozzle; 4 -…

Fuel tank components often include: 1 - lower cover; 2 - tensioning tape; 3 filling nozzle; 4 - ventilation system hose; 5 - gravity valve of the ventilation system; 6 ventilation system hose


Drain the fuel.

Remove the fuel tank sensor cover in the trunk.
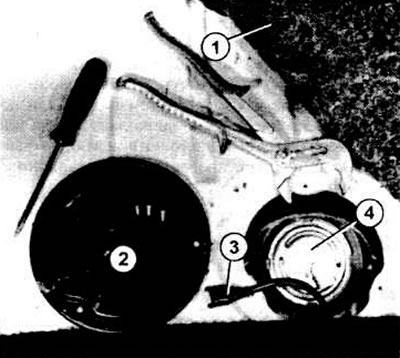
The fuel quantity sensor (4) is visible after opening the trunk lid (1) and unscrewing the cover…

The fuel quantity sensor (4) is visible after opening the trunk lid (1) and unscrewing the cover (2). Once the plug (3) has been removed, the tank sensor can be disconnected using the pipe wrench shown in the illustration.


Remove the hoses and plug from the fuel tank sensor.

Raise the car from behind and place it on supports.

Disconnect the brake hoses leading from the rear pipes to the rear axle (see "Replacing the brake hose", chapter "Brakes").


Loosen 2 rear axle locknuts on the right and left. Turn the axle down and support it.

Remove the two retaining rings: one in front of the main muffler and the other behind it.

(View the original on the website: www.vwmanual.ru)

Remove the hose between the filler neck and the fuel tank.

Unscrew the nuts of the tank support straps from the bottom of the body.

Lower the tank and remove it.

When installing, check whether the check valve moves easily at the bottom, near the filler hole of the tank.

The valve must be installed in a hanging position.

If necessary, remove the tubular insert with the reinforced flap and turn it.

For information on rear axle mounting, see the section "Removal the rear axle" in the chapter "Wheel suspension".

After connecting the brake hoses, bleed the brake system (see section "Bleeding the brake system", chapter "Brakes").

This article is available at russian, bulgarian, belarusian, ukrainian, serbian, croatian, romanian, polish, slovak, hungarian
The text has been checked: Medvedeva Elena

Share information:

Previous articles
Draining fuel from the tank
Fuel efficient driving
How the car itself affects fuel consumption
Normal fuel consumption
Winter diesel fuel
All about diesel fuel
Next articles
Replacing the fuel tank
Fuel quantity sensor
Fuel tank ventilation
Gravity valve
Fuel filter
Bleeding the fuel system


Similar articles from other manuals for VW cars:
Fuel tank filler flap Passat B6 (2005-2010)
Fuel tank cap Polo 3 (1995-2003)
Fuel tank filler flap Touareg 1 (2002-2006)
Fuel tank device Tiguan 1 (2007-2015)
Fuel level sensor in the tank Sharan 1 (1995-2000)
Fuel tank — design description Transporter T3 (1979-1992)
Fuel tank filler pipe installation (models with 2.4L engine) LT 28 (1975-1991)
Link to this page in different formats


Visitor comments


No comments yet


How much will 32 + 27 =


Golf 5 
  • General information
  • User manual
  • Maintenance
  • Troubleshooting
  • Power unit
  • Engine repair
  • Cooling and ventilation system
  • Fuel system
  • Ignition system
  • Transmission
  • Clutch
  • Mechanical gearbox
  • Automatic gearbox
  • Chassis
  • Brake system
  • Car suspension
  • Steering
  • Body
  • Interior (internal elements)
  • Exterior (external elements)
  • Doors and covers
  • Electrical equipment
  • Power devices
  • Washers and wipers
  • Lighting and appliances
  • Electrical circuits
Golf 4 
  • General information
  • User manual
  • Weekly checks
  • Maintenance
  • Power unit
  • Petrol engines
  • Diesel engines
  • Cooling system
  • Fuel system (petrol)
  • Control system (petrol)
  • Fuel system (diesel)
  • Exhaust system
  • Transmission
  • Clutch
  • Car gearbox
  • Drive shafts
  • Chassis
  • Car suspension
  • Steering
  • Wheels and tires
  • Brake system
  • Body
  • Exterior (external elements)
  • Interior (internal elements)
  • Ventilation and heating
  • Car doors and sunroof
  • Washers and glass cleaners
  • Electrical equipment
  • Power devices
  • Lighting and appliances
  • Electrical circuits
Golf 3 
  • Petrol engine
  • Engine repair
  • Lubrication system
  • Cooling system
  • Ignition system
  • Diesel engine
  • Engine repair
  • Diesel injection system
  • Pre-glow system
  • Transmission
  • Clutch
  • Gearbox and drive shafts
  • Chassis
  • Steering
  • Wheels and suspension
  • Brake system
  • Electrical equipment
  • Lighting and appliances
  • Electrical circuits
Golf 2 
  • General information
  • Introduction to guide
  • User manual
  • Petrol engines 1.3 l
  • Engine repair
  • Lubrication system
  • Cooling system
  • Carburetors
  • Supply system
  • Ignition system
  • Petrol engines 1.6/1.8 l
  • Engine repair
  • Supply system
  • Ignition system
  • Diesel engines
  • Engine repair
  • Lubrication system
  • Cooling system
  • Power and exhaust system
  • Transmission
  • Clutch
  • 4-speed gearbox 084
  • 5-speed gearbox 085
  • 4-speed gearbox 020/4R
  • 5-speed gearbox 020/4T
  • Automatic gearbox
  • Drive shafts
  • Chassis
  • Steering
  • Car suspension
  • Brake system
  • Body
  • Body elements
  • Doors, locks and windows
  • Electrical equipment
  • Equipment and devices
  • Power devices
Golf 2 (petrol) 
  • General information
  • Characteristics
  • Car care
  • Maintenance
  • Power unit
  • Engine repair
  • Engine 1.05/1.30
  • Engine 1.60/1.80
  • Cooling and lubrication system
  • Power and exhaust system
  • Transmission
  • Clutch
  • Car gearbox
  • Drive shafts
  • Chassis
  • Brake system
  • Steering
  • Suspension
  • Body
  • Body and equipment
  • Electrical equipment
  • Lighting and appliances
  • Electrical circuits
Golf 1 (petrol) 
  • General information
  • Characteristics
  • User manual
  • Maintenance
  • Power unit
  • Engine adjustment
  • Engine 1.1/1.3
  • Engine 1.5/1.6/1.8
  • Engine electrical equipment
  • Cooling system
  • Fuel system
  • Transmission
  • Clutch and manual gearbox
  • Automatic gearbox
  • Chassis
  • Steering
  • Front suspension
  • Rear suspension
  • Brake system
  • Electrical equipment
  • Lighting and appliances
  • Electrical circuits
  • Body
  • Body and equipment
  • Optional equipment
Golf 1 (diesel) 
  • General information
  • Specifications
  • Maintenance
  • Power unit
  • Engine repair
  • Exhaust and turbocharger
  • Cooling system
  • Fuel system
  • Fuel injection system
  • Transmission
  • Clutch and drive shafts
  • Car gearbox
  • Chassis
  • Suspension and wheels
  • Steering
  • Brake system
  • Wheels and tires
  • Body
  • Heating and ventilation
  • Exterior (external elements)
  • Interior (internal elements)
  • Doors and windows
  • Electrical equipment
  • Equipment and devices
  • Lighting system
  • Power devices
  • Electrical circuits
VWmanual.ru © 2016-2026 | Mobile version | News and articles | Sitemap: EN BG BY UA RS HR RO PL SK HU | Write message | Site search
Passat B2 • Passat B3 • Passat B4 • Passat B5 • Passat B6 • Golf 1, diesel • Golf 1, petrol • Golf 2, petrol • Golf 2 • Golf 3 • Golf 4 • Golf 5 • Polo 3 • Polo 4 • Touareg 1 • Tiguan 1 • Sharan 1 • Transporter T3 • Transporter T4 • LT 28 • LT 2D • Beetle • Caddy 3 •
Our website uses cookies to ensure functionality and convenience.