
English Русский
Български
Беларускі
Український
Српски
Hrvatski
Română
Polski
Slovenský
Magyar
  |  Articles  |  Sitemap  |  Contacts  |    |
Car maintenance Ford Car maintenance Hyundai Car maintenance Chevrolet Car maintenance BMW Car maintenance Audi Car maintenance Opel Car maintenance AvtoVAZ
VWmanual.ru


Main   Passat   Golf   Polo   Touareg   Tiguan   Sharan   Transporter   Others  
Transporter T3 (1979-1992) Transporter T4 (1990-2003)

Checking, removing and installing a hydraulically operated oil switch (VW Transporter T3)

  • Main
  • Transporter
  • Transporter T3
  • Petrol engines
  • Lubrication system
  • Checking, removing and installing a hydraulically operated oil switch
            0


Only cars produced before 7.85.


The oil pressure switch is located in the oil pan and, together with the control lamp on the instrument panel, serves to monitor the oil pressure. The membrane switch connects or disconnects the control lamp to ground.


When the engine is off - there is no oil pressure - the control lamp is connected to ground. Therefore, when the ignition is turned on, the control lamp lights up, since there is no oil pressure.

After starting under normal conditions, pressure is immediately created. The membrane in the switch moves the contact plate inside the switch, the control lamp goes out, thereby signaling that there is sufficient pressure. If the lamp lights up briefly when turning sharply, this is usually a sign of low oil level.

Disconnect the electrical wire from the oil switch and unscrew the switch.

When installing, tighten the switch with a tightening torque of 30 Nm.

Examination


Remove the oil switch and screw the switch into the appropriate control device.

Screw the control device into the oil radiator instead of the oil switch.
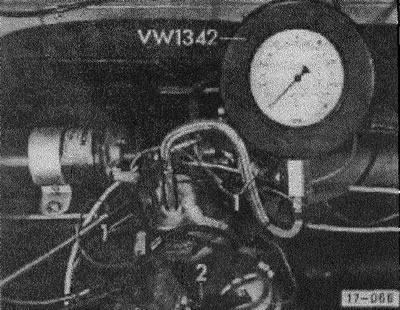
Screw the control device into the oil radiator instead of the oil switch.


Connect wire "1" (blue) of the control device with the oil switch to the wire of the oil switch, wire "2" (brown) connect to mass.


Turn on the ignition. The oil pressure indicator light should come on (provided that the lamp itself and the wiring are in order). Otherwise, replace the switch.

Start the engine, slowly increase the speed and thus the oil pressure. At an excess pressure of 0.15-0.45 bar the lamp should go out.

Continue to increase engine speed. At 2000 rpm and oil temperature of +80°C, the oil pressure should be at least 2.0 bar (atm.).

If this pressure is not achieved at this speed, this is a sign of wear of the crankshaft bearings.

This article is available at russian, bulgarian, belarusian, ukrainian, serbian, croatian, romanian, polish, slovak, hungarian
The text has been checked: Tarasov Ivan

Share information:

Previous articles
Removal and installation the oil pressure reducing valve
Oil pump, oil filter and pressure reducing valve
Replacing the oil filter
Engine oil change
Purpose of motor oil
Next articles
Automatic oil pressure control
Checking the oil switch, checking the oil pressure
Removal and installation the oil pump
Diagnostics of engine lubrication system faults


Similar articles from other manuals for VW cars:
Checking/removing and installing the fuel pump Passat B3 (1988-1993)
Checking, removing and installing the starter traction relay Golf 4 (1997-2004)
Checking/removing and installing the ball joint Polo 4 (2001-2009)
Steering column switch for headlights and turn signals Touareg 1 (2002-2006)
Checking the operation of the intake manifold flap Tiguan 1 (2007-2015)
Checking the engine oil level and replacing it Sharan 1 (1995-2000)
General information on removing and installing fuel system… Caddy 3 (2003-2010)
Link to this page in different formats


Visitor comments


No comments yet


How much will 29 + 25 =


Transporter T4 
  • General information
  • User manual
  • Maintenance
  • Power unit
  • Engine repair
  • Ignition system
  • Lubrication system
  • Cooling system
  • Fuel system (petrol)
  • Fuel system (diesel)
  • Injection system (petrol)
  • Exhaust system
  • Transmission
  • Clutch
  • Car gearbox
  • Chassis
  • Car suspension
  • Steering
  • Brake system
  • Wheels and tires
  • Body
  • Exterior
  • Interior
  • Doors and windows
  • Heating system
  • Electrical equipment
  • Equipment and devices
  • Lighting and signaling
  • Power devices
  • Electrical circuits
Transporter T3 
  • General information
  • Maintenance
  • Petrol engines
  • Engine repair
  • Lubrication system
  • Cooling system
  • Power and exhaust system
  • Carburetor 34 PICT
  • Carburetors 2E3 and 2E4
  • Fuel injection system
  • Ignition system
  • Diesel engines
  • Engine repair
  • Lubrication system
  • Cooling system
  • Power and exhaust system
  • Transmission
  • Clutch
  • Car gearbox
  • Chassis
  • Front suspension
  • Rear suspension
  • Steering
  • Brake system
  • Body
  • Body and interior elements
  • Doors, locks and windows
  • Electrical equipment
  • Lighting system
  • Equipment and devices
  • Power devices (diesel)
  • Power devices (petrol)
  • Wiring diagrams (diesel)
  • Wiring diagrams (petrol)
VWmanual.ru © 2016-2026 | Mobile version | News and articles | Sitemap: EN BG BY UA RS HR RO PL SK HU | Write message | Site search
Passat B2 • Passat B3 • Passat B4 • Passat B5 • Passat B6 • Golf 1, diesel • Golf 1, petrol • Golf 2, petrol • Golf 2 • Golf 3 • Golf 4 • Golf 5 • Polo 3 • Polo 4 • Touareg 1 • Tiguan 1 • Sharan 1 • Transporter T3 • Transporter T4 • LT 28 • LT 2D • Beetle • Caddy 3 •
Our website uses cookies to ensure functionality and convenience.