
English Русский
Български
Беларускі
Український
Српски
Hrvatski
Română
Polski
Slovenský
Magyar
  |  Articles  |  Sitemap  |  Contacts  |    |
Car maintenance Ford Car maintenance Hyundai Car maintenance Chevrolet Car maintenance BMW Car maintenance Audi Car maintenance Opel Car maintenance AvtoVAZ
VWmanual.ru


Main   Passat   Golf   Polo   Touareg   Tiguan   Sharan   Transporter   Others  
Tiguan 1 (2007-2015)

Removal and installation the corrugated cover (VW Tiguan 1)

  • Main
  • Tiguan
  • Tiguan 1
  • Chassis
  • Steering gear
  • Removal and installation the corrugated cover
            0


Contents: Removal ↓ Installation ↓

Removal


Instructions: If the bellows is damaged, moisture and dirt penetrate into the steering gear. There should be a film of grease on the rack teeth that can be felt. If there is no grease, the steering gear must be replaced. The steering gear is also replaced in the event of corrosion, damage or wear of the toothed rack.


Set the wheels to the straight-ahead position. Remove the wheel. Clean the steering gear in the area of the bellows. In doing so, prevent dirt from getting inside the steering gear through a damaged bellows. Mark the position of the nut "arrow 3" on the steering rod. While holding the steering rod end "arrow 2" from turning, loosen the lock nut "arrow 3". Remove the spring clamp "arrow 1" from the bellows using clamp installation pliers -VAG 1275- and move it towards the steering rod. Remove the clamp and pull the bellows off the steering gear housing. Unscrew the steering rod from the end. Pull the bellows together with the spring clamp off the steering rod.

Instructions: If there are visible signs of corrosion, damage, wear or contamination of the toothed rack, the steering gear is replaced as an assembly. If there is no visible film of grease on the toothed rack, the steering gear is also replaced as an assembly.


Installation


Caution: The rack does not need to be lubricated.


Set the wheels in the Straight position. Put new clamps and a corrugated boot on the steering rod. Screw the steering rod up to the mark made before removal. Hold the steering rod end "2" from turning and tighten the lock nut "3".
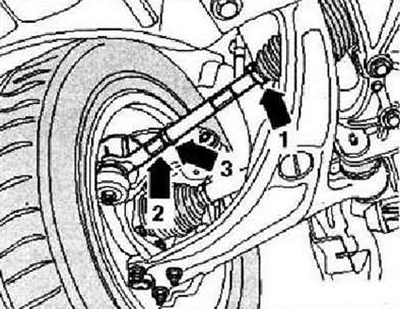


Set the wheels in the Straight position. Put new clamps and a corrugated boot on the steering rod.…


Install the bellows "2" on the steering rod "1" as shown in the figure. Use the clamp installation pliers -VAG 1275- to secure the spring clamp to the bellows. Push the bellows onto the steering gear housing until it stops.
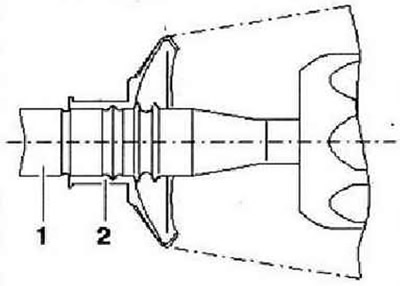
Install the bellows «2» on the steering rod «1» as shown in the figure. Use the clamp installation…


Using the Phaeton steering gear pliers -VAS 6199-, crimp the new clamp as shown in the figure.
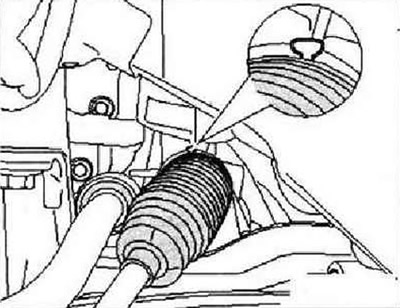
Using the Phaeton steering gear pliers -VAS 6199-, crimp the new clamp as shown in the figure.


Further installation is carried out in the reverse order. After installation, check the wheel alignment angles. Adjust the wheel alignment angles. After replacing both bellows, perform basic installation of the steering angle sensor "G85" using the VAS 5051B tester in the "guided fault finding" mode. Then perform basic installation of the steering. Tightening torque: tie rod end to tie rod - 70 Nm.

This article is available at russian, bulgarian, belarusian, ukrainian, serbian, croatian, romanian, polish, slovak, hungarian
The text has been checked: Tarasov Ivan

Share information:

Previous articles
Differences between 2nd and 3rd generation steering mechanisms
Removal and installation the steering gear
Steering gear with electromechanical power steering
Removal and installation the steering column
Removal and installation the steering wheel
Steering column
Next articles
Removal and installation the steering rod


Similar articles from other manuals for VW cars:
Removal and installation the protective cover Passat B3 (1988-1993)
Removal and installation the glass sliding sunroof cover Golf 4 (1997-2004)
Drainage cover Polo 3 (1995-2003)
Removal and installation the side cover Touareg 1 (2002-2006)
Hood cover — removal and installation Transporter T4 (1990-2003)
Removal and installation the upper engine cover Caddy 3 (2003-2010)
Link to this page in different formats


Visitor comments


No comments yet


How much will 15 + 13 =


Tiguan 1 
  • General information
  • Characteristics
  • Vehicle overview
  • Power unit
  • Petrol engine 1.4 BWK
  • Petrol engine 1.4 CAVA
  • Engine 2.0 (petrol)
  • Engine 2.0 (diesel)
  • Transmission
  • 6-speed manual gearbox 0A6
  • 6-speed automatic gearbox 09M
  • Drive shafts
  • Chassis
  • Front suspension
  • Rear suspension (2x4)
  • Rear suspension (4x4)
  • Air suspension
  • Wheels and rims
  • Brake system
  • Steering gear
  • Body
  • External equipment
  • Internal equipment
  • Electrical equipment
  • Power devices
  • Appliances and lighting
  • Communication systems
  • Heating and air conditioning
  • Electrical circuits
VWmanual.ru © 2016-2026 | Mobile version | News and articles | Sitemap: EN BG BY UA RS HR RO PL SK HU | Write message | Site search
Passat B2 • Passat B3 • Passat B4 • Passat B5 • Passat B6 • Golf 1, diesel • Golf 1, petrol • Golf 2, petrol • Golf 2 • Golf 3 • Golf 4 • Golf 5 • Polo 3 • Polo 4 • Touareg 1 • Tiguan 1 • Sharan 1 • Transporter T3 • Transporter T4 • LT 28 • LT 2D • Beetle • Caddy 3 •
Our website uses cookies to ensure functionality and convenience.