



- remove the air filter;
- remove the upper timing belt guard;
- remove the cylinder head cover;
- set the engine to TDC. To do this, remove the cylinder head cover and unscrew the plug located at the top of the gearbox so that the marks on the flywheel are visible;
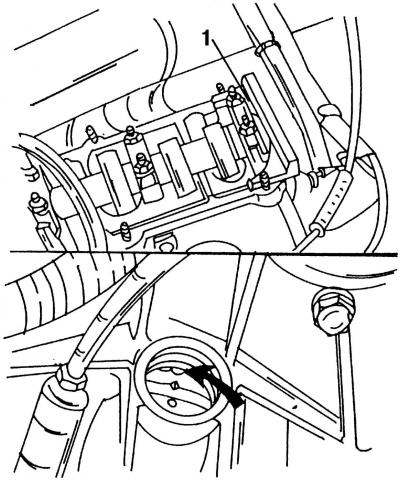
Fig. 415. The upper figure shows the adjusting gauge 1 installed on the camshaft. The lower figure shows how the flywheel with the TDC mark should be positioned
- turn the crankshaft (using a wrench placed on the pulley bolt) so that the mark on the flywheel is in the position shown in Fig. 415.
- install the adjusting gauge for the camshaft and remove the poly V-belt as described in section 17.4.1. Remove the guide roller;
- loosen the fuel injection pump gear nut, but do not unscrew it completely;
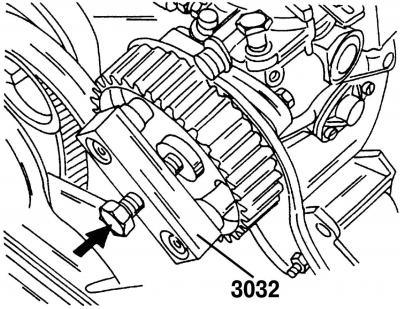
Fig. 474. Removing the fuel injection pump gear using a special device. Hit the bolt head with a plastic or rubber hammer in the direction shown by the arrow to dislodge the gear from its cone-shaped mounting location
- remove the toothed wheel using the special puller 3032. To do this, install the puller on the toothed wheel (Fig. 474). Tighten the puller's middle bolt so that the puller is pressed against the surface of the toothed wheel, and then remove the toothed wheel by hitting the end of the middle bolt with a plastic or rubber hammer;
- remove the puller, unscrew the nut from the end of the shaft and remove the gear wheel;
- disconnect all fuel lines from the injection pump;
- disconnect the fuel shut-off valve connector;
- disconnect the fuel control cable;
- mark the exact location of the injection pump so that you can install it in its original position. On the pump flange and mounting bracket, apply marks that must match again when reinstalling the injection pump;
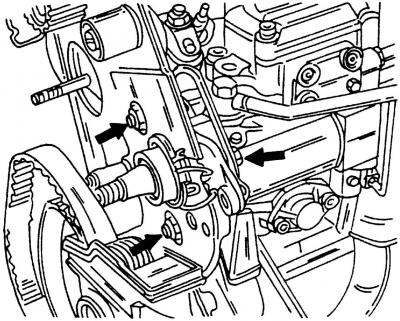
Fig. 475. High pressure fuel pump mounting bolts on bracket
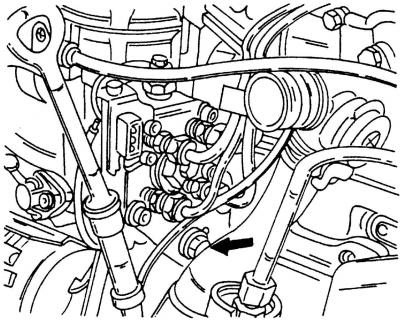
Fig. 476. In the place indicated by the arrow there is a conical nut that secures the rear support of the fuel injection pump
- using Fig. 475 as a guide, unscrew the three bolts on the fuel injection pump flange and unscrew the separate bolt located on the rear support (Fig. 476). Remove the fuel injection pump.
The fuel injection pump cannot be repaired. A faulty fuel injection pump should either be replaced or sent to a service station for repair.
The order of installation of the fuel injection pump:
- install the pump on the bracket, align it according to the marks applied and tighten the cone nut (Fig. 476).
- check that all previously applied marks match and tighten the mounting bolts evenly around the circle to a torque of 25 Nm;
- check if the wedge is on the injection pump shaft and carefully place the gear wheel on the shaft. Tighten the nut to a torque of 55 Nm;
- tighten the fuel line union nuts to 25 Nm;
- turn the fuel injection pump gear wheel so that the marks on the gear wheel and bracket coincide. Fix the fuel injection pump gear wheel in this position by inserting the lock 2064;
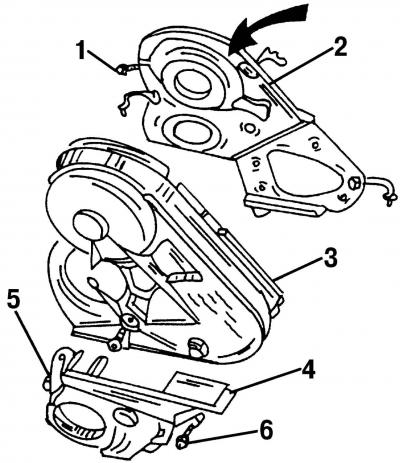
Fig. 477. Timing belt protection parts (in the place indicated by the arrow, install the mandrel for removing the camshaft gear): 1 - bolt, 10 Nm; 2 - back cover; 3 - upper drive belt protection; 4 - lower drive belt protection; 5 - bolt, 10 Nm; 6 - bolt, 20 Nm
- loosen the camshaft gear mounting bolt by half a turn and knock off the gear with a plastic or rubber hammer. You can insert a mandrel (Fig. 477) and hit it with a plastic or rubber hammer. The camshaft gear will also be shifted;
- check if the engine is at TDC;
- install the timing belt as described in p. 17.4.2. Perform all other work described in this section. Tighten the poly V-belt and the power steering drive belt.
- check the injection timing at a service station.
Injection timing adjustment
The injection moment should be checked and adjusted if necessary after installing the fuel injection pump. As already mentioned, such adjustment should be carried out at a service station.
Visitor comments