
English Русский
Български
Беларускі
Український
Српски
Hrvatski
Română
Polski
Slovenský
Magyar
  |  Articles  |  Sitemap  |  Contacts  |    |
Car maintenance Ford Car maintenance Hyundai Car maintenance Chevrolet Car maintenance BMW Car maintenance Audi Car maintenance Opel Car maintenance AvtoVAZ
VWmanual.ru


Main   Passat   Golf   Polo   Touareg   Tiguan   Sharan   Transporter   Others  
Sharan 1 (1995-2000)

Injectors — removal and installation (VW Sharan 1)

  • Main
  • Sharan
  • Sharan 1
  • Diesel engines
  • Supply system
  • Injectors — removal and installation
            0


Each injector is secured with a bolt to the pressure rail. There is a heat shield between the injector and the cylinder head. Damaged injectors can cause the following faults:
  • intermittent ignition of the fuel mixture;
  • knocking in one or more cylinders;
  • engine overheating;
  • loss of power;
  • black exhaust smoke;
  • high fuel consumption;
  • blue exhaust smoke when starting a cold engine.

The faulty injector can be identified by disconnecting the high-pressure fuel lines from the injectors one by one while the engine is running at high idle speed. When removing the injector, proceed as follows:
  • disconnect the wires from the battery;
  • unscrew the engine cover bolt, disconnect the hose from it and remove the cover;
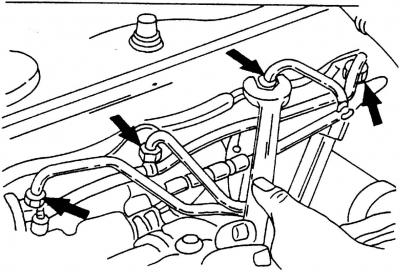
Fig. 478. Removing the fuel lines. Arrows indicate the connection points of the fuel lines

Fig. 478. Removing the fuel lines. Arrows indicate the connection points of the fuel lines

  • loosen and unscrew the union nuts of the high-pressure fuel lines (Fig. 478). Remove all fuel lines as a set. Do not bend the fuel lines;
  • disconnect the fuel lines from the injection pump;
  • remove the spring clamp from the oil drain hose and remove the hose kit;
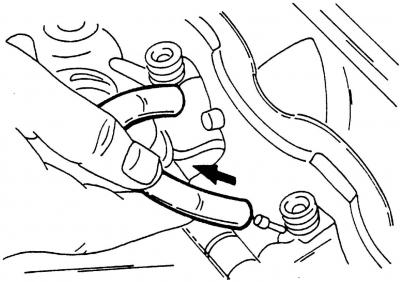
Fig. 479. Oil leak hoses are placed on small nozzles of injectors

Fig. 479. Oil leak hoses are placed on small nozzles of injectors


  • disconnect the oil drain hoses from the injectors (Fig. 479);
  • remove the needle lift sensor connector from the holder, and then disconnect the connector. Do not pull the cable;
  • release the needle lift sensor cable from the clamps securing the glow plug wire harness mount;
  • disconnect the glow plug wire harness;
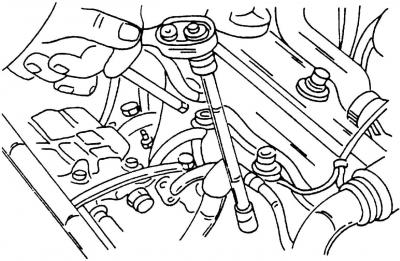
Fig. 480. Removing the injector pressure plates

Fig. 480. Removing the injector pressure plates

  • unscrew the bolts of the injector clamping rails (Fig. 480) and remove the rails;
  • remove the injectors. Use a screwdriver to remove the washers located under the injectors. On injector No.3 there is a connection point for the oil drain pipe. Unscrew the hollow bolt. If necessary, the connection point for the oil drain pipe can be removed.

(The original information is posted on the resource www.VWmanual.ru)

The installation of the injectors is done in the reverse order of the removal process. In this case, always replace the washers located under the injectors with new ones.

This article is available at russian, bulgarian, belarusian, ukrainian, serbian, croatian, romanian, polish, slovak, hungarian
The text has been checked: Tarasov Ivan

Share information:

Previous articles
Removal and installation the high pressure fuel pump
High Pressure Fuel Pump — General Information
Fuel filter — removal and installation
Diesel fuel — general information
Precautions when repairing the injection system
Diesel engine fuel system and turbocharger
Next articles
Removal and installation a turbocharger
Glow Plugs — Checking
Charge Air Radiator — Removal and Installation


Similar articles from other manuals for VW cars:
Removal and installation / checking of Digifant/Simos valve… Passat B3 (1988-1993)
Fuel injectors Golf 2 (1984-1993, petrol)
Checking the injectors Polo 3 (1995-2003)
Checking injectors (petrol engine) Touareg 1 (2002-2006)
Removal and installation injectors Tiguan 1 (2007-2015)
Injectors — removal, inspection and installation Transporter T4 (1990-2003)
Fuel manifold parts with injectors Caddy 3 (2003-2010)
Link to this page in different formats


Visitor comments


No comments yet


How much will 50 + 47 =


Sharan 1 
  • General information
  • Introduction to guide
  • Maintenance
  • Petrol engines
  • Engine repair 2.8 l (AAA)
  • Engine repair 2.0 l (ADY)
  • Lubrication system
  • Cooling system
  • Fuel injection system
  • Ignition system
  • Diesel engines
  • Engine repair
  • Lubrication system
  • Cooling system
  • Supply system
  • Transmission
  • Clutch
  • Manual gearbox and shafts
  • Chassis
  • Steering
  • Car suspension
  • Brake system
  • Electrical equipment
  • Equipment and devices
  • Power devices
  • Electrical circuits
VWmanual.ru © 2016-2026 | Mobile version | News and articles | Sitemap: EN BG BY UA RS HR RO PL SK HU | Write message | Site search
Passat B2 • Passat B3 • Passat B4 • Passat B5 • Passat B6 • Golf 1, diesel • Golf 1, petrol • Golf 2, petrol • Golf 2 • Golf 3 • Golf 4 • Golf 5 • Polo 3 • Polo 4 • Touareg 1 • Tiguan 1 • Sharan 1 • Transporter T3 • Transporter T4 • LT 28 • LT 2D • Beetle • Caddy 3 •
Our website uses cookies to ensure functionality and convenience.