
English Русский
Български
Беларускі
Український
Српски
Hrvatski
Română
Polski
Slovenský
Magyar
  |  Articles  |  Sitemap  |  Contacts  |    |
Car maintenance Ford Car maintenance Hyundai Car maintenance Chevrolet Car maintenance BMW Car maintenance Audi Car maintenance Opel Car maintenance AvtoVAZ
VWmanual.ru


Main   Passat   Golf   Polo   Touareg   Tiguan   Sharan   Transporter   Others  
Sharan 1 (1995-2000)

Fuel filter — removal and installation (VW Sharan 1)

  • Main
  • Sharan
  • Sharan 1
  • Diesel engines
  • Supply system
  • Fuel filter — removal and installation
            0


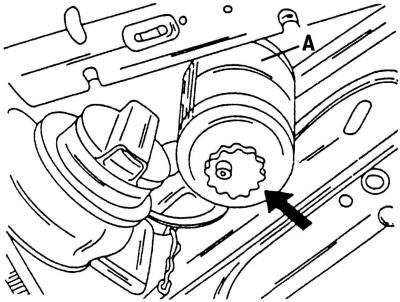
Fig. 471. The arrow shows the drain plug for removing condensate. The filter is secured with clamp A
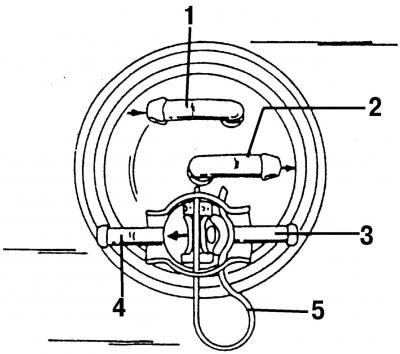
Fig. 471. The arrow shows the drain plug for removing condensate. The filter is secured with clamp A


Fig. 472. Connection points located on the top of the fuel filter: 1 - hose to the fuel tank; 2 -…

Fig. 472. Connection points located on the top of the fuel filter: 1 - hose to the fuel tank; 2 - fuel line to the high-pressure fuel pump; 3 - return fuel line from the high-pressure fuel pump; 4 - return fuel line to the fuel tank (shown by arrow); 5 - locking clamp


The fuel filter should be changed every 30,000 km, and every 15,000 km or 12 months it should be emptied of accumulated condensate. The filter is located in the engine compartment (Fig. 471). Fig. 472 shows a top view of the filter, where you can see the connection points located on it. In order to access the drain plug, you need to lift the front of the car.


To drain the condensate, unscrew the threaded plug of the air bleed hole (shown by the arrow in Fig. 471), which is located at the bottom of the filter, and drain the fuel along with the water (approximately 100 cm) until only fuel, no water, starts to flow out. Then reinstall the plug.
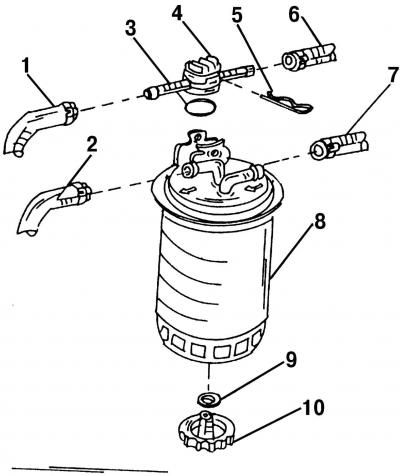
Fig. 473. View of fuel filter elements (the arrow shows the direction of fuel flow, which must be…

Fig. 473. View of fuel filter elements (the arrow shows the direction of fuel flow, which must be observed when installing the fuel filter): 1 - return pipeline from the high-pressure fuel pump; 2 - fuel injection pump supply hose; 3 - sealing ring; 4 - control valve; 5 - locking clamp; 6 - return line to the fuel tank; 7 - supply hose from the fuel tank; 8 - fuel filter; 9 - gasket; 10 - condensate drain plug


The upper part of the filter contains the control valve, which is secured with a spring clamp 5 (Fig. 473). When replacing the filter, remove the spring clamp and pull out the control valve together with the pipes located on it in an upward direction. The filter is secured with clamp A (Fig. 471). If the connections on the control valve have been removed, they must be reinstalled in accordance with Fig. 472.


After you rev the engine a few times, fuel should flow through the clear fuel hose at idle speed without any visible air bubbles.

[View the original on this portal www.vwmanual.ru]

This article is available at russian, bulgarian, belarusian, ukrainian, serbian, croatian, romanian, polish, slovak, hungarian
The text has been checked: Tarasov Ivan

Share information:

Previous articles
Diesel fuel — general information
Precautions when repairing the injection system
Diesel engine fuel system and turbocharger
Next articles
High Pressure Fuel Pump — General Information
Removal and installation the high pressure fuel pump
Injectors — removal and installation
Removal and installation a turbocharger
Glow Plugs — Checking
Charge Air Radiator — Removal and Installation


Similar articles from other manuals for VW cars:
Replacing the fuel filter Passat B3 (1988-1993)
Fuel filter Golf 2 (1984-1993, petrol)
Fuel filter Polo 3 (1995-2003)
Replacing the fuel filter (petrol engine) Touareg 1 (2002-2006)
Removal and installation the fuel filter Tiguan 1 (2007-2015)
Draining water from the fuel filter Transporter T4 (1990-2003)
Replacing the fuel filter in a diesel engine Caddy 3 (2003-2010)
Link to this page in different formats


Visitor comments


No comments yet


How much will 27 + 14 =


Sharan 1 
  • General information
  • Introduction to guide
  • Maintenance
  • Petrol engines
  • Engine repair 2.8 l (AAA)
  • Engine repair 2.0 l (ADY)
  • Lubrication system
  • Cooling system
  • Fuel injection system
  • Ignition system
  • Diesel engines
  • Engine repair
  • Lubrication system
  • Cooling system
  • Supply system
  • Transmission
  • Clutch
  • Manual gearbox and shafts
  • Chassis
  • Steering
  • Car suspension
  • Brake system
  • Electrical equipment
  • Equipment and devices
  • Power devices
  • Electrical circuits
VWmanual.ru © 2016-2026 | Mobile version | News and articles | Sitemap: EN BG BY UA RS HR RO PL SK HU | Write message | Site search
Passat B2 • Passat B3 • Passat B4 • Passat B5 • Passat B6 • Golf 1, diesel • Golf 1, petrol • Golf 2, petrol • Golf 2 • Golf 3 • Golf 4 • Golf 5 • Polo 3 • Polo 4 • Touareg 1 • Tiguan 1 • Sharan 1 • Transporter T3 • Transporter T4 • LT 28 • LT 2D • Beetle • Caddy 3 •
Our website uses cookies to ensure functionality and convenience.