
Required special tool:
- Open ring wrench for bleed valve.
- Transparent plastic hose and container for draining brake fluid.
Required consumables:
- POLO: 1.1 liters DOT 4 specification brake fluid.
- IBIZA: 2.0 L DOT 4 specification brake fluid.
Brake fluid is able to absorb moisture from the air through the pores in the brake hoses and the vent in the cover of the expansion tank. Therefore, over time, the boiling point of the brake fluid decreases. When the brakes are heavily loaded, vapor locks can form in the brake lines, which greatly impairs the operation of the brake system.
Brake fluid should be changed every 2 years, preferably in the spring. When driving on mountainous roads, change the brake fluid at shorter intervals.
Attention: The work steps for changing the brake fluid are in many respects the same as for bleeding the brake system. The following description of the operations only indicates the differences, therefore, in any case, also read the chapter «Removal of air from the brake system».
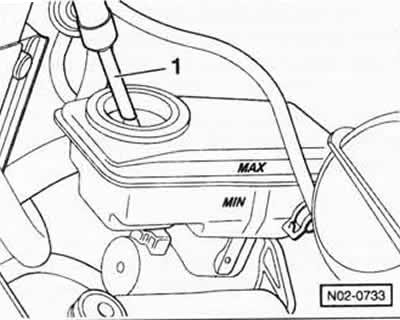
Mark the brake fluid level on the expansion tank with a felt-tip pen. When changing the brake fluid, make sure it is at the original level. Thanks to this, it is possible to avoid overfilling the expansion tank when replacing the brake pads.
Suck as much brake fluid as possible out of the reservoir using suction container -1-, leaving a layer of fluid of approx. 10 mm at the bottom of the reservoir.
Fill the reservoir with new brake fluid up to the MAX mark.
Remove the old brake fluid sequentially from all brake calipers by pumping it with the brake pedal. The drained brake fluid must in any case be clean and free of air bubbles. It is necessary to pump approximately 250 cm through each brake caliper3 (¼ liter) brake fluid.
Note: on IBIZA vehicles, each brake caliper must be bled approx. 400 to 500 cm3 brake fluid.
Attention: Do not forget to replenish the compensation tank with new brake fluid. It must never be empty, otherwise air will enter the brake system. If, however, the expansion tank turned out to be empty, then in this case it is necessary to bleed the air at the service station, since a special diagnostic tool is required to remove air from the ABC hydraulic unit.
After changing the brake fluid, depress the brake pedal and check its free play. The free play should not exceed ⅓ of the full pedal travel.
Removing brake fluid from the hydraulic clutch
Since brake fluid is also used in the clutch hydraulic drive, the contents of the hydraulic drive must also be replaced.
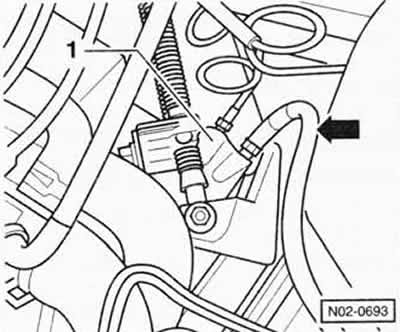
Remove dust cap from bleeder valve on clutch slave cylinder -1-. Clean the bleeder valve.
Fit a clean, transparent hose -arrow- onto the bleeder valve.
Insert the other end of the hose into a bottle half-filled with brake fluid. A suitable hose and container are available from auto supply stores.
Release the bleeder valve and have an assistant depress the clutch pedal. Approximately 0.1 liters of brake fluid may leak out through the hose.
While holding the pedal down, tighten the bleed valve.
Remove the bleed hose and set aside with the container.
Release the clutch pedal.
Top up the brake fluid level in the compensation tank to the level marked before changing the fluid.
Screw on the cover of the expansion tank.
Attention, perform a security compliance check:
- Are the brake lines tight?
- Are the brake hoses in holders?
- Are the bleed valves tight?
- Is there enough fluid in the brake system?
- With the engine running, perform a leak test. To do this, act on the brake pedal with a force of 200 to 300 N for about 10 seconds (from 20 to 30 kg). Do not loosen the brake pedal. Check all connections for tightness.
Finally, perform a few stops on a street with little traffic. At the same time, apply at least one hard braking with the control action of the ABS (determined by the pulsation of the brake pedal). The earlier control action of ABS is shown on soft ground.
Attention: Before doing this, make sure that there is no moving traffic behind at a close distance.
Visitor comments