
English Русский
Български
Беларускі
Український
Српски
Hrvatski
Română
Polski
Slovenský
Magyar
  |  Articles  |  Sitemap  |  Contacts  |    |
Car maintenance Ford Car maintenance Hyundai Car maintenance Chevrolet Car maintenance BMW Car maintenance Audi Car maintenance Opel Car maintenance AvtoVAZ
VWmanual.ru


Main   Passat   Golf   Polo   Touareg   Tiguan   Sharan   Transporter   Others  
Polo 3 (1995-2003) Polo 4 (2001-2009)

Checking the thickness of brake linings (VW Polo 4)

  • Main
  • Polo
  • Polo 4
  • General information
  • Maintenance
  • Checking the thickness of brake linings
            0


Contents: Special tool required: ↓ Prerequisite for verification ↓ Front disc brake mechanism: ↓ Rear wheel disc brake mechanism: ↓ Rear wheel drum brake mechanism: ↓

Special tool required:


  • Pocket flashlight and mirror.
  • Calipers.

Prerequisite for verification


Note: Experience shows that due to the larger amount of abrasive particles at the edge of the roadway, the wear of the brake linings on the passenger side next to the driver is somewhat greater than on the driver side. Therefore, it is advisable to perform the check at the wheel on the passenger side next to the driver.


Safety instructions

There is a risk of accident when lifting the vehicle! Please read the section "Lifting the vehicle" beforehand.


Mark the direction of rotation on the tire with an arrow. Loosen the wheel bolts. Raise the vehicle onto jack stands and remove the wheels. Caution: Be sure to read the instructions in the chapter "Removing and installing a wheel".

Front disc brake mechanism:
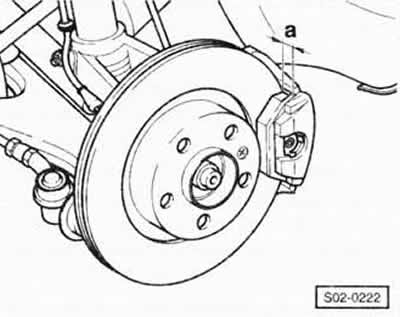


Front disc brake mechanism:


Measure the thickness of the pad "a" using a caliper, including the thickness of the metal support plate.
The brake pads of the front disc brakes have reached the wear limit if the thickness "a" of at least one of them, taking into account the thickness of the metal carrier plate, is only 7.0 mm. In this case, all four brake pads of the front axle replace.


Ensure the previous direction of rotation of the tires, tighten the wheels with bolts, lower the car and only then tighten the wheel bolts in a crosswise manner with a torque of 120 Nm.

Attention: Strictly follow the instructions given in the chapter "Removal and installation a wheel".


Note: Approximately 1 mm of wear of the lining thickness corresponds to a vehicle mileage of at least 1000 km. This estimate is valid under unfavorable conditions. Usually, brake linings last much longer. Thus, with a disc brake pad thickness of 10.0 mm (taking into account the thickness of the metal carrier board) the remaining service life of the brake linings will correspond to a vehicle mileage of at least 3,000 km.


Rear wheel disc brake mechanism:
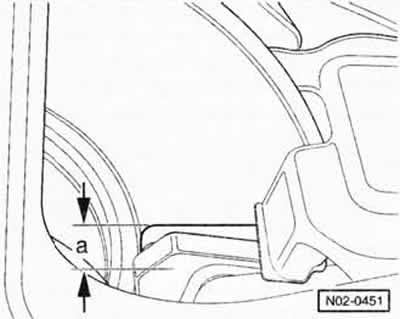


Rear wheel disc brake mechanism:


Check the thickness of the outer brake lining through the opening in the disc wheel, using a flashlight if necessary. There is no need to remove the wheel. If present, remove the wheel cap.

Check the thickness of the inner lining using a flashlight and a mirror.

The rear disc brake pads have reached the wear limit if the thickness "a" of at least one of them, taking into account the thickness of the metal carrier plate, is only 7.0 mm.


Rear wheel drum brake mechanism:
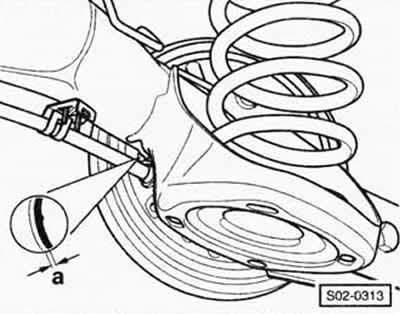


Rear wheel drum brake mechanism:


[The original article is available at www.VWManual.ru]

Remove the plug from the rear brake shield and shine the "cut in the picture" flashlight into the hole. Brake linings have reached the wear limit if the thickness "a" of at least one of them, without taking into account the thickness of the metal carrier plate, is only 2.5 mm.
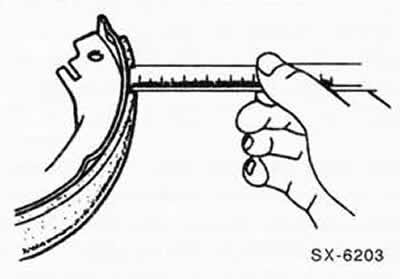
Remove the plug from the rear brake shield and shine the «cut in the picture» flashlight into the…


If in doubt, remove the brake drum and measure the thickness of the lining.

When checking the thickness of the pads, make sure that there is no brake fluid or oil on them. If such contamination is detected, the brake pads must be replaced immediately.

This article is available at russian, bulgarian, belarusian, ukrainian, serbian, croatian, romanian, polish, slovak, hungarian
The text has been checked: Semenova Anna

Share information:

Previous articles
Checking the brake fluid level
Brakes/tires/wheels
Checking the oil level in the power steering reservoir
Checking the corrugated covers of the cardan shafts
Checking tie rod ends and ball joints
Front axle/steering
Next articles
Visual inspection of brake lines
Replacing brake fluid
Checking the tire tread pattern
Checking tire inflation pressure
Checking the tire valve
Replacing the container with sealant for repairing damaged tires


Similar articles from other manuals for VW cars:
Checking the thickness of brake discs Passat B3 (1988-1993)
Checking the thickness of drum brake linings Golf 1 (1974-1984, diesel)
Checking the brake system Touareg 1 (2002-2006)
Checking the operation of the intake manifold flap Tiguan 1 (2007-2015)
Checking the thickness of the front brake pads Sharan 1 (1995-2000)
Checking the thickness of brake linings Transporter T4 (1990-2003)
Checking the thickness of disc brake friction linings Beetle (1960-1986)
Link to this page in different formats


Visitor comments


No comments yet


How much will 25 + 37 =


Polo 4 
  • General information
  • User manual
  • Maintenance
  • Power unit
  • Engine repair
  • Cooling and lubrication system
  • Control system
  • Injection system (diesel)
  • Supply system
  • Exhaust system
  • Chassis
  • Front suspension
  • Rear suspension
  • Steering
  • Wheels and tires
  • Brake system
  • Body
  • Interior
  • Exterior
  • Electrical equipment
  • Equipment and devices
  • Wiper system
  • Lighting system
  • Electrical circuits
Polo 3 
  • General information
  • User manual
  • Maintenance
  • Power unit
  • Petrol engines 1.4 and 1.6
  • Petrol engines 1.4 (V16)
  • Petrol engines 1.6 and 1.8
  • Diesel engines 1.7 and 1.9
  • Diesel engines 1.9 D and TD
  • Transmission
  • Mechanical gearbox 085
  • Mechanical gearbox 020/02K
  • Chassis
  • Front suspension
  • Rear suspension
  • Steering
  • Brake system
  • Body
  • Exterior
  • Interior
  • Electrical equipment
  • Equipment and instruments (until 2000)
  • Equipment and instruments (after 2000)
  • Electrical circuits
  • Wiring diagrams (petrol)
  • Wiring diagrams (diesel)
VWmanual.ru © 2016-2026 | Mobile version | News and articles | Sitemap: EN BG BY UA RS HR RO PL SK HU | Write message | Site search
Passat B2 • Passat B3 • Passat B4 • Passat B5 • Passat B6 • Golf 1, diesel • Golf 1, petrol • Golf 2, petrol • Golf 2 • Golf 3 • Golf 4 • Golf 5 • Polo 3 • Polo 4 • Touareg 1 • Tiguan 1 • Sharan 1 • Transporter T3 • Transporter T4 • LT 28 • LT 2D • Beetle • Caddy 3 •
Our website uses cookies to ensure functionality and convenience.