
English Русский
Български
Беларускі
Український
Српски
Hrvatski
Română
Polski
Slovenský
Magyar
  |  Articles  |  Sitemap  |  Contacts  |    |
Car maintenance Ford Car maintenance Hyundai Car maintenance Chevrolet Car maintenance BMW Car maintenance Audi Car maintenance Opel Car maintenance AvtoVAZ
VWmanual.ru


Main   Passat   Golf   Polo   Touareg   Tiguan   Sharan   Transporter   Others  
Passat B2 (1981-1988) Passat B3 (1988-1993) Passat B4 (1988-1996) Passat B5 (1996-2005) Passat B6 (2005-2010)

Fuel pump/fuel level sensor (VW Passat B5)

  • Main
  • Passat
  • Passat B5
  • Power unit
  • Fuel system (petrol)
  • Fuel pump/fuel level sensor
            0


Contents: Removal ↓ Installation ↓
On models with petrol engines, the fuel pump together with the fuel level sensor are installed in the fuel tank. On front-wheel drive vehicles with a diesel engine, fuel is taken from the fuel tank by a high-pressure fuel pump and there is no fuel pump in the tank. On all-wheel drive vehicles with a diesel engine, a fuel pump is installed in the fuel tank.

The fuel level sensor design consists of a potentiometer and a float connected to it. When the amount of fuel decreases, the sensor float drops and, by increasing the resistance of the potentiometer, reduces the voltage on the fuel level indicator located on the instrument cluster.

Removal


1. Turn off the ignition and remove the ground cable from the battery.

2. On the right side of the luggage compartment, move the carpet back and unscrew the cover located above the fuel pump/fuel level sensor. To access the cover located above the fuel pump/fuel level sensor on 4WD vehicles, remove the rear seat.

3. Disconnect the electrical connector of the fuel pump/fuel level sensor. Keep in mind that the fuel supply line is under pressure. Before disconnecting the fuel line, relieve the pressure in the fuel system. To do this, loosen the clamp securing the fuel line, then cover the connection with a rag and, being careful, remove the fuel hose from the fitting. Use safety glasses to protect your eyes from fuel.
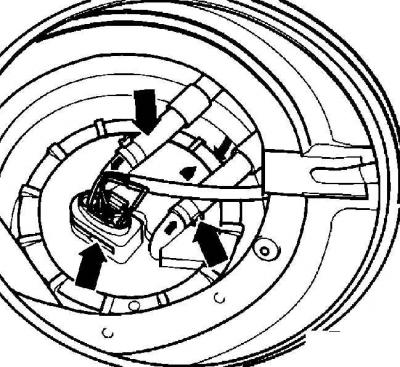
3. Disconnect the electrical connector of the fuel pump/fuel level sensor. Keep in mind that the…


4. Loosen the clamp and remove the supply and return fuel lines from the fitting of the mounting flange. Close the ends of the lines with suitable plugs.
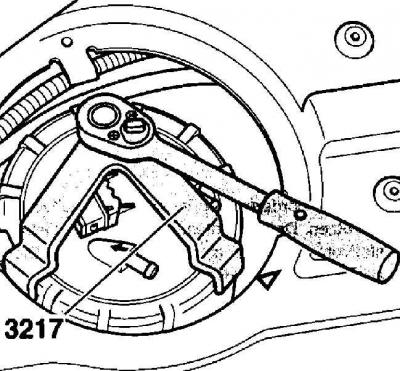


4. Loosen the clamp and remove the supply and return fuel lines from the fitting of the mounting…


5. Using the special tool VW-3217, unscrew the flange nut. To unscrew the flange nut on all-wheel drive vehicles, you must use the special tool VW-3087. If you do not have a special tool, unscrew the flange nut using a wooden block and a hammer.

6. Remove the mounting flange and sealing ring from the fuel tank opening.

7. From the inside of the mounting flange, mark and disconnect the electrical connectors and fuel hoses.

8. Carefully disconnect the fuel level sensor and remove it from the fuel tank.

[The original article is posted on the website VWMANUAL]

Gasoline engine
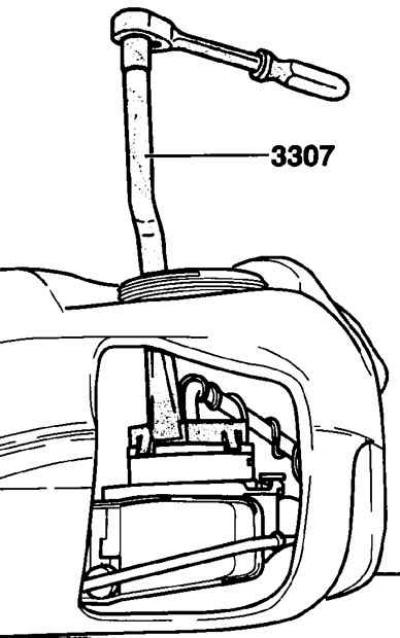
Gasoline engine


1. Using the special tool VW-3307, release the fuel pump from the retainer by turning it 15° and remove the fuel pump from the tank. The special tool is fixed in the slots of the fuel pump body.


2. Drain the fuel from the fuel pump into a suitable container.

Installation


Alignment of marks when installing the mounting flange on the fuel tank
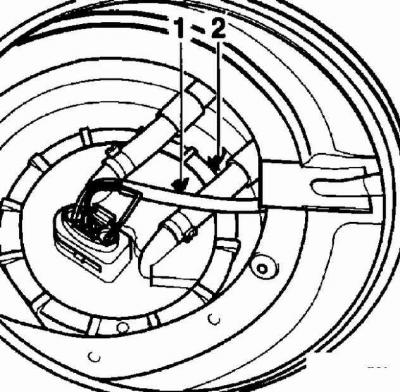


Alignment of marks when installing the mounting flange on the fuel tank

  • 1 - mark on the mounting flange,
  • 2 - mark on the fuel tank

1. Install the fuel pump into the fuel tank. Before installation, dip the sealing ring into the fuel.

2. Turn the fuel pump clockwise and fix it in the fuel tank.

3. Secure the fuel level sensor to the fuel tank retainers.

4. Connect the electrical connectors and fuel lines to the back of the mounting flange.

5. Install the mounting flange so that the mark on the flange aligns with the mark on the fuel tank, see Fig. Aligning the marks when installing the mounting flange on the fuel tank.

6. Screw on the flange nut and, using the special tool VW-3217, tighten it to a torque of 60 Nm.

7. Place the supply and return fuel hoses on the fitting of the mounting flange and secure them with clamps. The arrows on the fittings indicate the direction of fuel flow. The return fuel hose is blue.

8. Connect the electrical connector to the mounting flange.

9. Place the cover over the mounting flange and screw it in place.

10. Check that the fuel and ventilation hoses are properly and securely fastened to the fuel tank.

11. Replace the cargo area carpet. On all-wheel drive vehicles, install the rear seat.

12. Connect the ground wire to the battery.

This article is available at russian, bulgarian, belarusian, ukrainian, serbian, croatian, romanian, polish, slovak, hungarian
The text has been checked: Tarasov Ivan

Share information:

Previous articles
Fuel system device
Next articles
Fuel filter on models with petrol engines
Adjusting the accelerator cable (petrol engine)
Additional adjustment (automatic transmission)


Similar articles from other manuals for VW cars:
Scheme 23. Oil pressure sensor, fuel pump, fuel level sensor... Golf 4 (1997-2004)
Generator, starter, fuel pump, fuel level sensor (since 10.1995) Polo 3 (1995-2003)
Removal and installation of fuel supply module, fuel level… Touareg 1 (2002-2006)
Removal and installation the fuel level sensor Tiguan 1 (2007-2015)
Fuel level sensor in the tank Sharan 1 (1995-2000)
Removal and installation the fuel pump and pump sensor Transporter T4 (1990-2003)
Removal and installation the fuel level sensor Caddy 3 (2003-2010)
Link to this page in different formats


Visitor comments


No comments yet


How much will 46 + 39 =


Passat B6 
  • General information
  • User manual
  • Maintenance
  • Petrol engine 1.6L
  • Engine repair
  • Cooling and lubrication system
  • Fuel injection system
  • Petrol engine 2.0L
  • Engine repair
  • Lubrication system
  • Cooling system
  • Fuel and exhaust systems
  • Diesel engine 2.0L
  • Engine repair
  • Cooling and lubrication system
  • Fuel and exhaust systems
  • Transmission
  • Clutch
  • Mechanical gearbox
  • Automatic gearbox
  • Drive shafts
  • Chassis
  • Wheels and tires
  • Car suspension
  • Steering
  • Brake system
  • Body
  • Exterior (external elements)
  • Electrical equipment
  • Power devices
  • Lighting and appliances
  • Electrical circuits
Passat B5 
  • General information
  • User manual
  • Weekly checks
  • Maintenance
  • Power unit
  • Engine repair
  • Cooling system
  • Fuel system (petrol)
  • Fuel system (diesel)
  • Engine management
  • Exhaust system
  • Transmission
  • Clutch
  • Car gearbox
  • Drive shafts
  • Chassis
  • Car suspension
  • Wheels and tires
  • Steering
  • Brake system
  • Body
  • Exterior (external elements)
  • Interior (internal elements)
  • Doors and covers
  • Ventilation and heating
  • Electrical equipment
  • Power devices
  • Lighting and appliances
  • Electrical circuits
Passat B4 
  • General information
  • User manual
  • Maintenance
  • Technical data
  • 8-valve engine
  • Engine repair
  • Cooling and lubrication system
  • Supply system
  • Ignition system
  • Fuel injection «Mono-Jetronic»
  • Control system «Mono-Motronic»
  • Control system «Digifant»
  • Control system «Simos»
  • 16-valve engine
  • Engine repair
  • Cooling and lubrication system
  • Fuel injection «K-Jetronic»
  • Control system «KE-Motronic»
  • Control system «Digifant»
  • Diesel engine
  • Engine repair
  • Cooling and lubrication system
  • Power and control system
  • Turbocharging system
  • Digital control system
  • Transmission
  • Clutch
  • Manual gearbox
  • Hydromechanical gearbox
  • Front wheel drive
  • Chassis
  • Car suspension
  • Steering
  • Brake system
  • Body
  • Body elements
  • Electrical equipment
  • Power devices
  • Lighting and appliances
  • Electrical circuits
Passat B3 
  • General information
  • User manual
  • Driving Tips
  • Maintenance instructions
  • Technical data
  • Power unit
  • Engine repair
  • Ignition system
  • Lubrication system
  • Cooling system
  • Supply system
  • Petrol injection system
  • Diesel engine
  • Exhaust system
  • Transmission
  • Clutch
  • Car gearbox
  • Chassis
  • Suspension
  • Steering
  • Brake system
  • Wheels and tires
  • Body
  • Exterior
  • Interior
  • Heating system
  • Electrical equipment
  • Power devices
  • Lighting system
  • Equipment and devices
  • Wiper system
  • Electrical circuits
Passat B2 
  • General information
  • Introduction to instructions
  • User manual
  • Power unit
  • Engines 4-cylinder FZ
  • Engines 4-cylinder
  • Engines 5-cylinder
  • Transmission
  • Clutch
  • Four-speed gearbox
  • Five-speed gearbox
  • Hydromechanical gearbox
  • Front wheel drive
  • Chassis
  • Front suspension
  • Rear suspension
  • Steering
  • Brake system
  • Body
  • Body elements
  • Electrical equipment
  • Equipment and devices
  • Electrical circuits
VWmanual.ru © 2016-2026 | Mobile version | News and articles | Sitemap: EN BG BY UA RS HR RO PL SK HU | Write message | Site search
Passat B2 • Passat B3 • Passat B4 • Passat B5 • Passat B6 • Golf 1, diesel • Golf 1, petrol • Golf 2, petrol • Golf 2 • Golf 3 • Golf 4 • Golf 5 • Polo 3 • Polo 4 • Touareg 1 • Tiguan 1 • Sharan 1 • Transporter T3 • Transporter T4 • LT 28 • LT 2D • Beetle • Caddy 3 •
Our website uses cookies to ensure functionality and convenience.