



Contents: Tachometer (1) ↓ Electronic clock with digital…↓ Trip computer display (2) ↓ Coolant temperature (3) ↓ Fuel gauge (4) ↓ Automatic transmission selector…↓ Trip meter/daily odometer (6) ↓ Service indicator (7) ↓
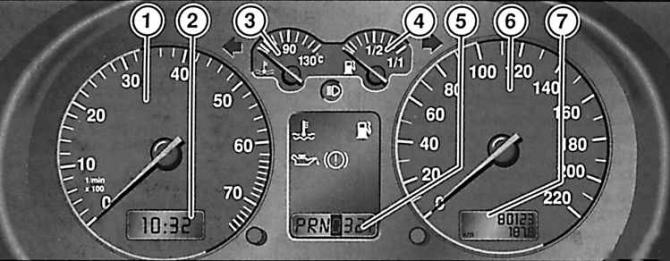
- 1 – tachometer;
- 2 – electronic clock with digital display or trip computer display;
- 3 – coolant temperature indicator;
- 4 – fuel reserve indicator;
- 5 – selector position display;
- 6 – speedometer;
- 7 – trip meter with service indicator
The location of the control instruments depends on the specific vehicle model and engine type.
Tachometer (1)
The tachometer needle should under no circumstances enter the red zone of the scale.
The start of the red zone on the scale depends on the specific engine.
Upshifting earlier saves fuel and reduces engine and transmission noise.
You should shift to a lower gear as late as possible, shortly before the moment when the engine starts to jerk.
Electronic clock with digital indication (2)
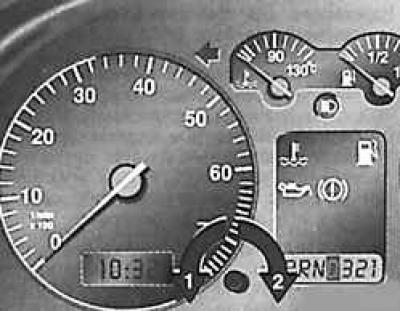
To set the current time, use the button located on the bottom right under the tachometer.
By turning the button counterclockwise (arrow 1) until it stops, the hours are set. A single short turn of the button sets the hours by one hour. By turning the button and holding it in this position, the hours are continuously set.
Turning the button clockwise (arrow 2) until it stops sets the minutes. A single short turn of the button sets the minutes by one minute. Turning the button and holding it in this position sets the minutes continuously.
Using this button you can set the clock with second accuracy:
ORDER OF EXECUTION
1. Turn the button to the right (arrow 2) until the watch shows a time one minute less than the control watch.
2. Turn the button immediately to the right when the second hand of the control watch with the exact movement reaches the full minute.
Trip computer display (2)
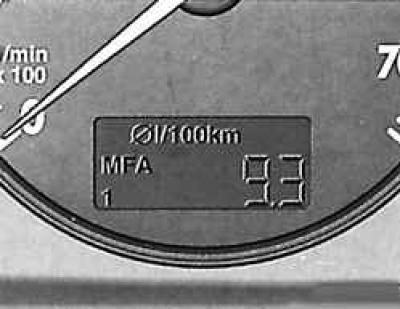
The figure shows the trip computer display with indication of average specific fuel consumption.
Trip computer display (mFA multifunctional pointer) along with the current time display, it provides a lot of additional information:
- outside air temperature;
- instantaneous fuel consumption;
- average fuel consumption;
- distance traveled;
- average speed of movement;
- travel time.
The icon of the currently displayed parameter appears, except for the current time, at the top border of the display field.
Additional information is displayed one by one on the display when the ignition is on by briefly pressing the balance button B, located on the windshield wiper handle.
If you press the top edge of the key, the readings of various quantities will change one after another.
If you press the lower edge of the key, the readings of various quantities will change one after another in reverse order.
STORAGE DEVICES
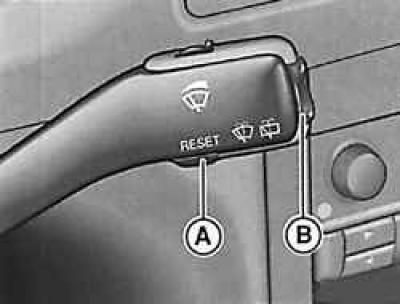
A, B - keys
The on-board computer is equipped with two automatic storage devices.
The trip memory (MFA 1) stores the following trip data from the moment the ignition is switched on until the moment the ignition is switched off: driving time, distance travelled and amount of fuel consumed.
Based on this data, the average speed and average specific fuel consumption are calculated.
If the vehicle is reactivated within two hours of the ignition being turned off, the new data is added to the previous data and taken into account in calculating the average values. If the vehicle is not moving for more than two hours, all data in the storage device is automatically erased.
The accumulator for storing information on the total mileage (MFA 2) of the vehicle accumulates all data on any number of trips up to reaching the total values of 100 hours of vehicle movement, 10,000 km of mileage and 1,000 liters of consumed fuel. The accumulated data is used to calculate the average values of specific fuel consumption and speed obtained based on the results of all trips.
When the limit of one of the above values is exceeded, the data in the accumulator for the total mileage is erased and the countdown starts again. This accumulator, unlike the accumulator for individual trips, does not erase the data after two hours of the car's break in movement.
To request data, you must access the relevant storage device by pressing button A on the windscreen wiper stalk.
The corresponding indicator of the selected drive appears in the digital display field of the clock:
- MFA 1 – a drive for storing information on individual trips;
- MFA 2 – a drive for storing information on the total mileage.
The following indicators can be called up from the storage devices:
- average specific fuel consumption;
- distance traveled;
- average speed of movement;
- time of movement.
The amount of fuel consumed is not shown.
If you hold down the A key for more than two seconds, the data on the selected drive is erased.
When the battery is disconnected, the data contained in both storage devices is erased.
INDICATIONS
When the ignition is switched on, the display shows either the last selected value or the outside temperature with a snowflake icon (warning of possible black ice).
No pictogram - Current time
The current time display is saved when the ignition is turned off.
The current time is set by turning the setting button near the tachometer on the instrument panel.
°C - Outside air temperature
The display ranges from -40°C to +58°C. When the vehicle is stationary or moving at very low speeds, the outside air temperature displayed may be slightly higher than the true value due to the influence of thermal radiation from the engine.
At outside temperatures from +4°C to -7°C, the display shows a snowflake icon in addition to the outside temperature (warning of possible black ice).
This icon flashes for approximately 5 seconds and then remains illuminated until the outside temperature exceeds +4°C or drops below 7°C.
When an ice warning is issued, the gauge switches from the displayed value to the outside temperature reading (warning of possible ice).
Warning: When you judge the possibility of icing of the road based on the outside temperature, keep in mind that icy roads can also appear at temperatures around +4°C.
By pressing the B button on the steering column switch, you can switch back to the display of the previous value.
 - Instantaneous specific fuel consumption
Shows current fuel consumption in liters per 100 km.
Instantaneous fuel consumption is calculated after 30 meters of travel. When the vehicle is stationary, the last instantaneous fuel consumption reading is saved.
If the instantaneous fuel consumption indicator is selected after starting the engine, the average fuel consumption value will be displayed for the first 30–40 meters of movement.
Using instantaneous fuel consumption readings, you can adjust your driving style to your desired fuel consumption.
 - Average specific fuel consumption
The average value of specific fuel consumption is displayed, not the current fuel consumption value.
This indicator starts to appear immediately after covering a thirty-meter distance from the moment when the data in the corresponding storage device was erased. Before that, dashes are shown on the display instead of numbers. During movement, the displayed indicator is updated every five seconds.
When the trip memory (MFA 1) is selected, the display shows the average specific fuel consumption for the trip.
With the mileage memory (MFA 2), the display shows the average specific fuel consumption for all recent trips.
Warning: The amount of fuel consumed is not shown.
 - Distance traveled
When the MFA 1 drive is selected, the display shows the mileage since the ignition was turned on or the drive was cleared.
When the MFA 2 drive is selected, the display shows the mileage for all individual trips.
The maximum value that can be displayed is 9999 km. If the mileage exceeds this value, the countdown starts from zero.
 - Average speed of movement
Everything stated above for the indicator "Average specific fuel consumption", is also true for the indicator "Average speed of movement".
 - Time of movement
Everything stated above for the indicator "Distance traveled", is also true for the indicator "Time of movement". The maximum possible value is 99 hours and 59 minutes. When this value is exceeded, the countdown starts again from zero.

Coolant temperature (3)
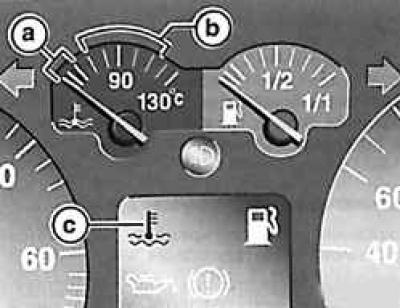
- a - low temperature zone. Avoid high engine speeds and do not put heavy loads on the engine;
- b – normal operating temperature zone. During normal vehicle movement, the pointer should be in the middle zone of the scale;
- c – warning light
The indicator works when the ignition is on.
After turning on the ignition, the warning lamp (c) lights up for several seconds during the operability check.
When the engine is under heavy load and the outside temperature is high, the pointer may occasionally enter the upper zone of the scale. This should not cause alarm until the warning lamp (c) starts to light.
If the warning light starts to light while driving, you should first check the temperature of the coolant temperature gauge.
If the needle is in the normal operating temperature range, add coolant to the cooling system as soon as possible.
If the arrow is in the right zone of the scale, this means that the coolant temperature is too high. You should stop the car, turn off the engine and determine the cause of the increase in coolant temperature.
Warning: Installing additional headlights in front of the radiator grille reduces its effectiveness. At high ambient temperatures and high engine loads, there is a risk of engine overheating!

Fuel gauge (4)
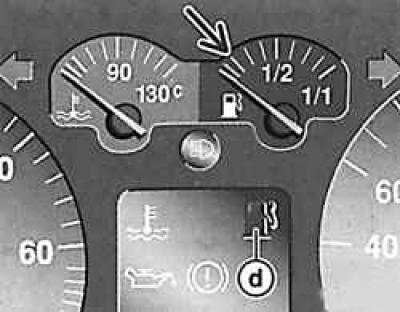
The arrow indicates the reserve fuel supply zone.
d – warning lamp
The indicator works when the ignition is on.
The car's fuel tank capacity is approximately 55 liters.
If the indicator has reached the reserve fuel zone (indicated by the arrow) and at the same time the warning lamp (d) lights up, this means that there are still about 7 liters of fuel left.
Automatic transmission selector position display (5)
This shows the position in which the automatic transmission selector is located.
Trip meter/daily odometer (6)
The upper counter shows the total mileage of the car, the lower one shows the mileage from a certain point (trip meter).
The last digit of the lower meter reading represents 100-meter sections.
The lower counter is reset to zero by pressing the button under the speedometer.
Service indicator (7)
When it is time for the next maintenance, the lower counter (daily mileage counter) the speedometer displays one of the following symbols indicating the type of maintenance required:
- oil change – service OEL or service OIL;
- inspection service – service INSP.
The service indicator display disappears approximately one minute after the engine is started. You can also switch on the trip odometer display by pressing and holding the trip odometer setting button for more than 0.5 seconds.
The Volkswagen service company that carries out the maintenance resets the service indicator to its original position after completing the work.
If the service was not carried out at a Volkswagen service centre, the service indicator should be reset to its original position in the following order:
ORDER OF EXECUTION
1. With the ignition off, press and hold the zero setting button below the speedometer.
2. Turn on the ignition and release the zero setting button only when one of the images for the required type of maintenance appears on the display.
3. Turn the minute button to the right to set the digital hour display (for watches with arrow indicators, pull out the button). The display will show the following: "service-".
4. Switch off the ignition. Only now the initial setting for the service indicator is performed.
5.In any case, it is necessary to set only the required type of maintenance. Otherwise, the time of the required maintenance will be indicated incorrectly. By pressing the setting button, you can select a separate type of maintenance.
6.Zeroing should not be performed between two maintenance intervals as the instrument will give incorrect readings.
When the battery is disconnected, the mileage readings after maintenance are saved.
If the speedometer is replaced after repair, it is necessary to reprogram the service indicator. This operation must be carried out at a Volkswagen service center. If the service indicator is not reprogrammed, it is necessary to carry out maintenance work on the vehicle according to "Service book", and not by the service indicator.
Visitor comments