
Rear wheel drive vehicles
Brake pads can be integrated as firm "Teves", as well as firms "Girling". Brake pads from these companies may only be fitted with "their" overlays.
It describes the dismantling and installation of the company's brakes "Teves". If there are differences, then this is discussed.
Dismantling
Loosen the wheel bolts, raise the vehicle, remove the front wheels.
Attention! If the brake linings are to be used again, they must be marked when dismantling. Replacing gaskets from the outside to the inside and vice versa, as well as from the right wheel to the left is not allowed. Such a replacement can lead to uneven braking.
firm brakes "Girling": Pull the locking tabs out of the locking pins.
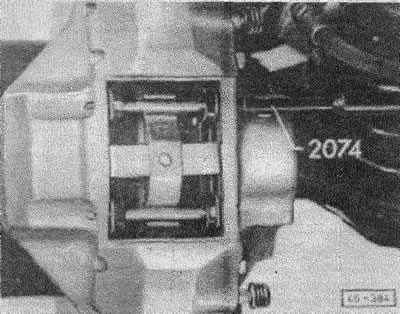
(46-379) knock out the pins with a punch.
(46-380) pull out the brake pads with pliers or a screwdriver.
firm brakes "Girling": take out the sound absorbing sheet, "Teves": Pull out the piston retainers.
Installation
Note! Before installing the pads, inspect the brake disc for scratches. Grind or replace discs with scratches.
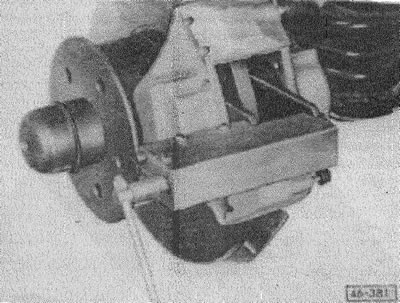
(46-381) push the pistons into the cylinders. Workshops use a special device. Pistons can also be pressed in with a hardwood rod. Pay attention to the safety of the protective cap.
Attention! When the pistons are pushed in, the brake fluid is forced out of the brake cylinders into the surge reservoir. Monitor the liquid level in the tank, it is possible to suck it out with a siphon.
Carefully! Brake fluid is poisonous and destroys varnish. Do not suck liquid by mouth through a hose, always store it in the same bottle.
Clean the location and guiding surfaces of the linings in the brake pad.
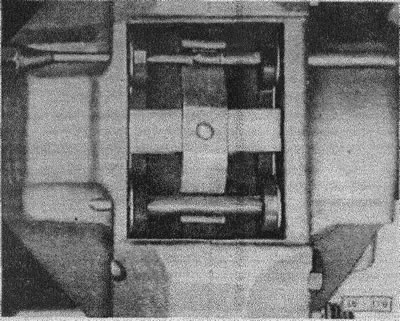
(46-382) in the brakes "Teves" the position of the piston is determined by the retainers, which must be in contact with the piston. The lugs of the retainers protrude into the recesses of the piston and look towards the lower guide surface in the brake pad.
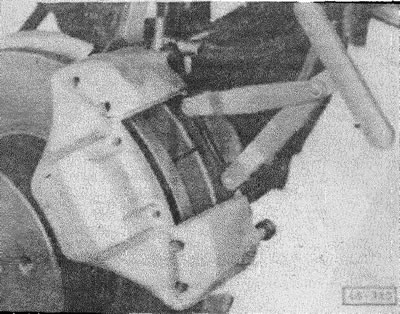
(46-383) if necessary, install the piston using special tongs. If there are no such tongs, then you can get by with a stock of hardwood. But, as a rule, installation of the piston is not necessary.
Install new piston position locks.
in the brakes "Girling" install new sound absorbing sheets. The arrow on them should point up.
(46-384) fit the brake linings and new cross springs or retaining springs respectively. Drive in the locking pins with a suitable punch and hammer.
brakes "Girling": When stationary, bleed the foot brake thoroughly several times until the brake linings are in their working position.
Hang the wheel, lower the car, tighten the wheel bolts crosswise with a torque of 180 Nm.
All wheel drive vehicles "synchro"
Attention! Observe the safety instructions in section "All wheel drive vehicles".
Removing
Remove front wheel.
Attention! It is recommended to use only original VW/AUDI brake pads. Be sure to replace all front gaskets at the same time, even if only one of them has reached the wear limit.

(46-784) unscrew the lower fixing bolts of the brake pad casing. While doing this, hold the guide pin with the wrench.
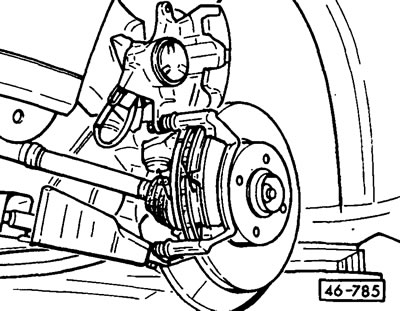
(46-785) open the cover up.
Take out the brake pads.
Installation
Attention! When the brake linings are removed, do not press the brake pedal, otherwise the piston will be squeezed out of the housing.
Clean the guide surfaces and the place of installation of the pads with a suitable soft metal brush, or wipe with a cloth soaked in alcohol. Do not use solvents containing mineral oils or sharp-edged tools.
Before installing the pads, you need to check the brake disc for scratches by feeling. Scratched discs can be sanded in the workshop if they are thick enough. Brake discs must always be ground on both sides and ensure that there is sufficient reserve for their thickness.
Measure the brake disc thickness.
Check protective cap for cracks. Replace a damaged cap immediately, as penetrating dirt quickly leads to leakage of the brake pad. The brake cushion must be dismantled and disassembled in a workshop for this.
Check the secure installation of the thermal insulation sheet.
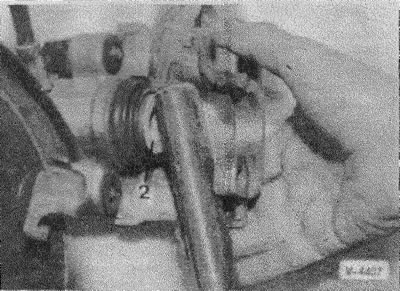
(4407) press piston 2 using a special device; this can also be done using a hard wood rod (hammer handle), just be careful not to warp the piston or damage the piston surfaces and cap.
Attention! When the piston is depressed, the brake fluid is forced out of the brake cylinders into the surge reservoir.
Attention! If the brake linings are heavily worn, check the ease of movement of the piston. To do this, insert a wooden block into the brake pad and ask an assistant to slowly press the brake pedal. The piston should move easily back and forth. To test another brake pad must be installed. Be careful not to push the piston out completely. If the piston moves hard, have the brake pad repaired in a workshop.
Install both brake pads. In this case, the pressure springs must be evenly up and parallel to the upper edge of the lining.
Lower the piston cover and secure with a new fixing bolt with a torque of 35 Nm. While doing this, hold the guide pin. Replace damaged pin and protective cap.
Attention! Each brake pad repair kit includes a new hex bolt for each pad. They must be used in every case.
Spin the wheel. Lower the vehicle and tighten the wheel bolts crosswise to 180 Nm.
Attention! In the parking lot, press the brake pedal hard many times until you feel strong resistance. In this case, the brake linings are centered and occupy the correct position.
Check the brake fluid in the equalizing reservoir, if necessary top up to the maximum mark.
Visitor comments