
English Русский
Български
Беларускі
Український
Српски
Hrvatski
Română
Polski
Slovenský
Magyar
  |  Articles  |  Sitemap  |  Contacts  |    |
Car maintenance Ford Car maintenance Hyundai Car maintenance Chevrolet Car maintenance BMW Car maintenance Audi Car maintenance Opel Car maintenance AvtoVAZ
VWmanual.ru


Main   Passat   Golf   Polo   Touareg   Tiguan   Sharan   Transporter   Others  
Transporter T3 (1979-1992) Transporter T4 (1990-2003)

Dismantling and overhauling the wheel brake cylinder (VW Transporter T3)

  • Main
  • Transporter
  • Transporter T3
  • Chassis
  • Brake system
  • Dismantling and overhauling the wheel brake cylinder
            0


Attention! When repairing, install parts from the repair kit as a set.


The circle in the figure indicates the parts included in the repair kit.
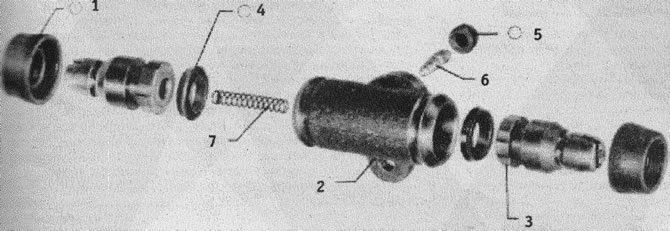
(1) protective cap

(1) protective cap
(2) Wheel brake cylinder housing. If there are scratches or rust, replace the cylinder completely
(3) piston. Pack with special paste for brake cylinders
(4) cuff. Lubricate with paste for brake cylinders
(5) protective (from dust) cap
(6) Air release plug
(7) spring


Unscrew the brake line from the cylinder and close the air bleed plugs with a protective cap.

Caution! No dirt must enter the pipeline.


Loosen the cylinder mounting bolt and remove the cylinder.

Disassembly


The wheel brake cylinder can be overhauled even when it is installed. Overhaul is necessary if the seals are loose or if the piston is stuck. The cylinder must be replaced if it has scratches or rust. Removing them is not allowed. It is better to replace a defective cylinder as a set; overhauling the cylinder is recommended only in very rare cases. When overhauling, use a complete repair kit, paying attention to the diameters of the parts, since there are cylinders of different designs.


Remove the protective cover. Pull out the piston with the cuff and pressure spring.

Clean all parts with brake fluid or alcohol. The cylinder can be cleaned with a lint-free cloth. A clean piston should move back and forth in the cylinder with a "sucking" motion.

Slide new seals onto the piston, with the long flange facing the cylinder. Lubricate the seals, piston and cylinder with a special paste for brake cylinders.

Replace the air bleed plug if necessary.

Replace damaged or rusty pipelines.

If the surface is damaged, clean it with a calcium-based neutralizer and dry it. Then apply a thin layer of anti-corrosion primer ALN 747003.

After cleaning the pipelines, they must be protected with AKR 321 M 15.4 ointment.

Remove the pipelines and, if possible, lay them in their old places.

When connecting pipelines, moisten the conical adjacent surfaces with a few drops of brake fluid and tighten with a torque of 15-20 Nm.

Finally, bleed the brake system of air.

Caution! The brake lines are coated with a layer of plastic to protect against corrosion. If this layer is damaged, this may lead to corrosion of the lines. Therefore, the brake lines must not be cleaned with wire brushes, sandpaper or a screwdriver.

This article is available at russian, bulgarian, belarusian, ukrainian, serbian, croatian, romanian, polish, slovak, hungarian
The text has been checked: Tarasov Ivan

Share information:

Previous articles
Brake lines and hoses
Replacing brake pads
Adjusting the rear wheel brake
Removal and installation brake pads
Disabling the rear wheel brake
Rear drum brake, brake lining control
Next articles
Replacing the brake hose
Brake fluid reservoir
Bleeding the brake system
Handbrake — design description
Adjusting the handbrake
Dismantling and installation of handbrake rods


Similar articles from other manuals for VW cars:
Removal and installation the wheel brake cylinder Passat B3 (1988-1993)
Wheel brake cylinder Golf 3 (1991-1997)
Removal and installation the wheel brake cylinder Polo 4 (2001-2009)
Removal and installation the master brake cylinder Touareg 1 (2002-2006)
Connecting brake pipes from the master cylinder to the hydraulic… Tiguan 1 (2007-2015)
Disassembly and assembly of the front wheel brake mechanism Sharan 1 (1995-2000)
Rear wheel brake — design description Beetle (1960-1986)
Link to this page in different formats


Visitor comments


No comments yet


How much will 10 + 22 =


Transporter T4 
  • General information
  • User manual
  • Maintenance
  • Power unit
  • Engine repair
  • Ignition system
  • Lubrication system
  • Cooling system
  • Fuel system (petrol)
  • Fuel system (diesel)
  • Injection system (petrol)
  • Exhaust system
  • Transmission
  • Clutch
  • Car gearbox
  • Chassis
  • Car suspension
  • Steering
  • Brake system
  • Wheels and tires
  • Body
  • Exterior
  • Interior
  • Doors and windows
  • Heating system
  • Electrical equipment
  • Equipment and devices
  • Lighting and signaling
  • Power devices
  • Electrical circuits
Transporter T3 
  • General information
  • Maintenance
  • Petrol engines
  • Engine repair
  • Lubrication system
  • Cooling system
  • Power and exhaust system
  • Carburetor 34 PICT
  • Carburetors 2E3 and 2E4
  • Fuel injection system
  • Ignition system
  • Diesel engines
  • Engine repair
  • Lubrication system
  • Cooling system
  • Power and exhaust system
  • Transmission
  • Clutch
  • Car gearbox
  • Chassis
  • Front suspension
  • Rear suspension
  • Steering
  • Brake system
  • Body
  • Body and interior elements
  • Doors, locks and windows
  • Electrical equipment
  • Lighting system
  • Equipment and devices
  • Power devices (diesel)
  • Power devices (petrol)
  • Wiring diagrams (diesel)
  • Wiring diagrams (petrol)
VWmanual.ru © 2016-2026 | Mobile version | News and articles | Sitemap: EN BG BY UA RS HR RO PL SK HU | Write message | Site search
Passat B2 • Passat B3 • Passat B4 • Passat B5 • Passat B6 • Golf 1, diesel • Golf 1, petrol • Golf 2, petrol • Golf 2 • Golf 3 • Golf 4 • Golf 5 • Polo 3 • Polo 4 • Touareg 1 • Tiguan 1 • Sharan 1 • Transporter T3 • Transporter T4 • LT 28 • LT 2D • Beetle • Caddy 3 •
Our website uses cookies to ensure functionality and convenience.