



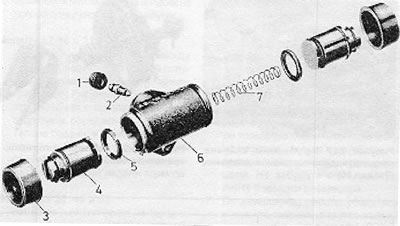
Figure 9.23. Detailed view of the rear wheel cylinder: 1 - Dust cap; 2 - Bleeding screw; 3 - Dustproof mount; 4 - Piston; 5 - Piston gasket; 6 - Cylinder body; 7 - Spring.
1. Remove the brake pads as described in previous Section.
2. Disconnect the hydraulic tube from the rear of the cylinder and quickly cap the end of the tube to prevent fluid loss. A bleed nipple cap may be suitable for this purpose.
3. Loosen the bolt securing the wheel cylinder to the rear plate and remove the cylinder.
4. Clean off any external dust and dirt and remove the dust caps.
5. Pull the pistons out. If they are difficult to remove, blow compressed air into the brake fluid supply hole of the nipple.
6. After removing the pistons, pull out the coil spring and then inspect the cylinder and piston for damage and metal-to-metal contact. If any damage is evident, replace the entire wheel cylinder.
7. If all parts are in good condition, discard the old gaskets and prepare a repair kit that will contain all the necessary gaskets and other parts that require replacement.
8. When inserting new piston gaskets, use only your fingers, then apply rubber grease or clean brake fluid to the pistons and insert them evenly into the cylinder with the coil spring between them.
9. Install the dust caps.
10. Attach the cylinder to the back plate and connect the hydraulic tube.
11. Install and adjust the brake pads as described in Section 7. Install the brake drum.
12. Bleed the brake hydraulic system (see Section 12).
The original can be found at: vwmanual.ru
Visitor comments