
English Русский
Български
Беларускі
Український
Српски
Hrvatski
Română
Polski
Slovenský
Magyar
  |  Articles  |  Sitemap  |  Contacts  |    |
Car maintenance Ford Car maintenance Hyundai Car maintenance Chevrolet Car maintenance BMW Car maintenance Audi Car maintenance Opel Car maintenance AvtoVAZ
VWmanual.ru


Main   Passat   Golf   Polo   Touareg   Tiguan   Sharan   Transporter   Others  
LT 28 (1975-1991) LT 2D (1996-2003) Beetle (1960-1986) Caddy 3 (2003-2010)

Drive shaft assembly (VW Caddy 3)

  • Main
  • Volkswagen
  • Caddy 3
  • Transmission
  • Drive shafts
  • Drive shaft assembly
            0


Drive shaft assembly

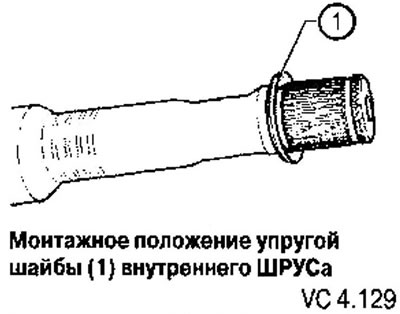
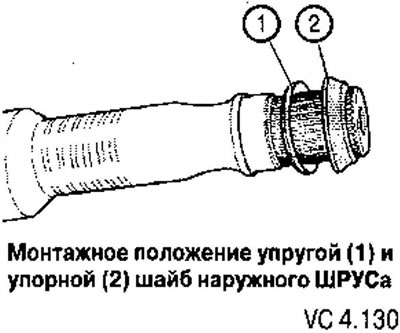
Press the hinge until it stops.

Install the retaining ring.

Pressing on the inner CV joint


Caution! The chamfer of the CV joint spline hole must face the splined end of the drive shaft.
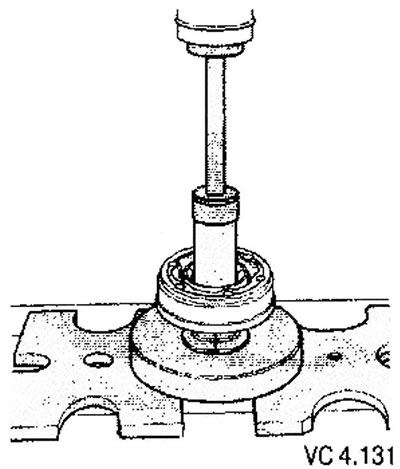

Caution! The chamfer of the CV joint spline hole must face the splined end of the drive shaft.


The original text is available on the portal: www.VWManual.ru

Installing boot clamps


Install the pliers as shown in the figure. In this case, it is necessary to ensure that the crimping edges of the pliers are adjacent to the base of the protrusion (arrow B) of the clamp.
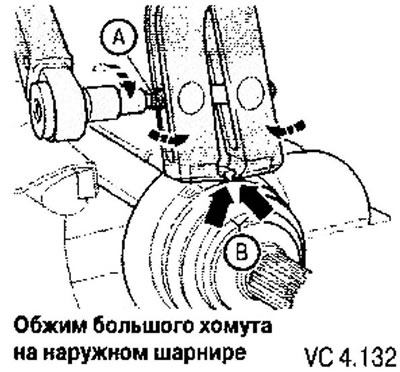


Install the pliers as shown in the figure. In this case, it is necessary to ensure that the…


Tighten the clamp by turning the lead screw with a torque wrench (without turning the pliers).
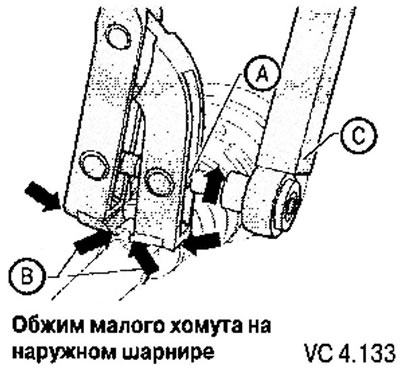
Tighten the clamp by turning the lead screw with a torque wrench (without turning the pliers).


Attention!
  • Because the material of the boot (compared to rubber) it is quite rigid and requires a high-quality steel clamp to secure it. This type of clamp can only be crimped with special pliers
  • Tightening torque: 25 Nm.
  • Use a torque wrench (C) with an adjustment range of 5-50 Nm.
  • If rotation is difficult, for example due to contamination of the thread, the required clamping force is not achieved at the specified tightening torque.


Connectable junctions and partsThreaded connectionTightening torque
Wheel hub with wheel hub bearingM16x1.5x80200 Nm+180° (1*)
Gearbox flange, first tighten to 10 Nm, then crosswise to the specified torqueM8x48
M10x52
M10x23
40 Nm
70 Nm
70 Nm
Intermediate shaft to support bracketM8x2520 Nm
Support bracket to the cylinder blockM8x25first tighten to 5 Nm, then to 35 Nm

(1) When tightening the bolt, the vehicle should not stand on its wheels.

This article is available at russian, bulgarian, belarusian, ukrainian, serbian, croatian, romanian, polish, slovak, hungarian
The text has been checked: Kolesnikov Artem

Share information:

Previous articles
Disassembling the drive shaft
Parts and components of the drive shaft with CV joint VL107
Parts and components of the drive shaft with CV joint VL100
Installing the drive shaft
Removal the drive shaft
General description of drive shafts
Next articles


Similar articles from other manuals for VW cars:
Drive shaft faults Passat B5 (1996-2005)
Drive shaft faults Golf 4 (1997-2004)
Timing belt drive with single pulley injection pump Polo 3 (1995-2003)
Replacing the generator drive shaft seal Touareg 1 (2002-2006)
Balance shaft drive chain Tiguan 1 (2007-2015)
Removal and installation the drive shaft (manual transmission) Sharan 1 (1995-2000)
Removal and installation the ignition distributor drive shaft Transporter T3 (1979-1992)
Link to this page in different formats


Visitor comments


No comments yet


How much will 44 + 40 =


Caddy 3 
  • General information
  • User manual
  • Daily care
  • Maintenance
  • Petrol engines 1.4 l
  • Engine repair
  • Cooling and lubrication system
  • Power and exhaust system
  • Petrol engines 1.6 l
  • Engine repair
  • Cooling and lubrication system
  • Power and exhaust system
  • Diesel engines
  • Engine repair
  • Cooling and lubrication system
  • Power and exhaust system
  • Transmission
  • Mechanical gearbox 0AH
  • Mechanical gearbox 0A4
  • Drive shafts
  • Chassis
  • Car suspension
  • Steering
  • Brake system
  • Body and wiring diagrams
  • Interior and exterior
  • Electrical circuits
Beetle 
  • General information
  • Maintenance
  • Power unit
  • Engine repair
  • Cooling and lubrication system
  • Supply system
  • Exhaust system
  • Transmission
  • Clutch
  • Car gearbox
  • Chassis
  • Front suspension
  • Rear suspension
  • Steering
  • Brake system
  • Wheels and tires
  • Body
  • Exterior
  • Electrical equipment
  • Equipment and devices
  • Power devices
  • Electrical circuits
LT 2D 
  • General information
  • User manual
  • Maintenance
  • Power unit
  • Petrol engines 2.3 l
  • Diesel engines 2.5 l
  • Diesel engines 2.8 l
  • Injection system (diesel 2.8 l)
  • Transmission
  • Clutch
  • Manual gearbox
  • Differential
  • Chassis
  • Car suspension
  • Steering system
  • Brake system
  • Body
  • Body elements
  • Heating system
  • Electrical equipment
  • Equipment and devices
  • Electrical circuits
LT 28 
  • General information
  • Maintenance
  • Power unit
  • Petrol engines 2.0L
  • Petrol engines 2.4L
  • Diesel engines
  • Cooling and heating
  • Fuel and exhaust system
  • Ignition system
  • Transmission
  • Clutch
  • Car gearbox
  • Cardan shaft
  • Rear axle
  • Chassis
  • Brake system
  • Car suspension
  • Steering system
  • Body
  • Body elements
  • Doors, locks and windows
  • Electrical equipment
  • Power devices
  • Equipment and devices
  • Electrical circuits
VWmanual.ru © 2016-2026 | Mobile version | News and articles | Sitemap: EN BG BY UA RS HR RO PL SK HU | Write message | Site search
Passat B2 • Passat B3 • Passat B4 • Passat B5 • Passat B6 • Golf 1, diesel • Golf 1, petrol • Golf 2, petrol • Golf 2 • Golf 3 • Golf 4 • Golf 5 • Polo 3 • Polo 4 • Touareg 1 • Tiguan 1 • Sharan 1 • Transporter T3 • Transporter T4 • LT 28 • LT 2D • Beetle • Caddy 3 •
Our website uses cookies to ensure functionality and convenience.