
English Русский
Български
Беларускі
Український
Српски
Hrvatski
Română
Polski
Slovenský
Magyar
  |  Articles  |  Sitemap  |  Contacts  |    |
Car maintenance Ford Car maintenance Hyundai Car maintenance Chevrolet Car maintenance BMW Car maintenance Audi Car maintenance Opel Car maintenance AvtoVAZ
VWmanual.ru


Main   Passat   Golf   Polo   Touareg   Tiguan   Sharan   Transporter   Others  
LT 28 (1975-1991) LT 2D (1996-2003) Beetle (1960-1986) Caddy 3 (2003-2010)

Removal, installation and inspection of shock absorbers and coil springs (VW Beetle)

  • Main
  • Volkswagen
  • Beetle
  • Chassis
  • Front suspension
  • Removal, installation and inspection of shock absorbers and coil springs
            0


Contents: Removal ↓ Installation ↓ Examination ↓

Removal


Remove the shock absorber strut.

Caution! To disassemble the shock absorber, you will have to compress the spring.
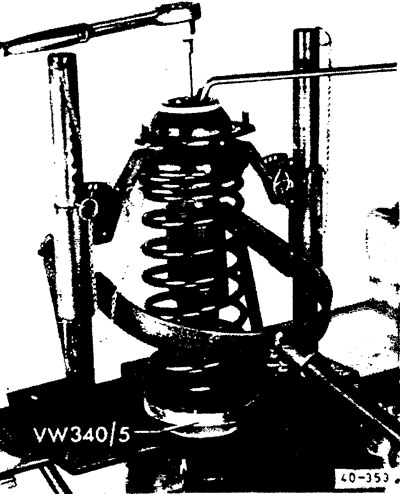

Compress the shock absorber spring using a special tool and unscrew the hex nut on the piston rod,…


Compress the shock absorber spring using a special tool and unscrew the hex nut on the piston rod, holding it from turning with a bent open-end wrench.

Remove the coil spring.

Installation


Caution! When replacing a spring, use only a spring with the same designation as the old one. Pay attention to the color coding.


Check the shock absorber before installation.

Important! If one shock absorber is faulty, there is no need to replace both shock absorbers, but in any case, only genuine Volkswagen shock absorbers should be used.


The original information is posted on the resource: VWManual.ru

Install a protective tube and a hollow rubber spring on the shock absorber.

Install the shock absorber ring onto the coil spring (install the spring with the coils having a smaller pitch upwards).
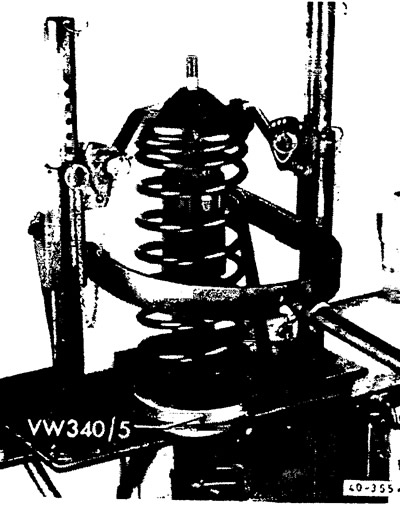
Compress the coil spring using a spring compressor until the threads on the piston rod protrude…


Compress the coil spring using a spring compressor until the threads on the piston rod protrude approximately 10 mm from the stop.


Install the washer, upper spring plate (pay attention to the correctness of their installation), shock absorber strut support, spacer sleeve, shock absorber ring (talc-dusted), shock absorber ring housing, thrust ring and stop (see the drawing above "Shock absorber strut").

Tighten the new self-locking nut onto the shock absorber piston rod to a torque of 60 Nm (6.0 kgfm).

Install the shock absorber strut.

Examination


Shock absorbers can be tested without using additional tools.

Remove the shock absorber.

Keeping the shock absorber vertical (i.e. in the working position; it is most convenient to place it on the ground and hold it with your feet), stretch and squeeze it several times in a row.

The shock absorber should move evenly throughout its entire stroke, without jerking. If possible, compare the nature of the movement with the movement of a new shock absorber.

A faulty shock absorber can also be identified while driving - by a knocking sound or strong rocking of the body.

If the shock absorber is working perfectly, minor oil leaks are not a reason to replace it. When there is a large loss of oil, the shock absorber compresses and expands in jerks. In this case, it needs to be replaced.

Visually inspect the shock absorber piston rod. If the chrome coating is damaged, replace the entire shock absorber.

Note: If one shock absorber is faulty, it is not necessary to replace both shock absorbers at the same time.

This article is available at russian, bulgarian, belarusian, ukrainian, serbian, croatian, romanian, polish, slovak, hungarian
The text has been checked: Kolesnikov Artem

Share information:

Previous articles
Removal and installation shock absorbers
Shock absorber strut — design description
Front suspension on shock absorber struts
Next articles
Front suspension with torsion bars
Removal and installation steering knuckles
Replacing shock absorbers
Removal and installation of brake drums, discs and hub bearings
Front wheel brakes
Checking and adjusting the play of wheel hub bearings


Similar articles from other manuals for VW cars:
Removal and installation of shock absorbers and springs Passat B2 (1981-1988)
Telescopic strut shock absorbers Golf 1 (1974-1984, petrol)
Shock absorber/ shock absorber/ coil spring Polo 4 (2001-2009)
Removal and installation the shock absorber strut Touareg 1 (2002-2006)
Shock absorber and coil spring Tiguan 1 (2007-2015)
Coil spring and shock absorber Sharan 1 (1995-2000)
Rear shock absorber coil spring Transporter T4 (1990-2003)
Link to this page in different formats


Visitor comments


No comments yet


How much will 17 + 23 =


Caddy 3 
  • General information
  • User manual
  • Daily care
  • Maintenance
  • Petrol engines 1.4 l
  • Engine repair
  • Cooling and lubrication system
  • Power and exhaust system
  • Petrol engines 1.6 l
  • Engine repair
  • Cooling and lubrication system
  • Power and exhaust system
  • Diesel engines
  • Engine repair
  • Cooling and lubrication system
  • Power and exhaust system
  • Transmission
  • Mechanical gearbox 0AH
  • Mechanical gearbox 0A4
  • Drive shafts
  • Chassis
  • Car suspension
  • Steering
  • Brake system
  • Body and wiring diagrams
  • Interior and exterior
  • Electrical circuits
Beetle 
  • General information
  • Maintenance
  • Power unit
  • Engine repair
  • Cooling and lubrication system
  • Supply system
  • Exhaust system
  • Transmission
  • Clutch
  • Car gearbox
  • Chassis
  • Front suspension
  • Rear suspension
  • Steering
  • Brake system
  • Wheels and tires
  • Body
  • Exterior
  • Electrical equipment
  • Equipment and devices
  • Power devices
  • Electrical circuits
LT 2D 
  • General information
  • User manual
  • Maintenance
  • Power unit
  • Petrol engines 2.3 l
  • Diesel engines 2.5 l
  • Diesel engines 2.8 l
  • Injection system (diesel 2.8 l)
  • Transmission
  • Clutch
  • Manual gearbox
  • Differential
  • Chassis
  • Car suspension
  • Steering system
  • Brake system
  • Body
  • Body elements
  • Heating system
  • Electrical equipment
  • Equipment and devices
  • Electrical circuits
LT 28 
  • General information
  • Maintenance
  • Power unit
  • Petrol engines 2.0L
  • Petrol engines 2.4L
  • Diesel engines
  • Cooling and heating
  • Fuel and exhaust system
  • Ignition system
  • Transmission
  • Clutch
  • Car gearbox
  • Cardan shaft
  • Rear axle
  • Chassis
  • Brake system
  • Car suspension
  • Steering system
  • Body
  • Body elements
  • Doors, locks and windows
  • Electrical equipment
  • Power devices
  • Equipment and devices
  • Electrical circuits
VWmanual.ru © 2016-2026 | Mobile version | News and articles | Sitemap: EN BG BY UA RS HR RO PL SK HU | Write message | Site search
Passat B2 • Passat B3 • Passat B4 • Passat B5 • Passat B6 • Golf 1, diesel • Golf 1, petrol • Golf 2, petrol • Golf 2 • Golf 3 • Golf 4 • Golf 5 • Polo 3 • Polo 4 • Touareg 1 • Tiguan 1 • Sharan 1 • Transporter T3 • Transporter T4 • LT 28 • LT 2D • Beetle • Caddy 3 •
Our website uses cookies to ensure functionality and convenience.