
English Русский
Български
Беларускі
Український
Српски
Hrvatski
Română
Polski
Slovenský
Magyar
  |  Articles  |  Sitemap  |  Contacts  |    |
Car maintenance Ford Car maintenance Hyundai Car maintenance Chevrolet Car maintenance BMW Car maintenance Audi Car maintenance Opel Car maintenance AvtoVAZ
VWmanual.ru


Main   Passat   Golf   Polo   Touareg   Tiguan   Sharan   Transporter   Others  
LT 28 (1975-1991) LT 2D (1996-2003) Beetle (1960-1986) Caddy 3 (2003-2010)

Removal and installation steering knuckles (VW Beetle)

  • Main
  • Volkswagen
  • Beetle
  • Chassis
  • Front suspension
  • Removal and installation steering knuckles
            0


Contents: Removal ↓ Installation ↓

Removal


Raise the car, place it on supports, and remove the wheels.

Disc brakes: remove the brake hose from the steering knuckle, remove the brake disc and hang it on a wire.

Caution! The disc must cool to ambient temperature before removal.
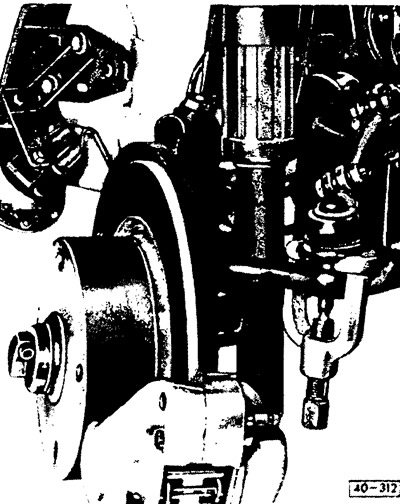

Remove the cotter pin from the outer joint of the tie rod, unscrew the nut, and press out the joint.


Remove the cotter pin from the outer joint of the tie rod, unscrew the nut, and press out the joint.

Remove or knock out the hub cap on the brake drum or brake disc, unscrew the clamp nut to adjust the wheel. Remove the brake disc or brake drum.

Disc brakes: Remove sheet metal cover.

Drum brakes: remove the brake support disc and hang it on a wire.

Use the special VW 179 key to loosen the eccentric bushing to adjust the wheel alignment.
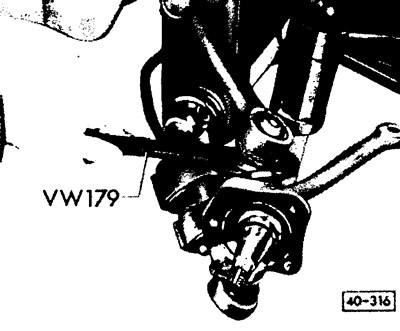
Loosen the hex nut on the lower ball joint.
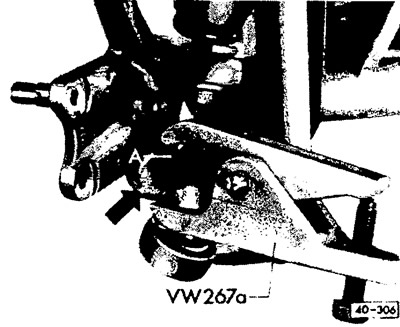

Loosen the hex nut on the lower ball joint.


Screw cap nut A until it stops (slightly tightening) and using the VW 267a puller, push the ball…


Screw cap nut A until it stops (slightly tightening) and using the VW 267a puller, push the ball joint out of the steering knuckle. If necessary, with the tool tightened, apply several sharp blows opposite the steering knuckle spring (see arrow).

Caution: If the rubber dust cap is damaged during removal, only the cap can be replaced. Before installing it, lubricate the joint with universal grease. As a rule, the clamping rings are replaced at this time. If, after removing the dust cap, contamination of the lubricant or excessive axial play of the bearing journal is detected, the joint must be replaced.
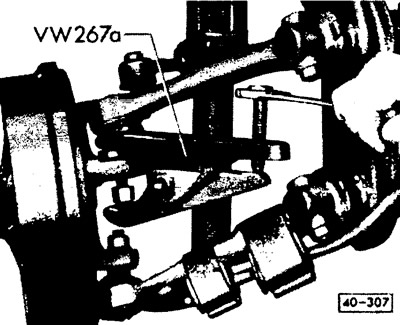

Loosen the hex nut on the upper ball joint and tighten the cap nut. Press out the ball joint using…


Loosen the hex nut on the upper ball joint and tighten the cap nut. Press out the ball joint using the VW 267a puller (the puller rests against the eccentric sleeve).
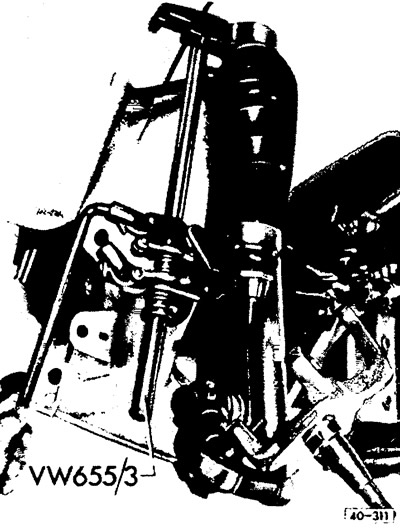

Using a suitable tool, raise the upper control arm until the steering knuckle is free.


Using a suitable tool, raise the upper control arm until the steering knuckle is free.

Installation


Before installation, check the front wheel bearings for wear and fit.
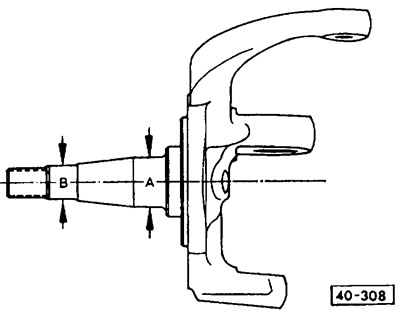
Outer bearing; landing diameter A = 17.45-17.46 mm, internal diameter = 17.46-17.48 mm.


Outer bearing; landing diameter A = 17.45-17.46 mm, internal diameter = 17.46-17.48 mm.

Inner bearing: seat diameter B=28.99-29.00 mm, inner diameter = 29.00-29.01 mm.
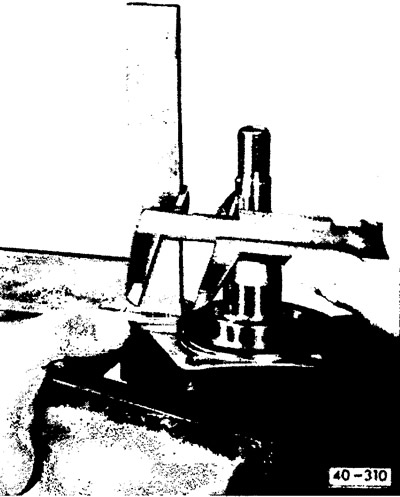
Using a square and calipers, measure the runout of the wheel bearing journal at three points around…


Using a square and calipers, measure the runout of the wheel bearing journal at three points around the circumference. The difference between the measured values should not exceed 0.25 mm.

The cutout on the eccentric bushing for adjusting the wheel camber must be directed in the direction of vehicle travel.

Using a tool, lift the upper control arm and install the steering knuckle.

Place a small washer on the upper support arm. Using new self-locking nuts for the ball joints, tighten them to a torque of 60 Nm (6.0 kgfm).

Install the tie rod, tighten the castle nut, pull it up to the cotter pin hole and secure it with the cotter pin.

Install the brake disc shield or brake support disc.

(The original material is available on the portal vwmanual.ru)

Install the brake disc or brake drum.

Disc brakes: Install the brake shield and tighten its mounting bolts to 40 Nm (4.0 kgfm). Bend back the lock washers.

Install the front wheel hub bearing, put on the washer, tighten the nut and adjust the bearing clearance (see section "Checking and adjusting the play of wheel hub bearings").

Secure the brake hose without twisting.

Caution! If the brake hose has been disconnected, bleed the brake system (see section "Bleeding the brake system").


Adjust the wheel alignment (see section "Geometrical parameters of wheel installation").

Install the wheels, lower the vehicle and tighten the wheel bolts to 130 Nm (13.0 kgfm).

This article is available at russian, bulgarian, belarusian, ukrainian, serbian, croatian, romanian, polish, slovak, hungarian
The text has been checked: Kolesnikov Artem

Share information:

Previous articles
Front suspension with torsion bars
Removal, installation and inspection of shock absorbers and coil springs
Removal and installation shock absorbers
Shock absorber strut — design description
Front suspension on shock absorber struts
Next articles
Replacing shock absorbers
Removal and installation of brake drums, discs and hub bearings
Front wheel brakes
Checking and adjusting the play of wheel hub bearings


Similar articles from other manuals for VW cars:
Height adjustable steering column Passat B3 (1988-1993)
Steering data Golf 1 (1974-1984, petrol)
Steering wheel height adjustment Polo 3 (1995-2003)
Controls on the multifunction steering wheel Touareg 1 (2002-2006)
Removal and installation the subframe with steering gear Tiguan 1 (2007-2015)
Checking the Power Steering Fluid Level Sharan 1 (1995-2000)
Steering and front axle Transporter T4 (1990-2003)
Link to this page in different formats


Visitor comments


No comments yet


How much will 41 + 50 =


Caddy 3 
  • General information
  • User manual
  • Daily care
  • Maintenance
  • Petrol engines 1.4 l
  • Engine repair
  • Cooling and lubrication system
  • Power and exhaust system
  • Petrol engines 1.6 l
  • Engine repair
  • Cooling and lubrication system
  • Power and exhaust system
  • Diesel engines
  • Engine repair
  • Cooling and lubrication system
  • Power and exhaust system
  • Transmission
  • Mechanical gearbox 0AH
  • Mechanical gearbox 0A4
  • Drive shafts
  • Chassis
  • Car suspension
  • Steering
  • Brake system
  • Body and wiring diagrams
  • Interior and exterior
  • Electrical circuits
Beetle 
  • General information
  • Maintenance
  • Power unit
  • Engine repair
  • Cooling and lubrication system
  • Supply system
  • Exhaust system
  • Transmission
  • Clutch
  • Car gearbox
  • Chassis
  • Front suspension
  • Rear suspension
  • Steering
  • Brake system
  • Wheels and tires
  • Body
  • Exterior
  • Electrical equipment
  • Equipment and devices
  • Power devices
  • Electrical circuits
LT 2D 
  • General information
  • User manual
  • Maintenance
  • Power unit
  • Petrol engines 2.3 l
  • Diesel engines 2.5 l
  • Diesel engines 2.8 l
  • Injection system (diesel 2.8 l)
  • Transmission
  • Clutch
  • Manual gearbox
  • Differential
  • Chassis
  • Car suspension
  • Steering system
  • Brake system
  • Body
  • Body elements
  • Heating system
  • Electrical equipment
  • Equipment and devices
  • Electrical circuits
LT 28 
  • General information
  • Maintenance
  • Power unit
  • Petrol engines 2.0L
  • Petrol engines 2.4L
  • Diesel engines
  • Cooling and heating
  • Fuel and exhaust system
  • Ignition system
  • Transmission
  • Clutch
  • Car gearbox
  • Cardan shaft
  • Rear axle
  • Chassis
  • Brake system
  • Car suspension
  • Steering system
  • Body
  • Body elements
  • Doors, locks and windows
  • Electrical equipment
  • Power devices
  • Equipment and devices
  • Electrical circuits
VWmanual.ru © 2016-2026 | Mobile version | News and articles | Sitemap: EN BG BY UA RS HR RO PL SK HU | Write message | Site search
Passat B2 • Passat B3 • Passat B4 • Passat B5 • Passat B6 • Golf 1, diesel • Golf 1, petrol • Golf 2, petrol • Golf 2 • Golf 3 • Golf 4 • Golf 5 • Polo 3 • Polo 4 • Touareg 1 • Tiguan 1 • Sharan 1 • Transporter T3 • Transporter T4 • LT 28 • LT 2D • Beetle • Caddy 3 •
Our website uses cookies to ensure functionality and convenience.