English Русский
Български
Беларускі
Український
Српски
Hrvatski
Română
Polski
Slovenský
Magyar
  |  Articles  |  Sitemap  |  Contacts  |    |
Car maintenance Ford Car maintenance Hyundai Car maintenance Chevrolet Car maintenance BMW Car maintenance Audi Car maintenance Opel Car maintenance AvtoVAZ
VWmanual.ru


Main   Passat   Golf   Polo   Touareg   Tiguan   Sharan   Transporter   Others  
Golf 1 (1974-1984, diesel) Golf 1 (1974-1984, petrol) Golf 2 (1984-1993, petrol) Golf 2 (1984-1993) Golf 3 (1991-1997) Golf 4 (1997-2004) Golf 5 (2003-2008)

Additional lighting devices (VW Golf 1)

  • Main
  • Golf
  • Golf 1
  • Body
  • Optional equipment
  • Additional lighting devices
            0


Contents: Installing additional high beam…↓ Rear Fog Lights - Installation ↓
We have kits of additional high beam and fog lights available for sale, including headlight covers and all necessary mounting parts.

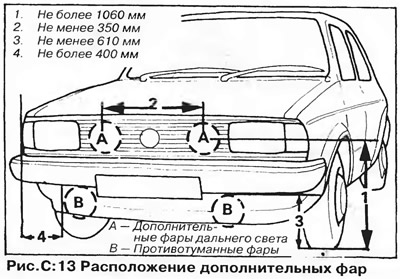
Additional high beam headlights are used together with the high beam of the main headlights, and must be switched off when switching to low beam. These headlights are installed in pairs, their centers must be located at a distance of at least 350 mm from each other, at the same distance from the central axis of the car and at a height of 610-1060 mm from the ground (A, figure C:13). Fog lights are designed for use in conditions of limited visibility (fog or snowfall). The outer edge of the fog lamp must be no more than 400 mm from the edge of the vehicle (B, Figure C:14).

Additional high beam headlights are used together with the high beam of the main headlights, and…


Additional high beam headlights are used together with the high beam of the main headlights, and…


When installing the rear fog light/lights, please observe the following rules:


Any part of the luminous surface of the rear fog lamp must be located at a distance of not less than 250 mm and not more than 1.0 m from the ground and not closer than 100 mm from the luminous surface of any brake light.

All vehicles equipped with rear fog lamps must have a corresponding indicator lamp that comes on when the fog lamps on the vehicle or trailer are switched on.

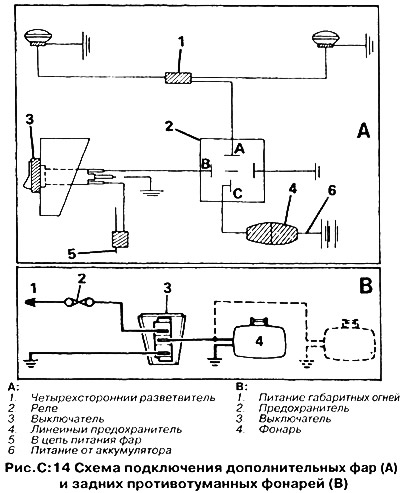
The rear fog light must be connected so that it can be switched off independently of the front headlights (including the back) must be switched on only together with the parking lights (figure C:14).

Use fog lights only in poor visibility conditions; turn them off when the vehicle is parked.

Installing additional high beam headlights or fog lights


The instructions below apply equally to the installation of additional high beam headlights or fog lights, only their location and the method of connecting the power supply differ.

NOTE: Additional high beam headlamps must only be switched on simultaneously with the high beam headlamps. Fog lamps must operate together with the main headlamps or parking lamps.


1. Disconnect the ground wire from the battery.

2. Mark the locations of the headlight mountings on the bumper or valance and drill 10 mm diameter holes. Insert the headlight mounting stud into the hole and secure it with the nut and lock washer included in the kit.

3. Connect the headlights to the vehicle's electrical system according to the diagram in Figure C:14. Install a lug on each headlight wire and attach the wires to the four-way splitter.


4. Mount the relay near the battery or anywhere else where there is a wire connected to the positive battery terminal. Drill a 3mm diameter hole and secure the relay with a self-tapping screw.

5. Connect the body and the relay mounting screw with a ground wire.

6. Using the second wire, connect terminal 5 of the relay to the four-way splitter connector.

7. Install the switch on the bracket in a convenient location for the driver. Secure the bracket with two self-tapping screws, drilling two 3 mm diameter holes for this.

8. Connect the wire from terminal 1 of the relay to the switch.

9. Connect the center terminal of the switch to ground. 10. Connect the "D" terminal of the switch to the high beam power supply circuit wire of the main headlights (when installing additional high beam headlights) or low beam headlights (when installing fog lights).

11. Connect the red wire from terminal "3" of the relay to the positive terminal of the battery or another contact that is under voltage from the battery.

12. Connect the ground wire to the battery and check the operation of the headlights.

Rear Fog Lights - Installation


The position of the rear fog lamps must comply with certain rules, as set out above. No part of the lamp lens must be less than 250 mm or more than 1 m from the ground. The lamp must be at least 100 mm from any brake light. In most cases, the existing bumper mounting bolts can be used to mount the lamp (depends on the design of the bracket supplied with the flashlight). If necessary, drill a hole to mount the light. Be careful not to damage electrical wiring, brake pipes, etc. located behind the panel when drilling the hole. Protect the edges of the hole from corrosion.

When installing rear fog lights, make sure that the drainage slot in the lens (if available) located below The wires from the lights should be routed to the switch on the dashboard, and it is advisable to pass them through existing holes with rubber seals (for example, for license plate light wires).

Wire from rear fog light (B, Figure C:14) attaches to the switch on the dashboard. Install the switch bracket in a convenient location for the driver, securing it with two self-tapping screws, insert the switch into the bracket and connect the fog lamp to the switch.

(The original article is available on the website vwmanual.ru)

Second wire from the switch (power supply for rear fog lamp circuit) connect to the power supply circuit of the rear parking lights.

This article is available at russian, bulgarian, belarusian, ukrainian, serbian, croatian, romanian, polish, slovak, hungarian
The text has been checked: Tarasov Ivan

Share information:

Previous articles
Child seat
Radio interference suppression
Installing the antenna
Installing a radio and speakers
Removal and installation tool
General information about additional equipment
Next articles
Towbar and towbar electrical equipment


Similar articles from other manuals for VW cars:
External lighting devices Passat B5 (1996-2005)
Main and additional fuses Polo 3 (1995-2003)
Additional equipment installed on vehicles Touareg 1 (2002-2006)
Overview of control devices Tiguan 1 (2007-2015)
Checking the operation of the lighting system Sharan 1 (1995-2000)
Additional heat exchanger — removal and installation Transporter T4 (1990-2003)
Car exterior lighting Caddy 3 (2003-2010)
Link to this page in different formats


Visitor comments


No comments yet


How much will 47 + 47 =


Golf 5 
  • General information
  • User manual
  • Maintenance
  • Troubleshooting
  • Power unit
  • Engine repair
  • Cooling and ventilation system
  • Fuel system
  • Ignition system
  • Transmission
  • Clutch
  • Mechanical gearbox
  • Automatic gearbox
  • Chassis
  • Brake system
  • Car suspension
  • Steering
  • Body
  • Interior (internal elements)
  • Exterior (external elements)
  • Doors and covers
  • Electrical equipment
  • Power devices
  • Washers and wipers
  • Lighting and appliances
  • Electrical circuits
Golf 4 
  • General information
  • User manual
  • Weekly checks
  • Maintenance
  • Power unit
  • Petrol engines
  • Diesel engines
  • Cooling system
  • Fuel system (petrol)
  • Control system (petrol)
  • Fuel system (diesel)
  • Exhaust system
  • Transmission
  • Clutch
  • Car gearbox
  • Drive shafts
  • Chassis
  • Car suspension
  • Steering
  • Wheels and tires
  • Brake system
  • Body
  • Exterior (external elements)
  • Interior (internal elements)
  • Ventilation and heating
  • Car doors and sunroof
  • Washers and glass cleaners
  • Electrical equipment
  • Power devices
  • Lighting and appliances
  • Electrical circuits
Golf 3 
  • Petrol engine
  • Engine repair
  • Lubrication system
  • Cooling system
  • Ignition system
  • Diesel engine
  • Engine repair
  • Diesel injection system
  • Pre-glow system
  • Transmission
  • Clutch
  • Gearbox and drive shafts
  • Chassis
  • Steering
  • Wheels and suspension
  • Brake system
  • Electrical equipment
  • Lighting and appliances
  • Electrical circuits
Golf 2 
  • General information
  • Introduction to guide
  • User manual
  • Petrol engines 1.3 l
  • Engine repair
  • Lubrication system
  • Cooling system
  • Carburetors
  • Supply system
  • Ignition system
  • Petrol engines 1.6/1.8 l
  • Engine repair
  • Supply system
  • Ignition system
  • Diesel engines
  • Engine repair
  • Lubrication system
  • Cooling system
  • Power and exhaust system
  • Transmission
  • Clutch
  • 4-speed gearbox 084
  • 5-speed gearbox 085
  • 4-speed gearbox 020/4R
  • 5-speed gearbox 020/4T
  • Automatic gearbox
  • Drive shafts
  • Chassis
  • Steering
  • Car suspension
  • Brake system
  • Body
  • Body elements
  • Doors, locks and windows
  • Electrical equipment
  • Equipment and devices
  • Power devices
Golf 2 (petrol) 
  • General information
  • Characteristics
  • Car care
  • Maintenance
  • Power unit
  • Engine repair
  • Engine 1.05/1.30
  • Engine 1.60/1.80
  • Cooling and lubrication system
  • Power and exhaust system
  • Transmission
  • Clutch
  • Car gearbox
  • Drive shafts
  • Chassis
  • Brake system
  • Steering
  • Suspension
  • Body
  • Body and equipment
  • Electrical equipment
  • Lighting and appliances
  • Electrical circuits
Golf 1 (petrol) 
  • General information
  • Characteristics
  • User manual
  • Maintenance
  • Power unit
  • Engine adjustment
  • Engine 1.1/1.3
  • Engine 1.5/1.6/1.8
  • Engine electrical equipment
  • Cooling system
  • Fuel system
  • Transmission
  • Clutch and manual gearbox
  • Automatic gearbox
  • Chassis
  • Steering
  • Front suspension
  • Rear suspension
  • Brake system
  • Electrical equipment
  • Lighting and appliances
  • Electrical circuits
  • Body
  • Body and equipment
  • Optional equipment
Golf 1 (diesel) 
  • General information
  • Specifications
  • Maintenance
  • Power unit
  • Engine repair
  • Exhaust and turbocharger
  • Cooling system
  • Fuel system
  • Fuel injection system
  • Transmission
  • Clutch and drive shafts
  • Car gearbox
  • Chassis
  • Suspension and wheels
  • Steering
  • Brake system
  • Wheels and tires
  • Body
  • Heating and ventilation
  • Exterior (external elements)
  • Interior (internal elements)
  • Doors and windows
  • Electrical equipment
  • Equipment and devices
  • Lighting system
  • Power devices
  • Electrical circuits
VWmanual.ru © 2016-2026 | Mobile version | News and articles | Sitemap: EN BG BY UA RS HR RO PL SK HU | Write message | Site search
Passat B2 • Passat B3 • Passat B4 • Passat B5 • Passat B6 • Golf 1, diesel • Golf 1, petrol • Golf 2, petrol • Golf 2 • Golf 3 • Golf 4 • Golf 5 • Polo 3 • Polo 4 • Touareg 1 • Tiguan 1 • Sharan 1 • Transporter T3 • Transporter T4 • LT 28 • LT 2D • Beetle • Caddy 3 •
Our website uses cookies to ensure functionality and convenience.