



Contents: Dismantling ↓ Installation ↓
The turbocharger and the control valve are one unit. If the turbocharger is faulty, it can only be replaced, as it cannot be repaired in a workshop.
The prerequisite for the perfect operation of the supercharger and achieving the set boost pressure is:
- absence of leaks in the intake and exhaust.
- the discharge line leading to the control valve is not clogged, is well secured and is tight.
- the injection start, valve clearance, compression pressure and maximum speed are set correctly, and the injectors are in good condition. The boost pressure check can only be performed in a workshop.
Dismantling
Remove the engine cover.
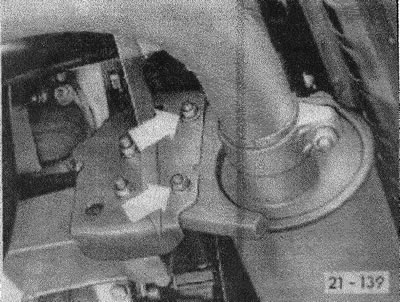
(21-139) Unscrew both mounting bolts on the left between the mufflers and the support.
Caution: Loosening these bolts is important to facilitate removal and installation of the supercharger.
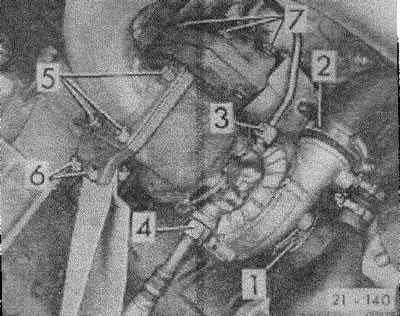
(21-140) Remove the air hose between the suction pipe (1) and the air filter.
Unscrew the oil supply line (3) and the outlet line (4).
Unscrew the fastening bolts (5) of the exhaust pipe and the support (6).
Remove the four mounting bolts (7) between the supercharger and the exhaust outlet.
Remove the turbocharger.
Installation
In order to easily install the supercharger, you need to follow the following installation sequence:
[The original article is available on the website VWManual]
Insert the supercharger and tighten the four mounting bolts between the supercharger and the exhaust outlet.
Screw the exhaust pipe to the supercharger with four bolts.
Tighten both support bolts.
Caution! If the support is not aligned with the exhaust pipe, release it from the cylinder head and center it.
Install the muffler and screw it to the support with two bolts.
Before tightening the supply oil line, lubricate the turbocharger connecting nipples with engine oil.
After installing the turbocharger, do not immediately turn on high speed, but let the engine run for 1 minute at idle speed to ensure a reliable supply of oil to the supercharger.
Visitor comments