
English Русский
Български
Беларускі
Український
Српски
Hrvatski
Română
Polski
Slovenský
Magyar
  |  Articles  |  Sitemap  |  Contacts  |    |
Car maintenance Ford Car maintenance Hyundai Car maintenance Chevrolet Car maintenance BMW Car maintenance Audi Car maintenance Opel Car maintenance AvtoVAZ
VWmanual.ru


Main   Passat   Golf   Polo   Touareg   Tiguan   Sharan   Transporter   Others  
Transporter T3 (1979-1992) Transporter T4 (1990-2003)

Removal and installation the brake drum (VW Transporter T3)

  • Main
  • Transporter
  • Transporter T3
  • Chassis
  • Rear suspension
  • Removal and installation the brake drum
            0


Contents: Dismantling ↓ Installation ↓

Dismantling


Remove the wheel cap.

Loosen the wheel bolts.

Remove the cotter pin and unscrew the axle nut.

Caution! When loosening and tightening the castle nut, the vehicle must be on its wheels for safety reasons!


The brake drum can be removed without the hub. In this case, there is no need to loosen the nut.

Raise the rear of the vehicle.

Remove the wheel.

Unscrew 2 bolts from the brake drum, remove the drum, if necessary, before doing this, move the handbrake cables using the equalizing lever and the brake shoes using the adjusting gear, see "Releasing the rear wheel brake" and "Handbrake".

In any case, the brake drum must be rotated by hand before removal.
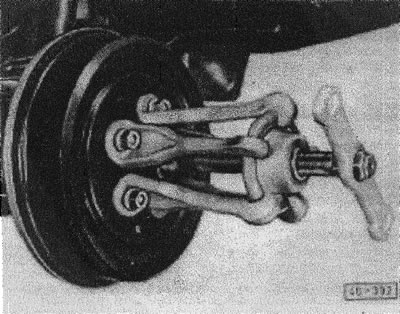
In any case, the brake drum must be rotated by hand before removal.


(46-392) If you need to remove the wheel hub as well, use a suitable puller and remove the brake drum together with the rear wheel hub.

A brake drum that has scratches should be rebored or replaced.

Installation


Adjust the rear wheel brakes, see "Adjusting the rear wheel brakes".

Install the hub with the brake drum or just one drum. Before doing this, check the brake drum for wear, damage, compliance with the established dimensions and flawless braking surfaces.


If only the brake drum was removed, secure it with two bolts.

Screw on the crown nut and tighten slightly.

Screw on the wheel.

Lower the car.

Caution! The castle nut can only be tightened when the wheels are on the ground.


Tighten the crown nut (cotter pin 6) with a torque of 500 Nm, the crown nut with cotter pin 10 - with a torque of 500 Nm. If now the cotter pin does not pass through the hole, tighten the crown nut further.

Tighten the wheel bolts crosswise to 180 Nm.

Install the wheel cover.

This article is available at russian, bulgarian, belarusian, ukrainian, serbian, croatian, romanian, polish, slovak, hungarian
The text has been checked: Tarasov Ivan

Share information:

Previous articles
Removal and installation the spring
Removal and installation the shock absorber
Rear suspension — design description
Rear Axle — General Description
Next articles
Dismantling and installation of the cardan shaft
Disassembling the cardan shaft, replacing the protective casing and joint
Checking and adjusting rear wheel alignment
Checking and adjusting the rear wheel alignment


Similar articles from other manuals for VW cars:
Wheel with drum brake mechanism Passat B3 (1988-1993)
Replacing rear drum brake pads Golf 1 (1974-1984, petrol)
Rear drum brake mechanism Polo 4 (2001-2009)
Parking brake Touareg 1 (2002-2006)
General information about the brake system Tiguan 1 (2007-2015)
Checking the brake fluid level Sharan 1 (1995-2000)
Checking the brake fluid level Caddy 3 (2003-2010)
Link to this page in different formats


Visitor comments


No comments yet


How much will 40 + 42 =


Transporter T4 
  • General information
  • User manual
  • Maintenance
  • Power unit
  • Engine repair
  • Ignition system
  • Lubrication system
  • Cooling system
  • Fuel system (petrol)
  • Fuel system (diesel)
  • Injection system (petrol)
  • Exhaust system
  • Transmission
  • Clutch
  • Car gearbox
  • Chassis
  • Car suspension
  • Steering
  • Brake system
  • Wheels and tires
  • Body
  • Exterior
  • Interior
  • Doors and windows
  • Heating system
  • Electrical equipment
  • Equipment and devices
  • Lighting and signaling
  • Power devices
  • Electrical circuits
Transporter T3 
  • General information
  • Maintenance
  • Petrol engines
  • Engine repair
  • Lubrication system
  • Cooling system
  • Power and exhaust system
  • Carburetor 34 PICT
  • Carburetors 2E3 and 2E4
  • Fuel injection system
  • Ignition system
  • Diesel engines
  • Engine repair
  • Lubrication system
  • Cooling system
  • Power and exhaust system
  • Transmission
  • Clutch
  • Car gearbox
  • Chassis
  • Front suspension
  • Rear suspension
  • Steering
  • Brake system
  • Body
  • Body and interior elements
  • Doors, locks and windows
  • Electrical equipment
  • Lighting system
  • Equipment and devices
  • Power devices (diesel)
  • Power devices (petrol)
  • Wiring diagrams (diesel)
  • Wiring diagrams (petrol)
VWmanual.ru © 2016-2026 | Mobile version | News and articles | Sitemap: EN BG BY UA RS HR RO PL SK HU | Write message | Site search
Passat B2 • Passat B3 • Passat B4 • Passat B5 • Passat B6 • Golf 1, diesel • Golf 1, petrol • Golf 2, petrol • Golf 2 • Golf 3 • Golf 4 • Golf 5 • Polo 3 • Polo 4 • Touareg 1 • Tiguan 1 • Sharan 1 • Transporter T3 • Transporter T4 • LT 28 • LT 2D • Beetle • Caddy 3 •
Our website uses cookies to ensure functionality and convenience.