
English Русский
Български
Беларускі
Український
Српски
Hrvatski
Română
Polski
Slovenský
Magyar
  |  Articles  |  Sitemap  |  Contacts  |    |
Car maintenance Ford Car maintenance Hyundai Car maintenance Chevrolet Car maintenance BMW Car maintenance Audi Car maintenance Opel Car maintenance AvtoVAZ
VWmanual.ru


Main   Passat   Golf   Polo   Touareg   Tiguan   Sharan   Transporter   Others  
Touareg 1 (2002-2006)

Fitting the hatch panel seal (VW Touareg 1)

  • Main
  • Touareg
  • Touareg 1
  • Body
  • Outdoor elements
  • Fitting the hatch panel seal
            0


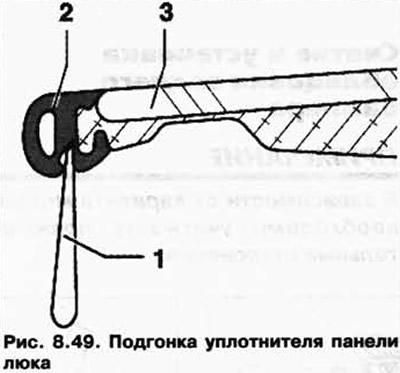
Check with a cardboard strip about 0.3 mm thick (for example a business card), is the density between the panel 2 seal and the body uniform along the entire perimeter of the hatch (Fig. 8.49).

Check with a cardboard strip about 0.3 mm thick (for example a business card), is the density…


The cardboard card should fit tightly between the panel seal and the body.

Remove the glass panel of the tilt/slide sunroof.

If the fit is too tight, the panel seal 2 can be pushed apart using wedge 3409 1.

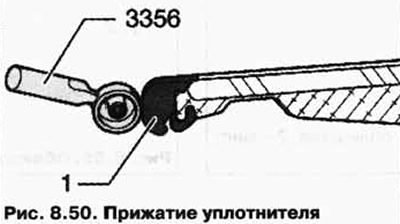
If the seal fits too tightly to the body, press seal 1 using pressure roller 3356 more tightly to the panel (Fig. 8.50).
If the seal fits too tightly to the body, press seal 1 using pressure roller 3356 more tightly to…


To adjust the seal, glass panel 3 must be removed.

Removal the fairing


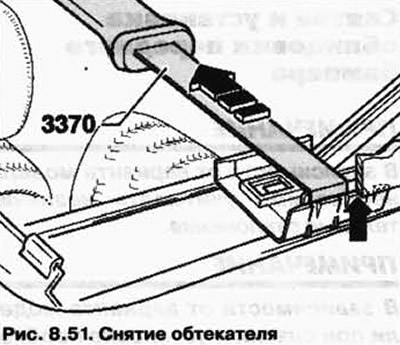
Open the sliding/tilting sunroof fully, insert hook 3370 between the edge of the panel and the fairing mount and, pulling the hook, release the fairing mount from the side retainer (left/right) (Fig. 8.51).


Open the sliding/tilting sunroof fully, insert hook 3370 between the edge of the panel and the…


Use a screwdriver to pry the fairing mount out of the guide rail (left/right).

Remove the fairing.

The information is posted on this resource VWmanual.ru

This article is available at russian, bulgarian, belarusian, ukrainian, serbian, croatian, romanian, polish, slovak, hungarian
The text has been checked: Tarasov Ivan

Share information:

Previous articles
Checking the parallel movement of the glass panel
Adjusting the glass panel of the lift-and-slide sunroof
Installing a glass panel for a lift and slide sunroof
Removal the glass panel of the lift-and-slide sunroof
Lift and slide sunroof with glass panel
Removal and installation the rear door lock cylinder housing
Next articles
Removal the sun shield
Removal and installation the front bumper trim
Removal and installation the rear bumper trim


Similar articles from other manuals for VW cars:
Lift and slide roof hatch panel Passat B5 (1996-2005)
Removal and installation the hatch cover seal Golf 4 (1997-2004)
Upper hatch (roof panel) Polo 4 (2001-2009)
Front support panel Tiguan 1 (2007-2015)
Replacing the camshaft seal Sharan 1 (1995-2000)
Door seal — removal and installation Transporter T4 (1990-2003)
Checking the thermal seal of piston rings Caddy 3 (2003-2010)
Link to this page in different formats


Visitor comments


No comments yet


How much will 19 + 10 =


Touareg 1 
  • General information
  • Vehicle device
  • Controls and instruments
  • Seats and safety
  • Maintenance and management
  • Power unit
  • Engine checks
  • Petrol engine 3.2L
  • Petrol engine 4.2L
  • Diesel engine 5.0L
  • Cooling system
  • Lubrication system
  • Injection system
  • Exhaust system
  • Fuel supply system
  • Transmission
  • Automatic gearbox 09D
  • Mechanical gearbox 08D
  • Cardan shaft
  • Chassis
  • Wheels and tires
  • Front suspension
  • Rear suspension
  • Steering gear
  • Brake system
  • Body
  • Outdoor elements
  • Electrical equipment
  • Battery
  • Generator and starter
  • Instruments and wipers
VWmanual.ru © 2016-2026 | Mobile version | News and articles | Sitemap: EN BG BY UA RS HR RO PL SK HU | Write message | Site search
Passat B2 • Passat B3 • Passat B4 • Passat B5 • Passat B6 • Golf 1, diesel • Golf 1, petrol • Golf 2, petrol • Golf 2 • Golf 3 • Golf 4 • Golf 5 • Polo 3 • Polo 4 • Touareg 1 • Tiguan 1 • Sharan 1 • Transporter T3 • Transporter T4 • LT 28 • LT 2D • Beetle • Caddy 3 •
Our website uses cookies to ensure functionality and convenience.