
English Русский
Български
Беларускі
Український
Српски
Hrvatski
Română
Polski
Slovenský
Magyar
  |  Articles  |  Sitemap  |  Contacts  |    |
Car maintenance Ford Car maintenance Hyundai Car maintenance Chevrolet Car maintenance BMW Car maintenance Audi Car maintenance Opel Car maintenance AvtoVAZ
VWmanual.ru


Main   Passat   Golf   Polo   Touareg   Tiguan   Sharan   Transporter   Others  
Tiguan 1 (2007-2015)

Removal and installation the lower wishbone (VW Tiguan 1)

  • Main
  • Tiguan
  • Tiguan 1
  • Chassis
  • Rear suspension (4x4)
  • Removal and installation the lower wishbone
            0


Contents: Removal ↓ Installation ↓ Tightening torques ↓

Removal


Remove the wheel. Remove the coil spring. Unscrew the bolt "arrow" securing the lower wishbone "1".
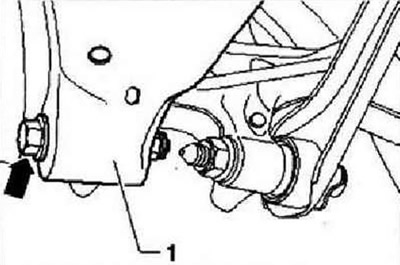
Remove the wheel. Remove the coil spring. Unscrew the bolt «arrow» securing the lower wishbone «1».


Cars with automatic headlight range control


Remove bolts "1" from the lower wishbone.
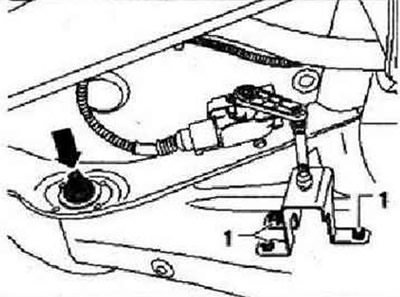
Remove bolts «1» from the lower wishbone.


All


Mark, for example with a felt-tip pen, the position of the eccentric bolt "arrow" in relation to the subframe. Disconnect and lower the rear part of the exhaust system. Unscrew the bolt "arrow". Remove the lower transverse arm.

Installation


Install the lower wishbone on the vehicle and tighten the bolts by hand. Tightening the wishbone mounting bolts may only be done after the suspension has been set to the position corresponding to dimension "a"! Screw the wishbone to the subframe and tighten the new nut "arrow" to the appropriate torque. The eccentric bolt "arrow" must be installed relative to the subframe in accordance with the previously applied marks. Install the rear part of the exhaust system in place.


Cars with automatic headlight range control


Screw bolts "1" into the lower wishbone.

All


Tighten the bolt "arrow" of the lower transverse arm -1. Install the coil spring. Install the wheel and tighten its mounting bolts. Adjust the wheel alignment angles.

Tightening torques


Lower wishbone to hub bearing housing. Use only new bolts and nuts, tighten only to position corresponding to curb weight90 Nm and turn 90° further
Lower wishbone to subframe. Use new nuts only, tighten only to position corresponding to curb weight95 Nm
Rear left ride height sensor "G7B" to lower wishbone5 Nm

This article is available at russian, bulgarian, belarusian, ukrainian, serbian, croatian, romanian, polish, slovak, hungarian
The text has been checked: Tarasov Ivan

Share information:

Previous articles
Removal and installation the upper wishbone
Parts and assemblies of transverse levers and transverse rods
Removal and installation of the subframe assembly with the units installed on it
Parts and units of the subframe, main gear
Next articles
Parts and units of the hub bearing housing and trailing arm
Shock absorber and coil spring
Shock absorber repair
Anti-roll bar
Drive shaft device
Removal and installation the drive shaft


Similar articles from other manuals for VW cars:
Removal and installation the rear lower wishbone Passat B6 (2005-2010)
Removal and installation the lower mudguard of the engine… Golf 4 (1997-2004)
Subframe, anti-roll bar and lower arm Polo 3 (1995-2003)
Removal and installation the lower noise insulation screen of… Touareg 1 (2002-2006)
Removal and installation the lower intake manifold (BGU) Caddy 3 (2003-2010)
Link to this page in different formats


Visitor comments


No comments yet


How much will 46 + 25 =


Tiguan 1 
  • General information
  • Characteristics
  • Vehicle overview
  • Power unit
  • Petrol engine 1.4 BWK
  • Petrol engine 1.4 CAVA
  • Engine 2.0 (petrol)
  • Engine 2.0 (diesel)
  • Transmission
  • 6-speed manual gearbox 0A6
  • 6-speed automatic gearbox 09M
  • Drive shafts
  • Chassis
  • Front suspension
  • Rear suspension (2x4)
  • Rear suspension (4x4)
  • Air suspension
  • Wheels and rims
  • Brake system
  • Steering gear
  • Body
  • External equipment
  • Internal equipment
  • Electrical equipment
  • Power devices
  • Appliances and lighting
  • Communication systems
  • Heating and air conditioning
  • Electrical circuits
VWmanual.ru © 2016-2026 | Mobile version | News and articles | Sitemap: EN BG BY UA RS HR RO PL SK HU | Write message | Site search
Passat B2 • Passat B3 • Passat B4 • Passat B5 • Passat B6 • Golf 1, diesel • Golf 1, petrol • Golf 2, petrol • Golf 2 • Golf 3 • Golf 4 • Golf 5 • Polo 3 • Polo 4 • Touareg 1 • Tiguan 1 • Sharan 1 • Transporter T3 • Transporter T4 • LT 28 • LT 2D • Beetle • Caddy 3 •
Our website uses cookies to ensure functionality and convenience.