



Contents: Removal ↓ Installation ↓
If the seal is torn or porous, moisture and dirt will penetrate into the steering gear. A damaged seal should be replaced immediately to ensure the required lubrication of the rack. Otherwise, the steering gear will be damaged.
Removal
1. Set the wheels to move straight.
2. Mark the direction of rotation of the wheel with an arrow on the sidewall of the tire and loosen the wheel bolts.
3. Jack up the front of the car, place it on jack stands and, after unscrewing the mounting bolts, remove the wheels.
4. Clean the steering gear and tie rod near the cuff to prevent dirt from getting inside the mechanism.
5. Remove the tie rod end.
6. Unscrew the lock nut that secures the tip to the cross rod.
7. Mark the position of clamps 1 and 2 with a felt-tip pen (see illustration).
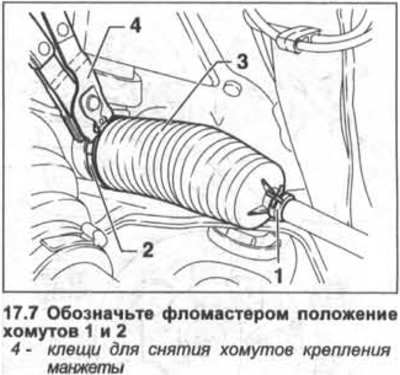
8. Loosen the outer clamp 1 of the cuff fastening using special pliers and move it to the cross rod (see illustration 17.7).
9. Carefully cut the clamp 2, which secures the cuff from the inside, and remove the cuff 3 from the steering gear (see illustration 17.7).
10. Remove the cuff from the tie rod.
Installation
11. Clean the tie rod and lubricate it with a thin layer.
12. Turn the steering wheel from lock to lock in both directions and lubricate the steering rack with VWG052 192 A1 grease.
13. Set the steering wheel to neutral position.
14. Install new clamps and a new seal onto the steering rod.
15. Secure the cuff to the steering rod with a clamp, making sure that the clamp is seated correctly.
16. Tighten the lock nut that secures the tip and the tie rod.
17. Secure the tie rod end pin to the steering knuckle arm and screw the nut onto the pin, tightening it by hand.
18. Slide the cuff onto the steering rack and place a new clamp on it.
19. Make sure the cuff is not twisted.
20. Fasten the clamp to the cuff using pliers 4, for example, HAZET1847-1 (see illustration 17.7).
21. Tighten the tie rod end ball joint pin nut and lock nut to the specified torque, see the relevant chapter.
22. Install the removed wheels in accordance with the marks made during removal.
23. Screw in the wheel bolts and lower the car onto its wheels.
24. Tighten the wheel bolts in a crisscross pattern to a torque of 120 Nm.
25. Contact a workshop to check the wheel alignment.
Visitor comments