
English Русский
Български
Беларускі
Український
Српски
Hrvatski
Română
Polski
Slovenský
Magyar
  |  Articles  |  Sitemap  |  Contacts  |    |
Car maintenance Ford Car maintenance Hyundai Car maintenance Chevrolet Car maintenance BMW Car maintenance Audi Car maintenance Opel Car maintenance AvtoVAZ
VWmanual.ru


Main   Passat   Golf   Polo   Touareg   Tiguan   Sharan   Transporter   Others  
Golf 1 (1974-1984, diesel) Golf 1 (1974-1984, petrol) Golf 2 (1984-1993, petrol) Golf 2 (1984-1993) Golf 3 (1991-1997) Golf 4 (1997-2004) Golf 5 (2003-2008)

Rear view mirrors (VW Golf 4)

  • Main
  • Golf
  • Golf 4
  • General information
  • User manual
  • Rear view mirrors
            0


Contents: Installing an interior mirror ↓ Installation of exterior mirrors…↓ Installation of electrically…↓ Synchronous installation of exterior…↓ Heated mirrors ↓ Memory for exterior mirrors ↓ Automatic setting of the right…↓
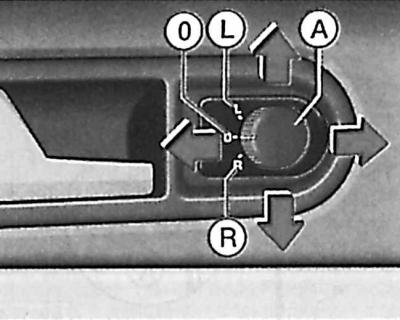
Rear view mirrors


The position of the mirror is set by button A in accordance with the directions of the arrows.
  • L – left mirror;
  • O – installation;
  • R – right mirror.

Rear view mirrors should be installed before starting a trip so that the traffic situation behind the car can be seen at any time.

Installing an interior mirror


Manual setting of anti-glare position

1. In the main position of the mirror, the lever at the bottom of the mirror should point forward.

2. To ensure the anti-glare effect, move the lever back.

Automatic creation of anti-glare effect

3. The mirror is installed manually.

4. When the ignition is on, the interior mirror darkens when light falls from behind (for example, headlights), the intensity of darkening depends on the amount of light coming from behind.

5.When you engage reverse gear or move the selector to the "R" position, the mirror switches to its original position (without anti-glare effect).


Installation of exterior mirrors without electric drive


The installation of exterior mirrors from the inside without electric drive is carried out manually using a button located in the door trim.

Installation of electrically adjustable exterior mirrors


1. There is a rotary button for installing mirrors.

2. The position of the mirror is set by button A in accordance with the directions of the arrows.

3. If the electric drive fails, you can set the outside mirrors manually by pressing on the mirror rim.

Synchronous installation of exterior mirrors


1. First, you need to set both mirrors to their original position. To do this, set the mirrors separately, first the left one, then the right one, as described above.

2. After this, you will be able to install both mirrors at the same time while you are installing the left mirror

3. After a certain time, it may become necessary to return both mirrors to their original position again.

Instructions for the use of convex and aspherical exterior rear-view mirrors

Convex rearview mirrors increase the field of view, while objects appear smaller. For this reason, these mirrors are only very conditionally suitable for assessing the distance to cars moving behind.

Aspherical mirrors have a mirror surface of varying curvature. These wide-angle mirrors increase the field of view even more than convex mirrors. They are also only very limitedly suitable for assessing the distance to following vehicles.

Heated mirrors


The heated electrically adjustable exterior mirrors are provided as long as the heated rear window is on. The ignition must be on.


On vehicles intended for export to countries with cold climates, heated exterior mirrors are switched on when the exterior mirrors are installed using an electric drive.

Memory for exterior mirrors


Vehicles with memory for the driver's seat also have memory for the outside mirrors.

Any position set for the outside mirrors is automatically entered into the memory when the driver's seat adjustments are memorized.

First, the driver's seat should be adjusted. Then, the mirrors are installed in accordance with the driver's seat.

Automatic setting of the right outside mirror when reversing


When reverse gear is engaged, the right outside mirror automatically takes the preset position, if such a position has been previously set.

This ensures that the right curb is visible when parking. The mirror returns to its normal position as soon as the reverse gear is disengaged.

The preset position of the right outside mirror for reversing can be changed and stored in the memory according to individual requirements.

This article is available at russian, bulgarian, belarusian, ukrainian, serbian, croatian, romanian, polish, slovak, hungarian
The text has been checked: Kolesnikov Artem

Share information:

Previous articles
Replacing windshield wipers
Windscreen wiper blades
Windscreen wipers and washers
Interior lighting
Steering column switch for direction indicators and headlights
Anti-slip regulation ASR
Next articles
Rear window heating
Sun visors
Front seats
Driver's seat
Memory for driver's seat
Front passenger seat


Similar articles from other manuals for VW cars:
Rear view mirrors Passat B4 (1988-1996)
Rear view mirrors Polo 4 (2001-2009)
Rear center armrest Touareg 1 (2002-2006)
Exterior rear view mirrors Tiguan 1 (2007-2015)
Rear suspension — design description Sharan 1 (1995-2000)
Rear suspension — design description Transporter T4 (1990-2003)
Exterior rearview mirrors Caddy 3 (2003-2010)
Link to this page in different formats


Visitor comments


No comments yet


How much will 12 + 20 =


Golf 5 
  • General information
  • User manual
  • Maintenance
  • Troubleshooting
  • Power unit
  • Engine repair
  • Cooling and ventilation system
  • Fuel system
  • Ignition system
  • Transmission
  • Clutch
  • Mechanical gearbox
  • Automatic gearbox
  • Chassis
  • Brake system
  • Car suspension
  • Steering
  • Body
  • Interior (internal elements)
  • Exterior (external elements)
  • Doors and covers
  • Electrical equipment
  • Power devices
  • Washers and wipers
  • Lighting and appliances
  • Electrical circuits
Golf 4 
  • General information
  • User manual
  • Weekly checks
  • Maintenance
  • Power unit
  • Petrol engines
  • Diesel engines
  • Cooling system
  • Fuel system (petrol)
  • Control system (petrol)
  • Fuel system (diesel)
  • Exhaust system
  • Transmission
  • Clutch
  • Car gearbox
  • Drive shafts
  • Chassis
  • Car suspension
  • Steering
  • Wheels and tires
  • Brake system
  • Body
  • Exterior (external elements)
  • Interior (internal elements)
  • Ventilation and heating
  • Car doors and sunroof
  • Washers and glass cleaners
  • Electrical equipment
  • Power devices
  • Lighting and appliances
  • Electrical circuits
Golf 3 
  • Petrol engine
  • Engine repair
  • Lubrication system
  • Cooling system
  • Ignition system
  • Diesel engine
  • Engine repair
  • Diesel injection system
  • Pre-glow system
  • Transmission
  • Clutch
  • Gearbox and drive shafts
  • Chassis
  • Steering
  • Wheels and suspension
  • Brake system
  • Electrical equipment
  • Lighting and appliances
  • Electrical circuits
Golf 2 
  • General information
  • Introduction to guide
  • User manual
  • Petrol engines 1.3 l
  • Engine repair
  • Lubrication system
  • Cooling system
  • Carburetors
  • Supply system
  • Ignition system
  • Petrol engines 1.6/1.8 l
  • Engine repair
  • Supply system
  • Ignition system
  • Diesel engines
  • Engine repair
  • Lubrication system
  • Cooling system
  • Power and exhaust system
  • Transmission
  • Clutch
  • 4-speed gearbox 084
  • 5-speed gearbox 085
  • 4-speed gearbox 020/4R
  • 5-speed gearbox 020/4T
  • Automatic gearbox
  • Drive shafts
  • Chassis
  • Steering
  • Car suspension
  • Brake system
  • Body
  • Body elements
  • Doors, locks and windows
  • Electrical equipment
  • Equipment and devices
  • Power devices
Golf 2 (petrol) 
  • General information
  • Characteristics
  • Car care
  • Maintenance
  • Power unit
  • Engine repair
  • Engine 1.05/1.30
  • Engine 1.60/1.80
  • Cooling and lubrication system
  • Power and exhaust system
  • Transmission
  • Clutch
  • Car gearbox
  • Drive shafts
  • Chassis
  • Brake system
  • Steering
  • Suspension
  • Body
  • Body and equipment
  • Electrical equipment
  • Lighting and appliances
  • Electrical circuits
Golf 1 (petrol) 
  • General information
  • Characteristics
  • User manual
  • Maintenance
  • Power unit
  • Engine adjustment
  • Engine 1.1/1.3
  • Engine 1.5/1.6/1.8
  • Engine electrical equipment
  • Cooling system
  • Fuel system
  • Transmission
  • Clutch and manual gearbox
  • Automatic gearbox
  • Chassis
  • Steering
  • Front suspension
  • Rear suspension
  • Brake system
  • Electrical equipment
  • Lighting and appliances
  • Electrical circuits
  • Body
  • Body and equipment
  • Optional equipment
Golf 1 (diesel) 
  • General information
  • Specifications
  • Maintenance
  • Power unit
  • Engine repair
  • Exhaust and turbocharger
  • Cooling system
  • Fuel system
  • Fuel injection system
  • Transmission
  • Clutch and drive shafts
  • Car gearbox
  • Chassis
  • Suspension and wheels
  • Steering
  • Brake system
  • Wheels and tires
  • Body
  • Heating and ventilation
  • Exterior (external elements)
  • Interior (internal elements)
  • Doors and windows
  • Electrical equipment
  • Equipment and devices
  • Lighting system
  • Power devices
  • Electrical circuits
VWmanual.ru © 2016-2026 | Mobile version | News and articles | Sitemap: EN BG BY UA RS HR RO PL SK HU | Write message | Site search
Passat B2 • Passat B3 • Passat B4 • Passat B5 • Passat B6 • Golf 1, diesel • Golf 1, petrol • Golf 2, petrol • Golf 2 • Golf 3 • Golf 4 • Golf 5 • Polo 3 • Polo 4 • Touareg 1 • Tiguan 1 • Sharan 1 • Transporter T3 • Transporter T4 • LT 28 • LT 2D • Beetle • Caddy 3 •
Our website uses cookies to ensure functionality and convenience.