



Contents: Removal ↓ Installation ↓
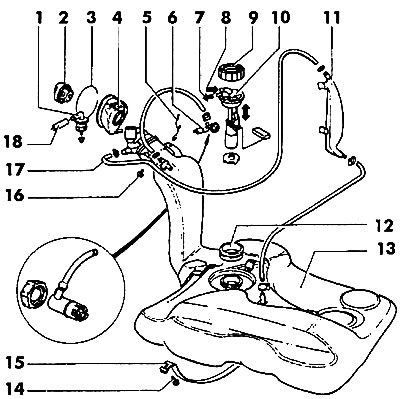
Figure 157. Fuel tank: 1 - inertia valve; 2 - filler cap; 3 - tension ring; 4 - rubber cover; 5 - jumper "'mass"; 6 - ventilation valve; 7 - fuel supply line; 8 - return fuel line; 9 - sensor union nut; 10 - fuel level sensor; 11 - expansion tank; l2 - sealing ring; 13 - fuel tank; 14 - tie bolt (25 Nm); 15 - coupler; 16 - bolt (10 Nm); 17 - ventilation tube; 18 - pipeline to the tank with activated carbon
Removal
Disconnect the battery.
Remove fuel from the fuel tank using a pump.
Remove the fuel level sensor cover. The cover is located under the luggage compartment floor trim.
Disconnect the fuel level sensor connector.
Disconnect the fuel lines, having first marked the supply and return fuel lines with adhesive tape.
Loosen the rear right wheel mounting bolts.
Raise the rear of the vehicle and remove the rear right wheel.
Disconnect the filler neck.
Disconnect the ground jumper.
Support the fuel tank with a jack and a wooden block.
Place the trolley underneath.
Release the tie-down straps, lower the fuel tank and roll it out from under the vehicle on the trolley.
Installation
Install the fuel tank and secure it with clamping straps.. Tightening torque of the bolts is 25 Nm.
Secure the filler neck with two bolts. Tightening torque 10 Nm.
Connect the ground jumper.
Install: rear wheel.
Lower the car.
Tighten the wheel mounting bolts crosswise. Tightening torque 110 Nm.
Connect the fuel hoses and secure them with clamps. Connect the electrical wires.
Install the fuel level sensor cover.
Fill the fuel tank with fuel and check for leaks.
Connect the ground wire to the battery.
Check the operation of the fuel level sensor.
Visitor comments