
English Русский
Български
Беларускі
Український
Српски
Hrvatski
Română
Polski
Slovenský
Magyar
  |  Articles  |  Sitemap  |  Contacts  |    |
Car maintenance Ford Car maintenance Hyundai Car maintenance Chevrolet Car maintenance BMW Car maintenance Audi Car maintenance Opel Car maintenance AvtoVAZ
VWmanual.ru


Main   Passat   Golf   Polo   Touareg   Tiguan   Sharan   Transporter   Others  
Tiguan 1 (2007-2015)

Removal and installation the generator (2.0L TDI engine) (VW Tiguan 1)

  • Main
  • Tiguan
  • Tiguan 1
  • Electrical equipment
  • Power devices
  • Removal and installation the generator (2.0L TDI engine)
            0


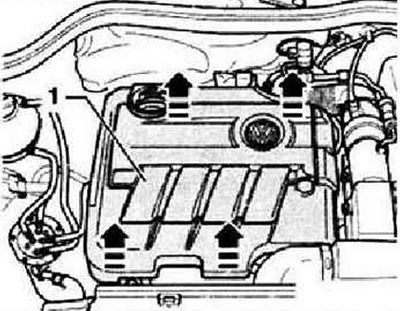
Disconnect the battery. Pull up and remove the engine cover "arrows".

Disconnect the battery. Pull up and remove the engine cover «arrows».


Caution: Before removing, mark the direction of travel and the upper side of the new belt with the velcro. When installing, observe the correct direction of travel and the position of the belt sides. Changing the direction of travel or the sides of a previously used poly V-belt will damage it!


Remove the poly V-belt. Unscrew both mounting screws "1" and the mounting nut "2" of the fuel filter "3" and set them aside. The fuel hoses can remain connected.
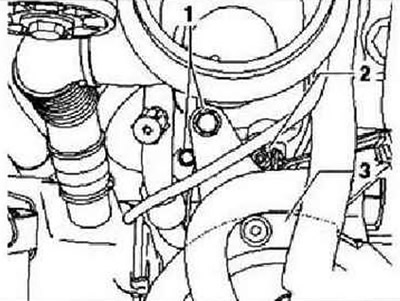
Remove the poly V-belt. Unscrew both mounting screws «1» and the mounting nut «2» of the fuel…


Unscrew both mounting bolts of the air conditioning compressor "arrow".
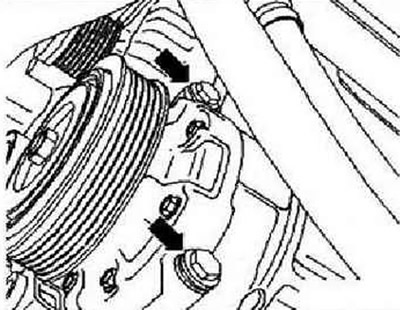
Unscrew both mounting bolts of the air conditioning compressor «arrow».


Unlock and disconnect plug connector "1". Unscrew the third mounting bolt "arrow" and remove the compressor from the bracket of additional units from below.
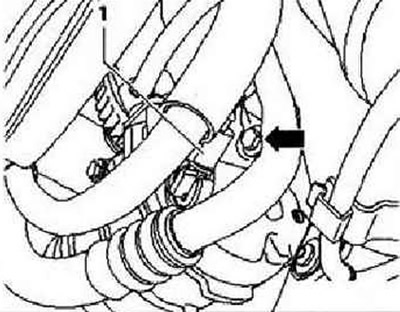


Unlock and disconnect plug connector «1». Unscrew the third mounting bolt «arrow» and remove the…


Instructions: The air conditioning compressor hoses can remain connected. Secure the compressor "3" before installation using the binding wire "1" in a suitable place under the car. Make sure that the hoses "2" do not stretch or bend.
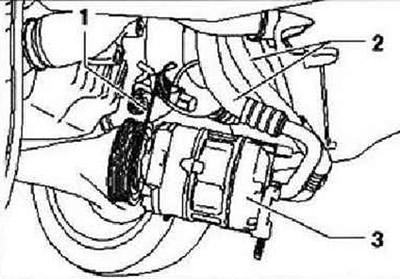

Instructions: The air conditioning compressor hoses can remain connected. Secure the compressor «3»…


Unlock and disconnect the shunt wire plug connector "1". Remove the protective cap "2".
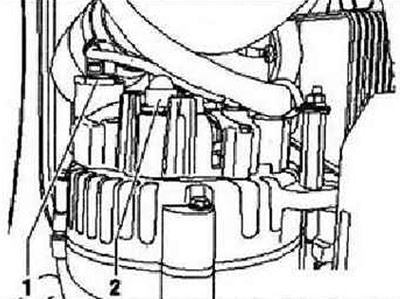
Unlock and disconnect the shunt wire plug connector «1». Remove the protective cap «2».


Unscrew the fastening nut -1- and remove the B+ wire located behind it from the generator connecting thread. Unscrew the fastening nut "3" and remove the wire holder "2" from the generator.
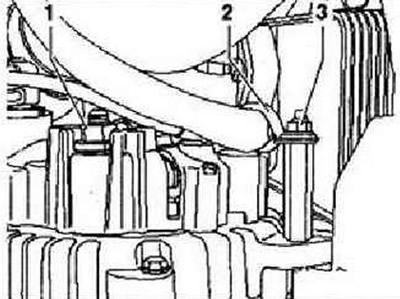

Unscrew the fastening nut -1- and remove the B+ wire located behind it from the generator…


Unscrew the generator mounting bolts "arrows". Remove the generator from the engine compartment from below.
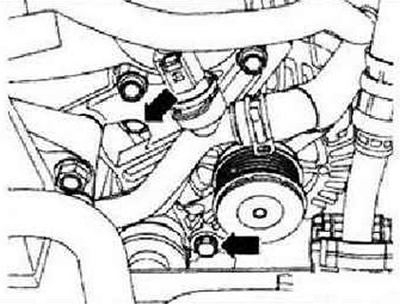
Unscrew the generator mounting bolts «arrows». Remove the generator from the engine compartment…


Installation is in reverse order, taking into account the following.

Caution: When installing a previously used poly V-belt, observe the direction of movement marked during removal! Before installing the poly V-belt, ensure that all units (generator, air conditioning compressor, vane pump) were securely installed. When laying the belt, observe the correct position of the poly V-belt on the pulleys!


Carefully knock out the threaded bushings "A" approximately 4 mm in the direction of the arrow from the generator housing.
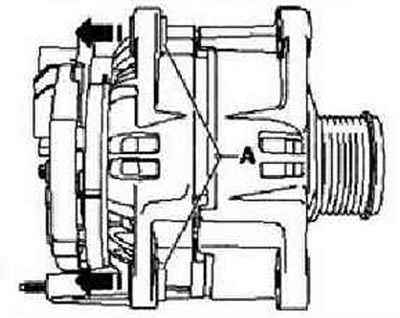
Carefully knock out the threaded bushings «A» approximately 4 mm in the direction of the arrow from…


Screw the "arrow" wire holder onto the back of the generator at the 3 o'clock position.
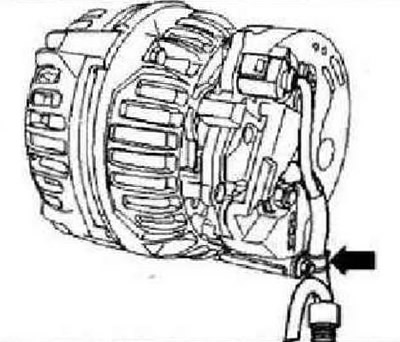
Screw the «arrow» wire holder onto the back of the generator at the 3 o'clock position.


Tighten the threaded connections to the specified tightening torques. Connect the battery. Start the engine and check the belt movement. Turn off the engine.

This article is available at russian, bulgarian, belarusian, ukrainian, serbian, croatian, romanian, polish, slovak, hungarian
The text has been checked: Tarasov Ivan

Share information:

Previous articles
Generator (2.0 l TDI engine)
Removal and installation the generator (1.4 l TSI engine)
Generator (1.4L TSI engine)
Starter (cars with 2.0 l TDI engines and AQ450 automatic transmission)
Starter (cars with 2.0 l TDI engines and MQ500 manual transmission)
Starter (cars with 1.4 l TSI engines and MQ500 manual transmission)
Next articles
Generator (2.0L TSI engine)
Removal and installation the generator (2.0L TSI engine)


Similar articles from other manuals for VW cars:
Removal and installation of a three-phase generator (1.6L engine… Passat B6 (2005-2010)
Generator, starter, ignition switch if there is a VR6 engine Golf 3 (1991-1997)
Starting the engine from an auxiliary battery Polo 3 (1995-2003)
Removal and installation of a three-phase generator, 6-cyl.… Touareg 1 (2002-2006)
Checking the engine oil level and replacing it Sharan 1 (1995-2000)
Starting the engine from another source Transporter T4 (1990-2003)
Generator — removal and installation (models with a 2.4 l engine) LT 28 (1975-1991)
Link to this page in different formats


Visitor comments


No comments yet


How much will 43 + 42 =


Tiguan 1 
  • General information
  • Characteristics
  • Vehicle overview
  • Power unit
  • Petrol engine 1.4 BWK
  • Petrol engine 1.4 CAVA
  • Engine 2.0 (petrol)
  • Engine 2.0 (diesel)
  • Transmission
  • 6-speed manual gearbox 0A6
  • 6-speed automatic gearbox 09M
  • Drive shafts
  • Chassis
  • Front suspension
  • Rear suspension (2x4)
  • Rear suspension (4x4)
  • Air suspension
  • Wheels and rims
  • Brake system
  • Steering gear
  • Body
  • External equipment
  • Internal equipment
  • Electrical equipment
  • Power devices
  • Appliances and lighting
  • Communication systems
  • Heating and air conditioning
  • Electrical circuits
VWmanual.ru © 2016-2026 | Mobile version | News and articles | Sitemap: EN BG BY UA RS HR RO PL SK HU | Write message | Site search
Passat B2 • Passat B3 • Passat B4 • Passat B5 • Passat B6 • Golf 1, diesel • Golf 1, petrol • Golf 2, petrol • Golf 2 • Golf 3 • Golf 4 • Golf 5 • Polo 3 • Polo 4 • Touareg 1 • Tiguan 1 • Sharan 1 • Transporter T3 • Transporter T4 • LT 28 • LT 2D • Beetle • Caddy 3 •
Our website uses cookies to ensure functionality and convenience.