



Contents: VR6 Engine ↓ Two-liter engine ↓
Oil filters are used to clean the oil from mechanical impurities. They should be replaced either in accordance with the recommendations provided in the vehicle's operating manual or at each engine repair and maintenance.
VR6 Engine
The VR6 engine oil filter differs from the commonly used oil filters. It is detachable and consists of a filter housing and a removable filter element located inside the housing. Servicing the oil filter is performed in the following order:
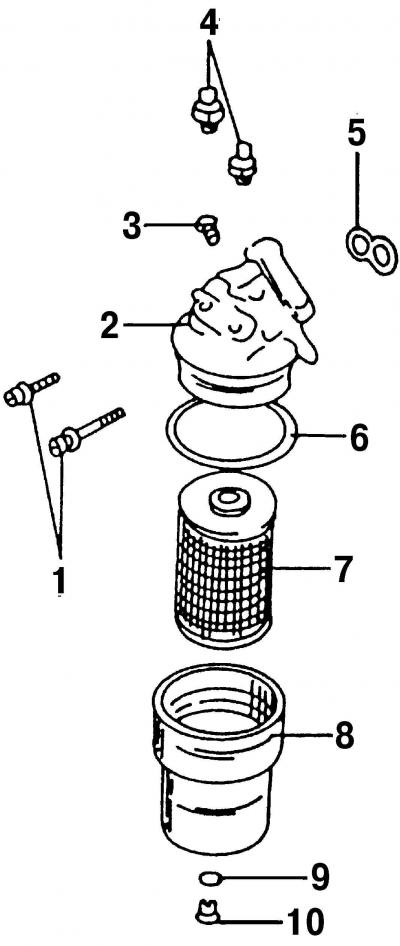
Fig. 173. VR6 engine oil filter parts: 1 - bolts, 25 Nm; 2 - filter base; 3 - oil temperature sensor; 4 - oil pressure switch; 5 - gasket, always replaceable; 6 - O-ring seal; 7 - filter element; 8 - filter housing; 9 - sealing ring; 10 - bolt, 15 Nm
- place a container under the car, namely under the oil filter, unscrew bolt 10 (Fig. 173) on the bottom surface of the filter and remove sealing ring 9, which is always replaced with a new one during assembly. Let the oil drain out;
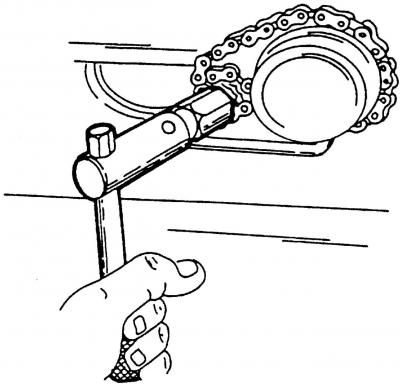
Fig. 174. Special key for removing the oil filter
- using a special key (Fig. 174) unscrew the filter;
- remove housing 8 and extract filter element 7 from it (Fig. 173);
- wash the inside surface of the filter housing with gasoline;
- insert a new sealing ring 9 into the groove of the filter base and install the filter housing with the filter element 7 inserted and screw on the oil filter housing;
- tighten bolt 10 into the lower surface of the filter housing with a new sealing ring and tighten to a torque of 15 Nm;
- if you only removed the oil filter, then add at least 0.5 l of engine oil;
- if you also need to replace the engine oil, the total amount of oil to be poured should be 5.5 liters;
- after starting the engine, check the oil level and add oil to the engine if necessary;
- start the engine and after a while check the oil level (top up if necessary) and are there any oil leaks?;
- if the double gasket 5 was removed (Fig. 173) (before removing, remember its location), then the gasket should always be replaced with a new one;
- the filter base mounting bolts are tightened to a torque of 25 Nm.
Two-liter engine
The oil filter should be replaced either in accordance with the recommendations in the vehicle's operating manual or whenever engine repairs and maintenance are performed. When removing the filter, use a special oil filter wrench (Fig. 174) or poke a screwdriver through the side of the filter housing and use it as a lever to unscrew the filter (the filter should still be replaced with a new one).
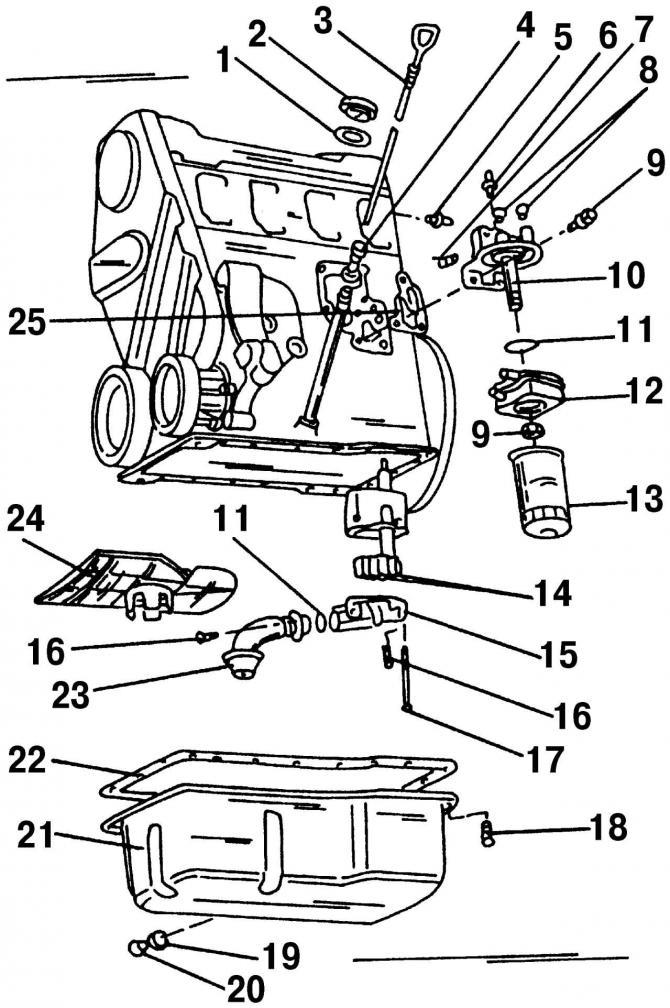
Fig. 166. Lubrication system of the 2.0-liter engine: 1 - gasket, replace with a new one; 2 - oil filler cap; 3 - dipstick for checking the oil level; 4 - oil level dipstick guide tube; 5 - 25 kPa oil pressure switch; 6 - oil pressure switch 180 kPa; 7 - check valve, 5 Nm; 8 - plugs; 9 - nut, 25 Nm; 10 - oil filter base; 11 - O-ring, always replaceable; 12 - oil radiator; 13 - oil filter; 14 - oil pump gear; 15 - oil pump cover with pressure reducing valve; 16 - bolt, 10 Nm; 17 - bolt, 20 Nm; 18 - oil pan mounting bolt; 19 - sealing ring, replace; 20 - Oil drain plug; 21 - oil pan; 22 - gasket, replace with a new one; 23 - oil receiver; 24 - oil guide shield; 25 - gasket, replace with a new one
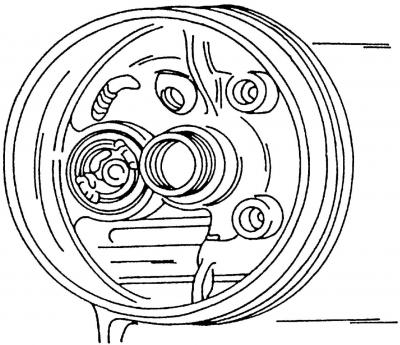
Fig. 175. View of the filter base from the inside. The safety valve is located on the left side
(The original can be seen on the portal vwmanual)
If the filter base 10 (Fig. 166) is removed from the engine, then during assembly a new sealing ring should be installed and the filter base nut 9 should be tightened to a torque of 25 N·m. Do not apply any lubricant to the sealing ring. The inside view of the filter base is shown in Fig. 175.
Recommendations for installing the oil filter are written on the sticker on the filter housing. Always install a new rubber sealing ring on the filter, which should be lubricated with engine oil around the perimeter. Screw in the new oil filter by hand, without using any tool to tighten it. Finally, check the oil level and add oil to the engine if necessary.
Visitor comments