
English Русский
Български
Беларускі
Український
Српски
Hrvatski
Română
Polski
Slovenský
Magyar
  |  Articles  |  Sitemap  |  Contacts  |    |
Car maintenance Ford Car maintenance Hyundai Car maintenance Chevrolet Car maintenance BMW Car maintenance Audi Car maintenance Opel Car maintenance AvtoVAZ
VWmanual.ru


Main   Passat   Golf   Polo   Touareg   Tiguan   Sharan   Transporter   Others  
LT 28 (1975-1991) LT 2D (1996-2003) Beetle (1960-1986) Caddy 3 (2003-2010)

Axle shafts and bearings (LT 35, 40, 45) — removal, disassembly and installation (VW Lt 28)

  • Main
  • Volkswagen
  • LT 28
  • Transmission
  • Rear axle
  • Axle shafts and bearings (LT 35, 40, 45) — removal, disassembly and installation
            0


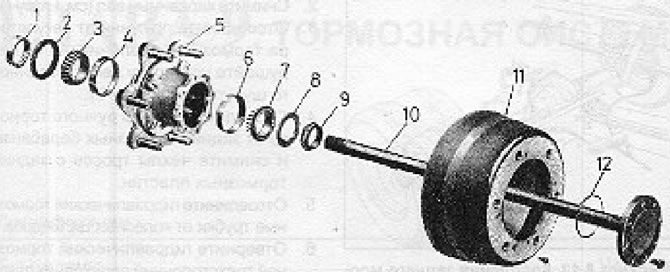
Figure 8.9. Axle shaft components (LT 35, 40, 45) (Section 5): 1 - Gasket sleeve; 2 - Seal; 3 -…

Figure 8.9. Axle shaft components (LT 35, 40, 45) (Section 5): 1 - Gasket sleeve; 2 - Seal; 3 - Inner bearing; 4 - Outer bearing race; 5 - Hub; 6 - Outer bearing race; 7 - Outer bearing; 8 - Thrust washer; 9 - Adjusting nut; 10 - Axle axle; 11 - Brake drum; 12 - O-ring.


1. If you only need to remove the axle shaft, this can be done without removing the wheel and brake drum (see points 3 and 4).

2. If the axle bearing needs to be replaced, the wheel and brake drum must first be removed.

3. Remove the wheel.

4. Loosen the mounting screw and remove the brake drum. If it is tight, screw four M10 x 40 bolts into the special threaded holes to make it easier to remove. If it still gets stuck, loosen the adjuster by inserting a screwdriver through the hole in the back plate.
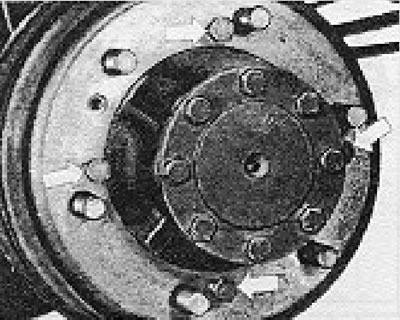
Figure 8.10. Bolts (indicated by arrows) to remove the brake drum (LT 35, 40, 45) (Section 5).

Figure 8.10. Bolts (indicated by arrows) to remove the brake drum (LT 35, 40, 45) (Section 5).


5. Loosen and remove the axle flange bolts and remove the axle shaft from the housing. Be prepared for some oil to spill.

6. Using a larger wrench, loosen and remove the bearing adjusting nut. Remove the thrust washer.
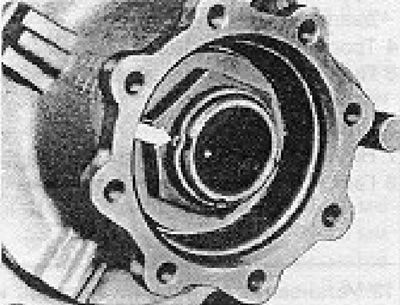
Figure 8.11. Bearing adjusting nut inserted into place (Section 5).

Figure 8.11. Bearing adjusting nut inserted into place (Section 5).


7. Remove the hub from the axle shaft, together with the outer and inner bearings and oil seal.

8. Check the sealing sleeve on the casing for damage. If they are obvious, remove it and install a new one in its place using a piece of tubing.

9. Remove the old seal from the hub and remove the bearing rollers.

10. Tap both outer bearing races using a steel or copper punch.

11. Install the bearing races, inner roller housing and new oil seal. Tap the seal into place until it is flush with the end of the hub.

12. Fill the hub half full with multi-purpose grease.

13. Install the hub onto the axle shaft and insert the outer bearing.

14. Install the thrust washer and tighten the nut. If this nut has already been used twice, replace it.

15. Turn the hub and tighten the nut by hand until the axial play disappears.

16. Insert the nut into the groove of the casing without changing the adjusted position.


17. Check that the O-ring is in good condition and if not, replace it.

18. Insert the axle shaft into the housing. Hold it horizontally, turning it slightly until it aligns with the splines of the differential gear, then push it fully into place.

19. Replace the flange bolts and tighten them to the required torque.

20. Install the brake drum and wheel. Check the rear axle oil level and top it up if necessary.

21. Adjust the brakes if you removed or loosened the adjuster during disassembly.

This article is available at russian, bulgarian, belarusian, ukrainian, serbian, croatian, romanian, polish, slovak, hungarian
The text has been checked: Kolesnikov Artem

Share information:

Previous articles
Axle shafts and bearings (LT 28, 31) — removal, disassembly and installation
Gear oil seal replacement
Rear axle maintenance
Rear axle specifications and description
Next articles
Rear axle — removal and installation
Troubleshooting — rear axle
Breathing valve — modification since november 1984.


Similar articles from other manuals for VW cars:
Replacing the bearings of the reverse intermediate gear axle Passat B4 (1988-1996)
Troubleshooting axle shafts Golf 1 (1974-1984, diesel)
Constant velocity joint axle shafts Polo 3 (1995-2003)
Checking the oil level in the main gear of the front axle Touareg 1 (2002-2006)
Removal and installation of the drive shaft with an internal… Tiguan 1 (2007-2015)
Wheel Drive Shafts — Design Description Sharan 1 (1995-2000)
Bottom protection and preservation of axle shafts Transporter T4 (1990-2003)
Link to this page in different formats


Visitor comments


No comments yet


How much will 35 + 31 =


Caddy 3 
  • General information
  • User manual
  • Daily care
  • Maintenance
  • Petrol engines 1.4 l
  • Engine repair
  • Cooling and lubrication system
  • Power and exhaust system
  • Petrol engines 1.6 l
  • Engine repair
  • Cooling and lubrication system
  • Power and exhaust system
  • Diesel engines
  • Engine repair
  • Cooling and lubrication system
  • Power and exhaust system
  • Transmission
  • Mechanical gearbox 0AH
  • Mechanical gearbox 0A4
  • Drive shafts
  • Chassis
  • Car suspension
  • Steering
  • Brake system
  • Body and wiring diagrams
  • Interior and exterior
  • Electrical circuits
Beetle 
  • General information
  • Maintenance
  • Power unit
  • Engine repair
  • Cooling and lubrication system
  • Supply system
  • Exhaust system
  • Transmission
  • Clutch
  • Car gearbox
  • Chassis
  • Front suspension
  • Rear suspension
  • Steering
  • Brake system
  • Wheels and tires
  • Body
  • Exterior
  • Electrical equipment
  • Equipment and devices
  • Power devices
  • Electrical circuits
LT 2D 
  • General information
  • User manual
  • Maintenance
  • Power unit
  • Petrol engines 2.3 l
  • Diesel engines 2.5 l
  • Diesel engines 2.8 l
  • Injection system (diesel 2.8 l)
  • Transmission
  • Clutch
  • Manual gearbox
  • Differential
  • Chassis
  • Car suspension
  • Steering system
  • Brake system
  • Body
  • Body elements
  • Heating system
  • Electrical equipment
  • Equipment and devices
  • Electrical circuits
LT 28 
  • General information
  • Maintenance
  • Power unit
  • Petrol engines 2.0L
  • Petrol engines 2.4L
  • Diesel engines
  • Cooling and heating
  • Fuel and exhaust system
  • Ignition system
  • Transmission
  • Clutch
  • Car gearbox
  • Cardan shaft
  • Rear axle
  • Chassis
  • Brake system
  • Car suspension
  • Steering system
  • Body
  • Body elements
  • Doors, locks and windows
  • Electrical equipment
  • Power devices
  • Equipment and devices
  • Electrical circuits
VWmanual.ru © 2016-2026 | Mobile version | News and articles | Sitemap: EN BG BY UA RS HR RO PL SK HU | Write message | Site search
Passat B2 • Passat B3 • Passat B4 • Passat B5 • Passat B6 • Golf 1, diesel • Golf 1, petrol • Golf 2, petrol • Golf 2 • Golf 3 • Golf 4 • Golf 5 • Polo 3 • Polo 4 • Touareg 1 • Tiguan 1 • Sharan 1 • Transporter T3 • Transporter T4 • LT 28 • LT 2D • Beetle • Caddy 3 •
Our website uses cookies to ensure functionality and convenience.