



Contents: Removal ↓ Installing a radiator ↓
Removal
Disconnect the ground cable from the battery.
Disconnect the wire connectors from the radiator fan and the fan thermal switch on the side radiator tank.
If there is an oil cooler on the right side of the radiator, separate it from the radiator and place it on the engine without disconnecting the hoses from the cooler.
Disconnect the lower radiator hose and drain the cooling system as described earlier. Disconnect the upper radiator hose.
If there is a separate expansion tank, disconnect the expansion tank hose from the radiator (figure E:2).
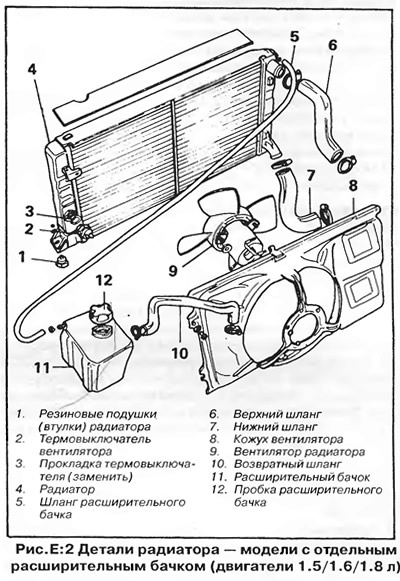
Remove the nuts securing the bottom of the radiator to the rubber grommets on each side. Raise the radiator slightly and slide the clamps securing the top of the radiator to the front panel to the sides.
Remove the radiator from the vehicle along with the fan and its shroud.
If necessary, remove the radiator shroud and fan.
From January 1981 onwards, radiators with core lengths of 430 mm and 525 mm were secured at the bottom with guide pins and rubber pads and at the top with two brackets secured with screws.
Installing a radiator
Install the radiator in reverse order. Please note the following:
- a) When replacing the radiator, transfer the fan thermal switch to the new radiator, replacing its gasket.
- b) Check the condition of the rubber cushions (bushings) of the lower radiator mount; replace the cushions if necessary.
- c) Check the condition of the radiator hoses, replace the hoses if necessary. Also check the condition of the clamps.
- d) Fill the cooling system, connect the fan and thermal switch wires and the ground to the battery.
- d) Start the engine and warm it up to operating temperature. Check the system for leaks.
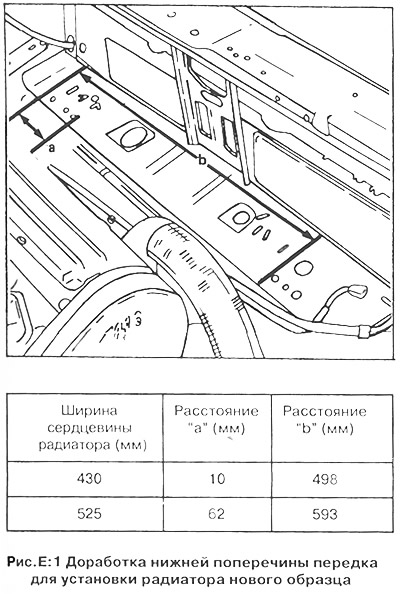
When installing a new-style radiator on an early-model car, it is necessary to modify the upper and lower front cross members (see figure E:1). Mark the distances "A" and "B" on the lower cross member (depending on the radiator length - see Figure E:1) and drill two holes with a diameter of 11.5 mm closer to the rear edge of the cross member. Install the inserts in the cross member. Transfer the thermal switch with a new gasket, the shroud and the radiator fan to the new radiator. Put the rubber pads on the radiator guide pins and install the radiator in the holes in the lower cross member. Attach the upper radiator mounting brackets in place, drill two holes with a diameter of 6 5 mm in the upper front cross member and secure the upper part of the radiator with bolts, nuts and spring washers.
Visitor comments