
English Русский
Български
Беларускі
Український
Српски
Hrvatski
Română
Polski
Slovenský
Magyar
  |  Articles  |  Sitemap  |  Contacts  |    |
Car maintenance Ford Car maintenance Hyundai Car maintenance Chevrolet Car maintenance BMW Car maintenance Audi Car maintenance Opel Car maintenance AvtoVAZ
VWmanual.ru


Main   Passat   Golf   Polo   Touareg   Tiguan   Sharan   Transporter   Others  
LT 28 (1975-1991) LT 2D (1996-2003) Beetle (1960-1986) Caddy 3 (2003-2010)

Breaker contacts — replacement (VW Lt 28)

  • Main
  • Volkswagen
  • LT 28
  • Power unit
  • Ignition system
  • Breaker contacts — replacement
            0


1. With the regularity specified in the section "Routine maintenance" at the beginning of this Manual, the breaker contacts should be replaced.

2. Remove the engine cover.

3. Release the spring clips, remove the distributor cap and fold it to the side. Remove the runner.
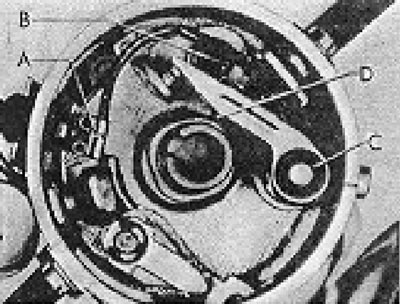
Figure 4.1. Distributor with cover removed (section 2): A - Low voltage terminal; B - Contact…

Figure 4.1. Distributor with cover removed (section 2): A - Low voltage terminal; B - Contact breaker screw; C - Pivot axis of the movable contact lever; D - Plastic back of the lever.


4. Disconnect the wire from the low voltage terminal.

5. Pull out and remove the screw securing the breaker's movable contact lever to the support plate.

6. Remove the contacts from the distributor.

7. Wipe the inside of the distributor and its cover to remove accumulated oil and dirt. Check the condition of the central carbon and the electrodes on the distributor cap. Inspect the distributor cap for cracks. If there are any defects, the cover must be replaced.

8. Install the new breaker contacts without tightening the retaining screw yet.

(The article is posted on the portal www.VWmanual.ru)

9. Turn the crankshaft so that the plastic back of the sliding contact lever is centered on one of the distributor cam protrusions.


10. Adjust the gap between the breaker contacts to the required value by appropriately moving the movable contact, which has a special slot for a screwdriver. This adjustment is basic and is necessary to be able to start the engine. The final adjustment of the gap between the contacts must be made using a device for measuring the angle of the closed state of the contacts (see section 3).
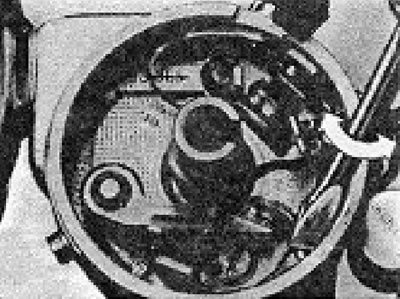
Figure 4.2. Adjusting the gap between the breaker contacts using a screwdriver.

Figure 4.2. Adjusting the gap between the breaker contacts using a screwdriver.


11. Place 2 drops of engine oil on the felt pad at the top of the distributor shaft and one drop of oil on the pivot pin of the sliding contact lever. Apply a small amount of high temperature grease to the cam lobes.

12. Install the rotor and distributor cap in place.

This article is available at russian, bulgarian, belarusian, ukrainian, serbian, croatian, romanian, polish, slovak, hungarian
The text has been checked: Kolesnikov Artem

Share information:

Previous articles
General description of the ignition system
Ignition system specifications
Next articles
Contact closing angle — checking and adjustment
Ignition timing adjustment
Capacitor — removal, inspection and installation
Distributor — removal and installation
Distributor — bulkhead
Ignition coil — general information


Similar articles from other manuals for VW cars:
Repair of contacts in connector housings Passat B6 (2005-2010)
Checking the breaker contacts Golf 2 (1984-1993, petrol)
Location of instrument cluster connector contacts Touareg 1 (2002-2006)
Link to this page in different formats


Visitor comments


No comments yet


How much will 10 + 22 =


Caddy 3 
  • General information
  • User manual
  • Daily care
  • Maintenance
  • Petrol engines 1.4 l
  • Engine repair
  • Cooling and lubrication system
  • Power and exhaust system
  • Petrol engines 1.6 l
  • Engine repair
  • Cooling and lubrication system
  • Power and exhaust system
  • Diesel engines
  • Engine repair
  • Cooling and lubrication system
  • Power and exhaust system
  • Transmission
  • Mechanical gearbox 0AH
  • Mechanical gearbox 0A4
  • Drive shafts
  • Chassis
  • Car suspension
  • Steering
  • Brake system
  • Body and wiring diagrams
  • Interior and exterior
  • Electrical circuits
Beetle 
  • General information
  • Maintenance
  • Power unit
  • Engine repair
  • Cooling and lubrication system
  • Supply system
  • Exhaust system
  • Transmission
  • Clutch
  • Car gearbox
  • Chassis
  • Front suspension
  • Rear suspension
  • Steering
  • Brake system
  • Wheels and tires
  • Body
  • Exterior
  • Electrical equipment
  • Equipment and devices
  • Power devices
  • Electrical circuits
LT 2D 
  • General information
  • User manual
  • Maintenance
  • Power unit
  • Petrol engines 2.3 l
  • Diesel engines 2.5 l
  • Diesel engines 2.8 l
  • Injection system (diesel 2.8 l)
  • Transmission
  • Clutch
  • Manual gearbox
  • Differential
  • Chassis
  • Car suspension
  • Steering system
  • Brake system
  • Body
  • Body elements
  • Heating system
  • Electrical equipment
  • Equipment and devices
  • Electrical circuits
LT 28 
  • General information
  • Maintenance
  • Power unit
  • Petrol engines 2.0L
  • Petrol engines 2.4L
  • Diesel engines
  • Cooling and heating
  • Fuel and exhaust system
  • Ignition system
  • Transmission
  • Clutch
  • Car gearbox
  • Cardan shaft
  • Rear axle
  • Chassis
  • Brake system
  • Car suspension
  • Steering system
  • Body
  • Body elements
  • Doors, locks and windows
  • Electrical equipment
  • Power devices
  • Equipment and devices
  • Electrical circuits
VWmanual.ru © 2016-2026 | Mobile version | News and articles | Sitemap: EN BG BY UA RS HR RO PL SK HU | Write message | Site search
Passat B2 • Passat B3 • Passat B4 • Passat B5 • Passat B6 • Golf 1, diesel • Golf 1, petrol • Golf 2, petrol • Golf 2 • Golf 3 • Golf 4 • Golf 5 • Polo 3 • Polo 4 • Touareg 1 • Tiguan 1 • Sharan 1 • Transporter T3 • Transporter T4 • LT 28 • LT 2D • Beetle • Caddy 3 •
Our website uses cookies to ensure functionality and convenience.