

English Русский
Български
Беларускі
Український
Српски
Hrvatski
Română
Polski
Slovenský
Magyar
  |  Articles  |  Sitemap  |  Contacts  |    |
Car maintenance Ford Car maintenance Hyundai Car maintenance Chevrolet Car maintenance BMW Car maintenance Audi Car maintenance Opel Car maintenance AvtoVAZ
VWmanual.ru


Main   Passat   Golf   Polo   Touareg   Tiguan   Sharan   Transporter   Others  
Polo 3 (1995-2003) Polo 4 (2001-2009)

Checking the coolant temperature sensor (VW Polo 3)

  • Main
  • Polo
  • Polo 3
  • Power unit
  • Petrol engines 1.6 and 1.8
  • Checking the coolant temperature sensor
            0


Contents: Continue testing at 240 or -50°C ↓ Continue testing at 0 or 130°C ↓
1. Connect the VAG 1551 tester and dial "01" to select the "Address word" function of the engine control unit. The engine should be idling. The display should show the following information:

1. Connect the VAG 1551 tester and dial «01» to select the «Address word» function of the engine…

2. Press "08" to select the "Read measured value block" function and confirm by pressing the "Q" button. The display should show the following information:

2. Press «08» to select the «Read measured value block» function and confirm by pressing the «Q»…

3. Press "001" to select the "Display Group 1" function and press "Q". The display should show the following information:

3. Press «001» to select the «Display Group 1» function and press «Q». The display should show the…

4. Read the incoming air temperature in field 2 of the display.
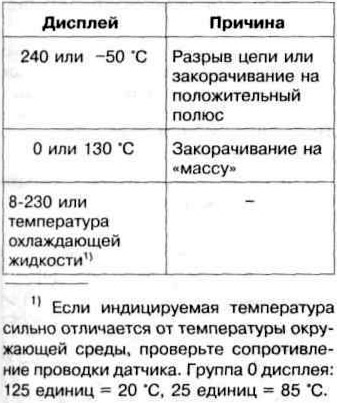


4. Read the incoming air temperature in field 2 of the display.

11 If the displayed temperature differs greatly from the ambient temperature, check the resistance of the sensor wiring. Display group 0: 125 units = 20°C, 25 units = 85°C.

(View the original article on the resource VWmanual.ru)

Continue testing at 240 or -50°C


5. Disconnect the four-pin connector of wiring 1 from the coolant temperature sensor (Fig. 5.48).
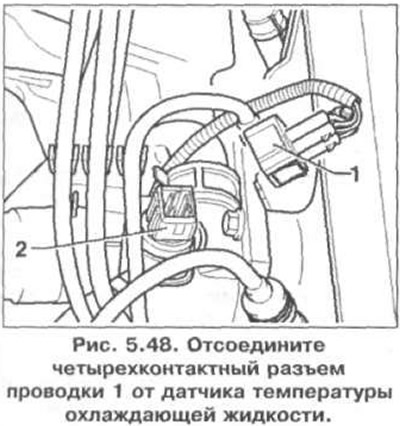
5. Disconnect the four-pin connector of wiring 1 from the coolant temperature sensor (Fig. 5.48).


6. Shunt contacts 1 and 3 of the wiring connector using auxiliary wires from the VAG 1594 tester and observe the readings on the display.

7. Display shows 0 or 130°C: replace the coolant temperature sensor.
8. The display shows 240 or -50°C:
  • press "→";
  • press "06" to select the "Complete Output" function and confirm by pressing the "Q" button;
  • turn off the ignition;
  • connect the VAG 1598/18 tester to the engine control unit wiring harness;
  • check the wire between the tester and the connector for an open circuit: socket 42 of the tester and contact 4 of the four-pin wiring connector (fig. 5.45). Specified value: max. 1.5 Ohm.
  • check the wires for short circuit to positive. Specified value: ∞ Ohms.
  • check the wire between the tester and the connector for continuity: socket 17 of the tester and contact 1 of the four-pin wiring connector. Specified value: max. 1.5 ohms.

9. If no fault is found in the wires, then replace the engine control unit.


Continue testing at 0 or 130°C


10. Disconnect the four-pin wiring connector 1 from the coolant temperature sensor 2 (Fig. 5.49).
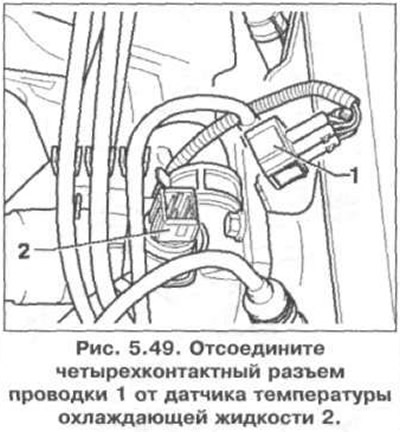
10. Disconnect the four-pin wiring connector 1 from the coolant temperature sensor 2 (Fig. 5.49).


11. The display shows 240 or -50 'C: replace the coolant temperature sensor.
12. The display shows 0 or 130°C:
  • press "→"
  • press "06" to select the "Complete Output" function and confirm by pressing the "Q" button;
  • turn off the ignition;
  • disconnect the wiring connector from the engine control unit;
  • check the wire to contact 3 of the four-pin connector of the engine control unit wiring for a short to contact 1 of the wire and to ground. Specified value: ∞ Ohms.

13. If no fault is found in the wires, then replace the engine control unit.

This article is available at russian, bulgarian, belarusian, ukrainian, serbian, croatian, romanian, polish, slovak, hungarian
The text has been checked: Kolesnikov Artem

Share information:

Previous articles
Checking the engine operating modes
Checking the Oxygen Sensor Heater
Checking the oxygen sensor and lambda control
Reading the measured value block and basic settings
Clearing fault memory
Querying fault memory
Next articles
Checking the injector
Checking the inlet air temperature sensor
Installing the ignition distributor
Checking and adjusting the ignition timing angle
Checking the Hall sensor
Checking the ignition coil


Similar articles from other manuals for VW cars:
Checking the coolant temperature sensor Passat B4 (1988-1996)
Coolant temperature sensor Golf 1 (1974-1984, petrol)
Checking the oil pressure sensor (petrol engine) Touareg 1 (2002-2006)
Removal and installation coolant temperature sensor G62 Tiguan 1 (2007-2015)
Checking the temperature sensor of a remote thermometer Sharan 1 (1995-2000)
Removal and installation the coolant temperature gauge sensor Transporter T3 (1979-1992)
Checking the coolant temperature sensor LT 2D (1996-2003)
Link to this page in different formats


Visitor comments


No comments yet


How much will 17 + 48 =


Polo 4 
  • General information
  • User manual
  • Maintenance
  • Power unit
  • Engine repair
  • Cooling and lubrication system
  • Control system
  • Injection system (diesel)
  • Supply system
  • Exhaust system
  • Chassis
  • Front suspension
  • Rear suspension
  • Steering
  • Wheels and tires
  • Brake system
  • Body
  • Interior
  • Exterior
  • Electrical equipment
  • Equipment and devices
  • Wiper system
  • Lighting system
  • Electrical circuits
Polo 3 
  • General information
  • User manual
  • Maintenance
  • Power unit
  • Petrol engines 1.4 and 1.6
  • Petrol engines 1.4 (V16)
  • Petrol engines 1.6 and 1.8
  • Diesel engines 1.7 and 1.9
  • Diesel engines 1.9 D and TD
  • Transmission
  • Mechanical gearbox 085
  • Mechanical gearbox 020/02K
  • Chassis
  • Front suspension
  • Rear suspension
  • Steering
  • Brake system
  • Body
  • Exterior
  • Interior
  • Electrical equipment
  • Equipment and instruments (until 2000)
  • Equipment and instruments (after 2000)
  • Electrical circuits
  • Wiring diagrams (petrol)
  • Wiring diagrams (diesel)
VWmanual.ru © 2016-2026 | Mobile version | News and articles | Sitemap: EN BG BY UA RS HR RO PL SK HU | Write message | Site search
Passat B2 • Passat B3 • Passat B4 • Passat B5 • Passat B6 • Golf 1, diesel • Golf 1, petrol • Golf 2, petrol • Golf 2 • Golf 3 • Golf 4 • Golf 5 • Polo 3 • Polo 4 • Touareg 1 • Tiguan 1 • Sharan 1 • Transporter T3 • Transporter T4 • LT 28 • LT 2D • Beetle • Caddy 3 •
Our website uses cookies to ensure functionality and convenience.