
Checking for voltage and resistance
1. Check Hall sensor.
2. Disconnect the plug from the cold start valve.
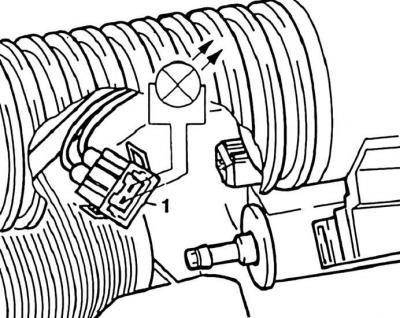
3. Check for voltage at all injection valves. To do this, connect the LED indicator to the plug (1). Turn on starter. The LEDs should flash.
4. If the LEDs are lit without flashing, replace the ground wire (-) from the battery to the gearbox and the Digifant control unit.
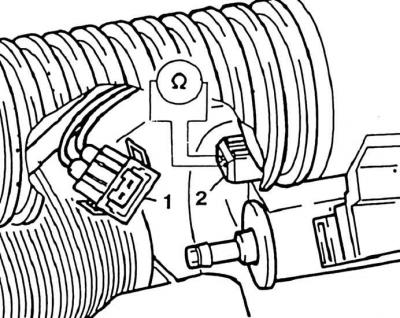
5. The LEDs do not blink or light up. Connect plug (1) to plug connection (2).
6. Find and repair an open in the wiring between the valves and the control unit. Check the electrical part of the injection system at the service station. The control unit may need to be replaced.
7. If the ignition is on, turn it off.
8. Check the resistance of all injection valves at the connection (2). For required value, see subsection 2.18.8.
Attention! If the measured resistance does not correspond to the required value, then with a 4-cylinder engine, the number of faulty injection valves can be determined from the measured value. On a 5-cylinder engine, the resistance on each injection valve must be measured. Required value: 15-20 ohms.
9. If necessary, replace the defective injection valve.
Checking the jet shape and tightness
1. Disconnect the plug from the cold start valve.
2. Remove injection valves.
3. Disconnect the supply and return lines at the fuel distributor.
4. Direct valve outlet to suitable containers.
Attention! Protect eyes from fuel splashes.
5. Disconnect the blue plug (arrow) temperature sensor on the coolant pipe.
6. Connect a resistance of 15 ohms to the contacts of the temperature sensor plug.
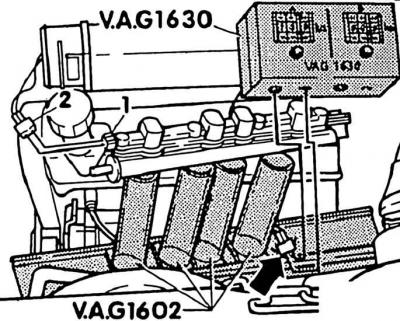
7. injection valve plug (2), using additional wires, connect to the contacts (1) fuel distributor.
8. Engage the starter for a few seconds (assistant), while comparing the jet shapes of the injection valves with each other. The jet of fuel should be cone-shaped and look the same on all valves.
9. Install valves.
Attention! The use of household detergents is unacceptable. To prevent damage to the washer pump.
10. When connecting the valves, make sure that the rings are not damaged. Check sealing ring for damage, replace if necessary. Lubricate the O-ring with fuel before installation.
Visitor comments