English Русский
Български
Беларускі
Український
Српски
Hrvatski
Română
Polski
Slovenský
Magyar
  |  Articles  |  Sitemap  |  Contacts  |    |
Car maintenance Ford Car maintenance Hyundai Car maintenance Chevrolet Car maintenance BMW Car maintenance Audi Car maintenance Opel Car maintenance AvtoVAZ
VWmanual.ru


Main   Passat   Golf   Polo   Touareg   Tiguan   Sharan   Transporter   Others  
Tiguan 1 (2007-2015)

Crush and install additional heater Thermo Top V (VW Tiguan 1)

  • Main
  • Tiguan
  • Tiguan 1
  • Electrical equipment
  • Heating and air conditioning
  • Crush and install additional heater Thermo Top V
            0


Instructions: After depressurizing the coolant circulation circuit, it is necessary to remove air from it. When the engine is warm, the liquid in the cooling system is under pressure. Before carrying out repair work, release the pressure.


Instructions: After depressurizing the coolant circulation circuit, it is necessary to remove air…

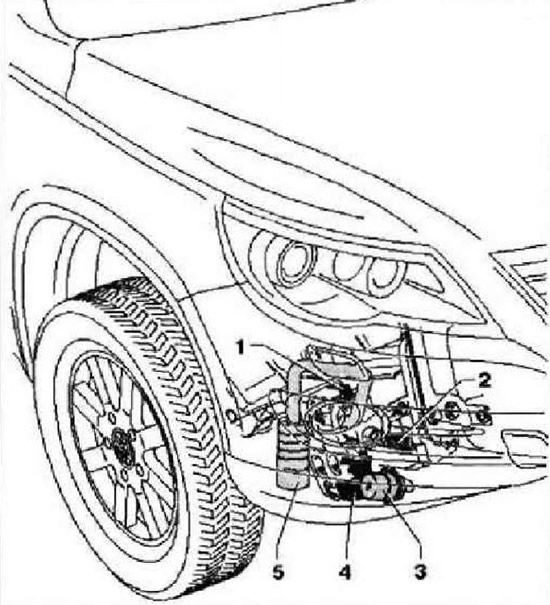
  • 1 - Fuel line with quick-release fitting
  • 2 - Exhaust system
  • 3 - Circulation pump "V55"
  • 4 - Additional heater Thermo Top V with additional heater control unit "J364"
  • 5 - Intake muffler

Instructions: When replacing the Thermo Top V heater, you must first connect the tester -VAS 5051B- and in the Guided functions mode, run the "Heater Replacement" function.


Remove the noise-insulating casing. Remove the front bumper. Remove the right front wheel arch liner.

CAUTION: Avoid burns from hot coolant.


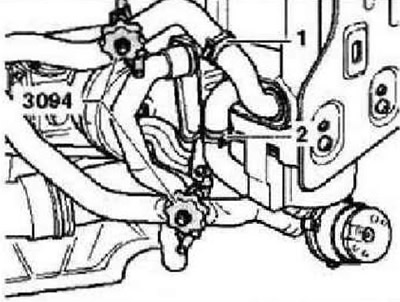
Clamp coolant hoses "1" and "2" using clamps with a diameter of up to 25 mm "3094" "3" and disconnect the hoses from the heater.

Instructions: Do not disconnect coolant hoses that are connected to each other.


Disconnect the circulation pump "V55" from the heater.

Disconnect the circulation pump «V55» from the heater.


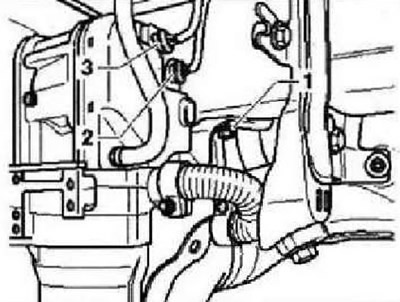
Unscrew nut "3" (10±1.5 Nm) securing the additional heater to the right side member. Unscrew screw "1" (10±1.5 Nm).


CAUTION: Danger! Fuel leakage! The fuel in the fuel system is under pressure.


CAUTION: Danger! Fuel leakage! The fuel in the fuel system is under pressure.


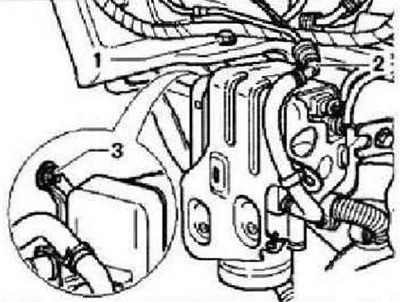
Disconnect the quick-release fitting of the fuel line "2" and close the fuel lines with suitable plugs.

Disconnect the quick-release fitting of the fuel line «2» and close the fuel lines with suitable…


Unscrew nut "1" (20±3 Nm) securing the additional heater to the right side member.

Caution: The additional heater control unit "J364" may be damaged. Excessively high voltage may appear on the contacts of its connector. Disconnect the 8-pin connector first. First disconnect the 8-pin connector "3" from the heater.


Disconnect the remaining connectors from the auxiliary heater. Disconnect the remaining connectors from the heater.

Installation


Adequate space must be provided when working with all moving or hot parts.

Instructions: If the Thermo Top V heater is not being replaced, it is first necessary to connect the tester -VAS 5051B- and in the Guided functions mode, run the "Heater unlock" function.


Installation is carried out in the reverse order. After installing the additional heater, it is necessary to remove air from the coolant circulation circuit.

This article is available at russian, bulgarian, belarusian, ukrainian, serbian, croatian, romanian, polish, slovak, hungarian
The text has been checked: Tarasov Ivan

Share information:

Previous articles
Removal and installation the heater radio signal receiving device
Removal and installation of the heater exhaust system
Manufacturer's plates on the Thermo Top V heater
Repair of additional heater Thermo Top V
Safety precautions when working with the Thermo Top V additional heater
Fluids for air conditioning systems
Next articles
Removal and installation of additional heater attachments Thermo Top V
Disassembly and assembly of the additional heater Thermo Top V
Connection diagram of an additional heater to the cooling circuit
Removal and installation the auxiliary heater control unit
Removal and installation a glow plug with a flame sensor
Removal and installation the temperature sensor and overheating sensor


Similar articles from other manuals for VW cars:
Heating and ventilation (manual heater) Passat B3 (1988-1993)
Removal and installation the heater fan and additional resistor Golf 4 (1997-2004)
Main and additional fuses Polo 3 (1995-2003)
Crush and install radiator (diesel engine) Touareg 1 (2002-2006)
Additional operations on a car with air conditioning Sharan 1 (1995-2000)
Heater motor — removal and installation Transporter T4 (1990-2003)
Parts and components of additional and main mufflers Caddy 3 (2003-2010)
Link to this page in different formats


Visitor comments


No comments yet


How much will 50 + 13 =


Tiguan 1 
  • General information
  • Characteristics
  • Vehicle overview
  • Power unit
  • Petrol engine 1.4 BWK
  • Petrol engine 1.4 CAVA
  • Engine 2.0 (petrol)
  • Engine 2.0 (diesel)
  • Transmission
  • 6-speed manual gearbox 0A6
  • 6-speed automatic gearbox 09M
  • Drive shafts
  • Chassis
  • Front suspension
  • Rear suspension (2x4)
  • Rear suspension (4x4)
  • Air suspension
  • Wheels and rims
  • Brake system
  • Steering gear
  • Body
  • External equipment
  • Internal equipment
  • Electrical equipment
  • Power devices
  • Appliances and lighting
  • Communication systems
  • Heating and air conditioning
  • Electrical circuits
VWmanual.ru © 2016-2026 | Mobile version | News and articles | Sitemap: EN BG BY UA RS HR RO PL SK HU | Write message | Site search
Passat B2 • Passat B3 • Passat B4 • Passat B5 • Passat B6 • Golf 1, diesel • Golf 1, petrol • Golf 2, petrol • Golf 2 • Golf 3 • Golf 4 • Golf 5 • Polo 3 • Polo 4 • Touareg 1 • Tiguan 1 • Sharan 1 • Transporter T3 • Transporter T4 • LT 28 • LT 2D • Beetle • Caddy 3 •
Our website uses cookies to ensure functionality and convenience.