English Русский
Български
Беларускі
Український
Српски
Hrvatski
Română
Polski
Slovenský
Magyar
  |  Articles  |  Sitemap  |  Contacts  |    |
Car maintenance Ford Car maintenance Hyundai Car maintenance Chevrolet Car maintenance BMW Car maintenance Audi Car maintenance Opel Car maintenance AvtoVAZ
VWmanual.ru


Main   Passat   Golf   Polo   Touareg   Tiguan   Sharan   Transporter   Others  
Sharan 1 (1995-2000)

Removal and installation the radiator (VW Sharan 1)

  • Main
  • Sharan
  • Sharan 1
  • Diesel engines
  • Cooling system
  • Removal and installation the radiator
            0


The radiator is removed together with the electric fan. Removing the radiator is a labor-intensive job, as a fairly large number of parts must be removed before you can get to the radiator itself.

To remove the radiator or fan motor, you must disconnect the battery, since the fan wires are live when the ignition is on.

Radiator removal procedure:
  • drain the coolant from the cooling system (see paragraph 19.1.1), do not reconnect the lower coolant hose. Remove the expansion tank cap to allow the coolant to drain better;
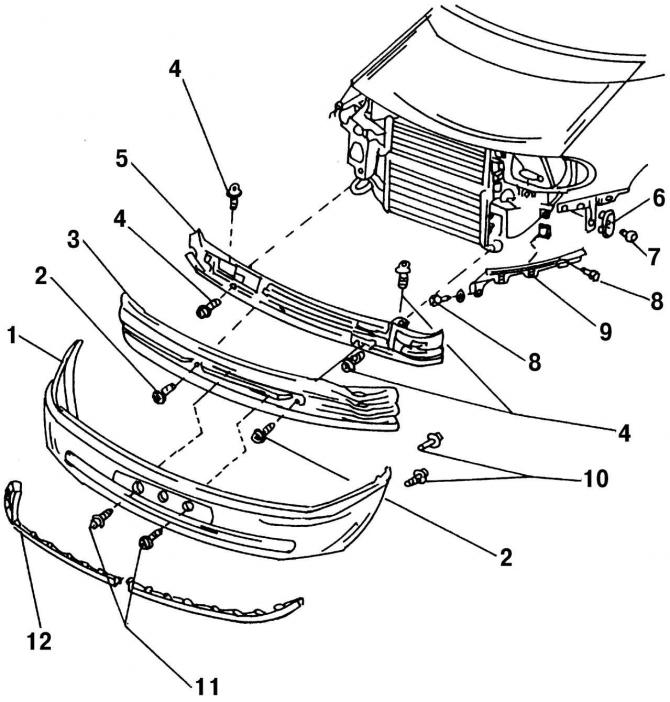
Fig. 462. Removing and installing the front bumper: 1 - Front bumper trim; 2 - bolt, 15 Nm; 3 -…

Fig. 462. Removing and installing the front bumper: 1 - Front bumper trim; 2 - bolt, 15 Nm; 3 - bumper; 4 - bolt, 15 Nm; 5 - bumper crossbar; 6 - bracket; 7 - bolt; 8 - screw; 9 - guide element; 10 - bolt; 11 - bolt; 12 - spoiler

  • remove the front bumper (Fig. 462);
  • remove the radiator grille;

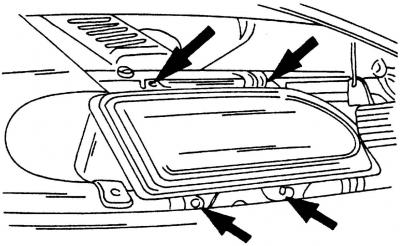
Fig. 463. Removing the headlights. The arrows show the locations of the headlights

Fig. 463. Removing the headlights. The arrows show the locations of the headlights


  • remove both front headlights. The mounting locations of the headlights are shown in Fig. 463. Disconnect the connectors from the back of the headlights;
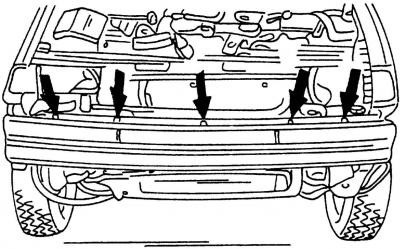
Fig. 464. Removing the headlight washer pipe. The arrows show the location of the spring clips

Fig. 464. Removing the headlight washer pipe. The arrows show the location of the spring clips

  • remove the pipe fasteners (Fig. 464) if the vehicle is equipped with headlight washers;
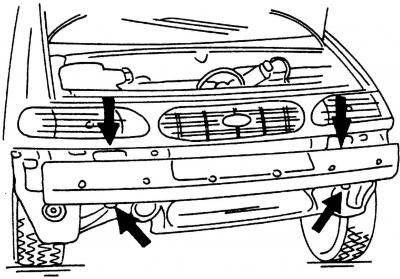
Fig. 465. Removing the front bumper. The arrows show the location of the bumper mounting bolts

Fig. 465. Removing the front bumper. The arrows show the location of the bumper mounting bolts

  • remove the front bumper (Fig. 465). Tighten the bolts by hand to secure the front spoiler;
  • disconnect the upper hose from the radiator;
  • disconnect the radiator charge air hose. To do this, disconnect the connector block and remove the hose clamp;
  • put the front of the car on supports;
  • disconnect the radiator fan thermal switch connector and disconnect the fan mode switch connector;
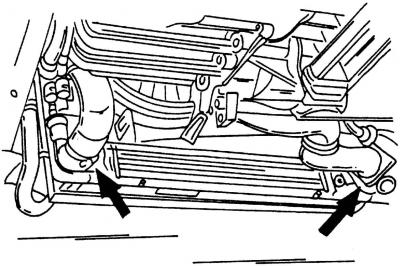
Fig. 466. Removing the hoses from the supercharged air radiator. The arrows indicate the hose…

Fig. 466. Removing the hoses from the supercharged air radiator. The arrows indicate the hose attachment points


  • disconnect the hoses from the charge air radiator (Fig. 466). Remove the right hose;
  • remove the charge air radiator (located below the engine radiator);
  • remove the fan and fan shroud (two bolts on each side) and take it all out together in a downward direction;

Caution! When performing work, do not damage the radiator cells.

  • unscrew the radiator mounting bolts (2 bolts on each side of the radiator). Carefully remove the radiator downwards;
  • if necessary, remove the radiator shroud and fan motor from the shroud.

The radiator is installed in the reverse order of the removal process. If you are reinstalling the old radiator, clean it thoroughly first. Remove the radiator casing to clean it (underneath it are all the insects that have landed on the radiator). Remove large particles that have entered the radiator cells with a jet of water under pressure.

Warning! Very strong water pressure can damage the radiator cells.


Do not use metal objects to remove dirt from the radiator.

If you notice that the coolant is dark when draining the coolant, flush the radiator or the entire cooling system with running water. This is easy to do if the radiator is removed. The order of operations:
  • install the radiator without connecting the lower coolant hose;
  • insert a garden hose into the expansion tank and turn on the water. Watch the condition of the water flowing out from below. You can stop flushing as soon as clean water starts to flow out. After flushing, drain all the water from the cooling system again and fill it with coolant as described in section 19.1.1.


(The original text can be found at: www.VWMANUAL.ru)

This article is available at russian, bulgarian, belarusian, ukrainian, serbian, croatian, romanian, polish, slovak, hungarian
The text has been checked: Tarasov Ivan

Share information:

Previous articles
Radiator Cap and Radiator Check
Filling the cooling system with coolant
Diesel Engine Cooling System — General Information
Next articles
Checking the cooling system fan
Removal and installation the water pump
Coolant pump repair
Poly V-belt — removal and installation
Thermostat — Removal, Installation and Checking


Similar articles from other manuals for VW cars:
Radiator fan Passat B3 (1988-1993)
Removal and installation the radiator Golf 1 (1974-1984, petrol)
Radiator grille Polo 3 (1995-2003)
Removal and installation the radiator (petrol engine) Touareg 1 (2002-2006)
Removal and installation the radiator and radiator fan V7 Tiguan 1 (2007-2015)
Removal the radiator Transporter T4 (1990-2003)
Parts and components of the thermostat, radiator and expansion… Caddy 3 (2003-2010)
Link to this page in different formats


Visitor comments


No comments yet


How much will 13 + 47 =


Sharan 1 
  • General information
  • Introduction to guide
  • Maintenance
  • Petrol engines
  • Engine repair 2.8 l (AAA)
  • Engine repair 2.0 l (ADY)
  • Lubrication system
  • Cooling system
  • Fuel injection system
  • Ignition system
  • Diesel engines
  • Engine repair
  • Lubrication system
  • Cooling system
  • Supply system
  • Transmission
  • Clutch
  • Manual gearbox and shafts
  • Chassis
  • Steering
  • Car suspension
  • Brake system
  • Electrical equipment
  • Equipment and devices
  • Power devices
  • Electrical circuits
VWmanual.ru © 2016-2026 | Mobile version | News and articles | Sitemap: EN BG BY UA RS HR RO PL SK HU | Write message | Site search
Passat B2 • Passat B3 • Passat B4 • Passat B5 • Passat B6 • Golf 1, diesel • Golf 1, petrol • Golf 2, petrol • Golf 2 • Golf 3 • Golf 4 • Golf 5 • Polo 3 • Polo 4 • Touareg 1 • Tiguan 1 • Sharan 1 • Transporter T3 • Transporter T4 • LT 28 • LT 2D • Beetle • Caddy 3 •
Our website uses cookies to ensure functionality and convenience.