
English Русский
Български
Беларускі
Український
Српски
Hrvatski
Română
Polski
Slovenský
Magyar
  |  Articles  |  Sitemap  |  Contacts  |    |
Car maintenance Ford Car maintenance Hyundai Car maintenance Chevrolet Car maintenance BMW Car maintenance Audi Car maintenance Opel Car maintenance AvtoVAZ
VWmanual.ru


Main   Passat   Golf   Polo   Touareg   Tiguan   Sharan   Transporter   Others  
LT 28 (1975-1991) LT 2D (1996-2003) Beetle (1960-1986) Caddy 3 (2003-2010)

Checking the amount of fuel injected (VW Caddy 3)

  • Main
  • Volkswagen
  • Caddy 3
  • Petrol engines 1.4 l
  • Power and exhaust system
  • Checking the amount of fuel injected
            0


Verification conditions


Fuel pressure should be ok, check:

The injectors are installed in the fuel rail and the fuel line is connected.

Position the nozzle so that the sprayed fuel is completely captured by the measuring container.

Remove fuse SB 33 located in socket F 33 of the fuse box.

Connect the right contact of the F33 fuse socket to the positive terminal of the battery.
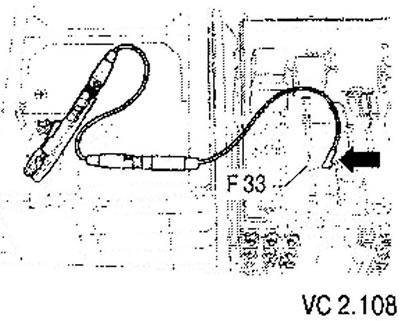
Connect the right contact of the F33 fuse socket to the positive terminal of the battery.


Connect one of the injector contacts to the engine ground.

Connect the second contact of the connector of the injector being tested via a push-button switch to the positive terminal of the battery.

Press and hold the remote control switch button for 30 seconds.

Repeat the test on other injectors. For other injectors, you should use other measuring capacities.

Compare the volume of injected fuel. Set value: 85-105 ml for each nozzle.

When checking the amount of fuel injected, the shape of the sprayed fuel torch is also checked. The torch shape must be the same for all nozzles.

The jet of sprayed fuel should be the same for all injectors.

If the measured value of the fuel quantity for one or more injectors goes beyond the nominal value range in one direction or another, replace the faulty injector.
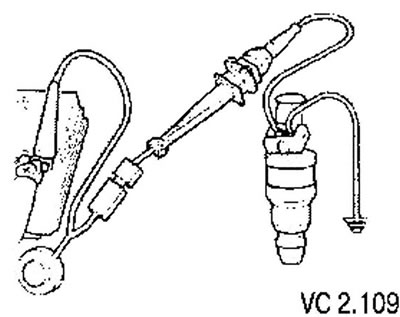
If the measured value of the fuel quantity for one or more injectors goes beyond the nominal value…

This article is available at russian, bulgarian, belarusian, ukrainian, serbian, croatian, romanian, polish, slovak, hungarian
The text has been checked: Kolesnikov Artem

Share information:

Previous articles
Checking the intake air preheating
Removal and installation fuel injectors
Cleaning the throttle valve control unit (J338)
Air filter housing for BUD engines — removal and installation
Air Filter Housing for BCA Engines — removal and installation
Air filter housing for engines with the designation BUD
Next articles
Checking the tightness and quantity of fuel injected (since 2006)
Fuel pressure regulator and residual pressure
Removal and installation the engine control unit with theft protection
Exhaust system parts and components (BCA engines)
Exhaust system components and assemblies (BUD engines)


Similar articles from other manuals for VW cars:
Checking the fuel shut-off valve Passat B3 (1988-1993)
Rear window wipers and radiator fan (1.1, 1.3 and 1.8 fuel… Golf 2 (1984-1993, petrol)
Checking the fuel pump Polo 3 (1995-2003)
Checking the amount of fuel injected (petrol engine) Touareg 1 (2002-2006)
Checking the fuel pressure regulator N276 Tiguan 1 (2007-2015)
Checking the performance of the fuel pump Sharan 1 (1995-2000)
Checking the amount of fuel supplied Transporter T4 (1990-2003)
Link to this page in different formats


Visitor comments


No comments yet


How much will 37 + 22 =


Caddy 3 
  • General information
  • User manual
  • Daily care
  • Maintenance
  • Petrol engines 1.4 l
  • Engine repair
  • Cooling and lubrication system
  • Power and exhaust system
  • Petrol engines 1.6 l
  • Engine repair
  • Cooling and lubrication system
  • Power and exhaust system
  • Diesel engines
  • Engine repair
  • Cooling and lubrication system
  • Power and exhaust system
  • Transmission
  • Mechanical gearbox 0AH
  • Mechanical gearbox 0A4
  • Drive shafts
  • Chassis
  • Car suspension
  • Steering
  • Brake system
  • Body and wiring diagrams
  • Interior and exterior
  • Electrical circuits
Beetle 
  • General information
  • Maintenance
  • Power unit
  • Engine repair
  • Cooling and lubrication system
  • Supply system
  • Exhaust system
  • Transmission
  • Clutch
  • Car gearbox
  • Chassis
  • Front suspension
  • Rear suspension
  • Steering
  • Brake system
  • Wheels and tires
  • Body
  • Exterior
  • Electrical equipment
  • Equipment and devices
  • Power devices
  • Electrical circuits
LT 2D 
  • General information
  • User manual
  • Maintenance
  • Power unit
  • Petrol engines 2.3 l
  • Diesel engines 2.5 l
  • Diesel engines 2.8 l
  • Injection system (diesel 2.8 l)
  • Transmission
  • Clutch
  • Manual gearbox
  • Differential
  • Chassis
  • Car suspension
  • Steering system
  • Brake system
  • Body
  • Body elements
  • Heating system
  • Electrical equipment
  • Equipment and devices
  • Electrical circuits
LT 28 
  • General information
  • Maintenance
  • Power unit
  • Petrol engines 2.0L
  • Petrol engines 2.4L
  • Diesel engines
  • Cooling and heating
  • Fuel and exhaust system
  • Ignition system
  • Transmission
  • Clutch
  • Car gearbox
  • Cardan shaft
  • Rear axle
  • Chassis
  • Brake system
  • Car suspension
  • Steering system
  • Body
  • Body elements
  • Doors, locks and windows
  • Electrical equipment
  • Power devices
  • Equipment and devices
  • Electrical circuits
VWmanual.ru © 2016-2026 | Mobile version | News and articles | Sitemap: EN BG BY UA RS HR RO PL SK HU | Write message | Site search
Passat B2 • Passat B3 • Passat B4 • Passat B5 • Passat B6 • Golf 1, diesel • Golf 1, petrol • Golf 2, petrol • Golf 2 • Golf 3 • Golf 4 • Golf 5 • Polo 3 • Polo 4 • Touareg 1 • Tiguan 1 • Sharan 1 • Transporter T3 • Transporter T4 • LT 28 • LT 2D • Beetle • Caddy 3 •
Our website uses cookies to ensure functionality and convenience.