
English Русский
Български
Беларускі
Український
Српски
Hrvatski
Română
Polski
Slovenský
Magyar
  |  Articles  |  Sitemap  |  Contacts  |    |
Car maintenance Ford Car maintenance Hyundai Car maintenance Chevrolet Car maintenance BMW Car maintenance Audi Car maintenance Opel Car maintenance AvtoVAZ
VWmanual.ru


Main   Passat   Golf   Polo   Touareg   Tiguan   Sharan   Transporter   Others  
Polo 3 (1995-2003) Polo 4 (2001-2009)

Checking the rear window heating (VW Polo 4)

  • Main
  • Polo
  • Polo 4
  • Electrical equipment
  • Equipment and devices
  • Checking the rear window heating
            0


When the rear window heating is switched on, the glass field with visible conductors should be free of fogging or ice after a while.

If there is a malfunction, first check the condition of the fuse in the fuse box.

If the fuse is OK, then check the reliability of the contacts of the plug connectors on the left and right of the rear window, and if necessary, clean the contacts from corrosion.

If the rear window heating still does not work, check the supply electrical wires and the switch.
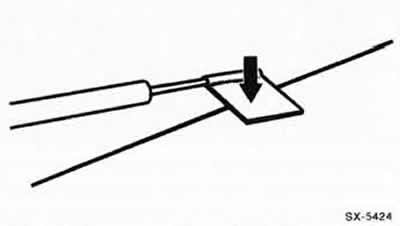
If the rear window heating still does not work, check the supply electrical wires and the switch.


Check the filament. Measure the voltage between the filament and the connection point of the supply electric wire. To do this, wrap the pointed electrode of the measuring device with a wide foil strip and press it to the filament "arrow" during the measurement.

Start the engine and turn on the rear window defroster.

Measure the voltage in the middle of each section of the filament. If this voltage is about 6 volts, then the filament is OK. If the voltage is about 10 volts or 0 volts, then the filament is broken.

By moving the pointed electrode along the sections of the filament, you can determine the location of the break. This is the place where the voltage jumps from zero to several volts.


By moving the pointed electrode along the sections of the filament, you can determine the location…


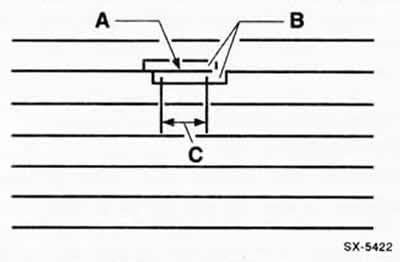
If the filament is damaged, the electrical circuit can be restored by applying a silver-based conductive varnish. To do this, the damaged area "A" must be cleaned beforehand.

Cover the damaged area "A" on both sides with adhesive tape "B" as shown in the picture and apply varnish "C" with a thin brush.

Dry the varnish at a temperature of approximately +25°C for approximately 24 hours. You can also use a technical hair dryer for drying. At a temperature of +150°C the varnish dries in approximately 30 minutes.

The information is available on the website [VWManual.ru]

Caution: Do not turn on the rear window heating until the varnish is completely dry. Do not use gasoline or other solvents to clean the damaged area.

This article is available at russian, bulgarian, belarusian, ukrainian, serbian, croatian, romanian, polish, slovak, hungarian
The text has been checked: Semenova Anna

Share information:

Previous articles
Checking the relay
Checking the serviceability of an electrical switch
Troubleshooting electrical equipment
Installation of additional components of the electrical equipment system
Electrical equipment system. General information
Next articles
Disconnecting electrical plug connectors
Checking the brake light
Removal and installation the POLO on-board electrical system control unit
Removal and installation the horn
Removal and installation batteries in a key with a remote radio control
Removal and installation batteries/bulbs in a key with backlight


Similar articles from other manuals for VW cars:
Rear window heating element Passat B4 (1988-1996)
Rear window heating Golf 4 (1997-2004)
Checking the oil level in the rear main gear Touareg 1 (2002-2006)
Rear window heating element, rear window heating relay Tiguan 1 (2007-2015)
Checking the thickness of the rear brake pads Sharan 1 (1995-2000)
Rear window heating and sound signal Transporter T4 (1990-2003)
Rear Window Defogger — description and precautions LT 28 (1975-1991)
Link to this page in different formats


Visitor comments


No comments yet


How much will 10 + 38 =


Polo 4 
  • General information
  • User manual
  • Maintenance
  • Power unit
  • Engine repair
  • Cooling and lubrication system
  • Control system
  • Injection system (diesel)
  • Supply system
  • Exhaust system
  • Chassis
  • Front suspension
  • Rear suspension
  • Steering
  • Wheels and tires
  • Brake system
  • Body
  • Interior
  • Exterior
  • Electrical equipment
  • Equipment and devices
  • Wiper system
  • Lighting system
  • Electrical circuits
Polo 3 
  • General information
  • User manual
  • Maintenance
  • Power unit
  • Petrol engines 1.4 and 1.6
  • Petrol engines 1.4 (V16)
  • Petrol engines 1.6 and 1.8
  • Diesel engines 1.7 and 1.9
  • Diesel engines 1.9 D and TD
  • Transmission
  • Mechanical gearbox 085
  • Mechanical gearbox 020/02K
  • Chassis
  • Front suspension
  • Rear suspension
  • Steering
  • Brake system
  • Body
  • Exterior
  • Interior
  • Electrical equipment
  • Equipment and instruments (until 2000)
  • Equipment and instruments (after 2000)
  • Electrical circuits
  • Wiring diagrams (petrol)
  • Wiring diagrams (diesel)
VWmanual.ru © 2016-2026 | Mobile version | News and articles | Sitemap: EN BG BY UA RS HR RO PL SK HU | Write message | Site search
Passat B2 • Passat B3 • Passat B4 • Passat B5 • Passat B6 • Golf 1, diesel • Golf 1, petrol • Golf 2, petrol • Golf 2 • Golf 3 • Golf 4 • Golf 5 • Polo 3 • Polo 4 • Touareg 1 • Tiguan 1 • Sharan 1 • Transporter T3 • Transporter T4 • LT 28 • LT 2D • Beetle • Caddy 3 •
Our website uses cookies to ensure functionality and convenience.