English Русский
Български
Беларускі
Український
Српски
Hrvatski
Română
Polski
Slovenský
Magyar
  |  Articles  |  Sitemap  |  Contacts  |    |
Car maintenance Ford Car maintenance Hyundai Car maintenance Chevrolet Car maintenance BMW Car maintenance Audi Car maintenance Opel Car maintenance AvtoVAZ
VWmanual.ru


Main   Passat   Golf   Polo   Touareg   Tiguan   Sharan   Transporter   Others  
LT 28 (1975-1991) LT 2D (1996-2003) Beetle (1960-1986) Caddy 3 (2003-2010)

Checking the positioning of electric windows (VW Caddy 3)

  • Main
  • Volkswagen
  • Caddy 3
  • General information
  • Daily care
  • Checking the positioning of electric windows
            0


Contents: Front wiper blades, checking the…↓ Rear wiper blades: checking the…↓
After disconnecting and reconnecting the battery in the electric windows, the function of raising and lowering the glass with one short press of the button does not work. Therefore, before putting a new car into operation, it is necessary to immediately reposition the window lifters. Once positioned, it is not permitted to disconnect the battery.

Caution! After disconnecting and reconnecting the battery, the power windows operate without force limitation. This could result in serious injuries due to pinching!


Note: The following description is for the front left door window regulator. Positioning of other windows is carried out in a similar manner by activating the corresponding switch on the driver's door.

To position the electric windows, follow these steps.
  • Close all windows and doors completely.
  • Turn on the ignition.
  • Press and hold the switch in the driver's door and completely lower the front left side window.
  • Pull the switch and hold it, fully raise the side window again and then release the switch.
  • Pull the switch again for 1 second. Now, when you press the switch, the side window should automatically lower down, and when you pull the switch, the side window should automatically rise up.
  • Turn off the ignition.

Front wiper blades, checking the correct end position


Every second time the wiper motor is turned off, it returns to a different starting position. The edges of the brushes thus adhere to the glass with the other side.


To do this, the wiper drive passes the starting position when moving the wiper blades downwards and then moves the wiper blades slightly upwards. In this intermediate starting position, the windshield wiper crank cannot be adjusted.

The check should be carried out in the final position in which the windshield wiper motor shaft passes straight and without falling into the final position. If necessary, turn on the windshield wiper again.

Turn the windshield wiper on and off until the blades return to their original position.

Turn off the ignition.

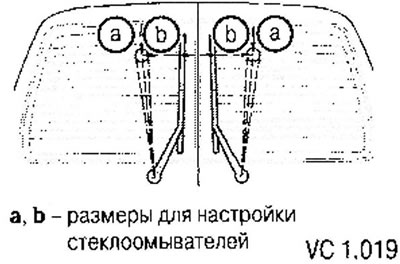
Check the position of the ends of the windshield wipers relative to the water drain box cover on the lower edge of the windshield.

If necessary, adjust the position of the brush leash.
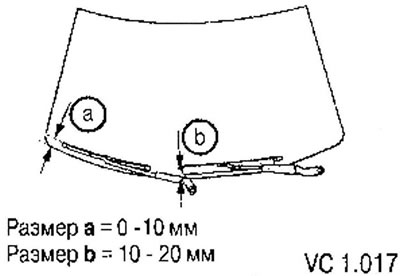
If necessary, adjust the position of the brush leash.


Rear wiper blades: checking the correct end position


Lifting tailgate:
  • Turn the rear window wiper on and off until the blade returns to its original position.
  • Check the position of the end of the brush relative to the bottom edge of the glass.
  • Adjust the wiper arms if necessary.

The original article is posted on the website: VWMANUAL
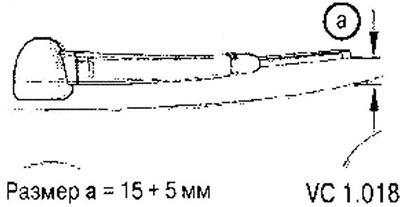
Adjust the wiper arms if necessary.


Rear hinged doors:

  • Turn the rear window wiper on and off until the blades return to their original position.
  • Check if the brushes are positioned vertically.
  • Adjust the wiper arms if necessary.

Adjust the wiper arms if necessary.


Check the operation and adjustment of the windshield wiper/washer and headlight washers.

Checking the antifreeze content in the washer fluid concentrate with antifreeze (G 052 164) for windshield wipers/washers, adding (if necessary).

Windscreen wiper with washer: check the installation of the sprayers, adjust if necessary.

Headlight washers: check the adjustment of the sprayers, adjust if necessary.

This article is available at russian, bulgarian, belarusian, ukrainian, serbian, croatian, romanian, polish, slovak, hungarian
The text has been checked: Kolesnikov Artem

Share information:

Previous articles
Poly V-belt — checking condition
Checking the condition of antifreeze and coolant level
Checking the engine oil level
Visual inspection of parts in the engine compartment and on the bottom
Visual inspection of axle joints
Checking the power steering fluid level
Next articles
Checking the antifreeze content in the washer fluid concentrate
Adjusting the windshield washer jets
Adjusting headlight washer nozzles
Performing a test drive


Similar articles from other manuals for VW cars:
Checking the thermal switch of the electric fan Passat B3 (1988-1993)
Electric windows Golf 4 (1997-2004)
Power windows with electric drive Polo 4 (2001-2009)
Opening and closing windows Touareg 1 (2002-2006)
Checking the operation of the intake manifold flap Tiguan 1 (2007-2015)
Checking the engine oil level and replacing it Sharan 1 (1995-2000)
Checking Electric Motors Transporter T4 (1990-2003)
Link to this page in different formats


Visitor comments


No comments yet


How much will 29 + 30 =


Caddy 3 
  • General information
  • User manual
  • Daily care
  • Maintenance
  • Petrol engines 1.4 l
  • Engine repair
  • Cooling and lubrication system
  • Power and exhaust system
  • Petrol engines 1.6 l
  • Engine repair
  • Cooling and lubrication system
  • Power and exhaust system
  • Diesel engines
  • Engine repair
  • Cooling and lubrication system
  • Power and exhaust system
  • Transmission
  • Mechanical gearbox 0AH
  • Mechanical gearbox 0A4
  • Drive shafts
  • Chassis
  • Car suspension
  • Steering
  • Brake system
  • Body and wiring diagrams
  • Interior and exterior
  • Electrical circuits
Beetle 
  • General information
  • Maintenance
  • Power unit
  • Engine repair
  • Cooling and lubrication system
  • Supply system
  • Exhaust system
  • Transmission
  • Clutch
  • Car gearbox
  • Chassis
  • Front suspension
  • Rear suspension
  • Steering
  • Brake system
  • Wheels and tires
  • Body
  • Exterior
  • Electrical equipment
  • Equipment and devices
  • Power devices
  • Electrical circuits
LT 2D 
  • General information
  • User manual
  • Maintenance
  • Power unit
  • Petrol engines 2.3 l
  • Diesel engines 2.5 l
  • Diesel engines 2.8 l
  • Injection system (diesel 2.8 l)
  • Transmission
  • Clutch
  • Manual gearbox
  • Differential
  • Chassis
  • Car suspension
  • Steering system
  • Brake system
  • Body
  • Body elements
  • Heating system
  • Electrical equipment
  • Equipment and devices
  • Electrical circuits
LT 28 
  • General information
  • Maintenance
  • Power unit
  • Petrol engines 2.0L
  • Petrol engines 2.4L
  • Diesel engines
  • Cooling and heating
  • Fuel and exhaust system
  • Ignition system
  • Transmission
  • Clutch
  • Car gearbox
  • Cardan shaft
  • Rear axle
  • Chassis
  • Brake system
  • Car suspension
  • Steering system
  • Body
  • Body elements
  • Doors, locks and windows
  • Electrical equipment
  • Power devices
  • Equipment and devices
  • Electrical circuits
VWmanual.ru © 2016-2026 | Mobile version | News and articles | Sitemap: EN BG BY UA RS HR RO PL SK HU | Write message | Site search
Passat B2 • Passat B3 • Passat B4 • Passat B5 • Passat B6 • Golf 1, diesel • Golf 1, petrol • Golf 2, petrol • Golf 2 • Golf 3 • Golf 4 • Golf 5 • Polo 3 • Polo 4 • Touareg 1 • Tiguan 1 • Sharan 1 • Transporter T3 • Transporter T4 • LT 28 • LT 2D • Beetle • Caddy 3 •
Our website uses cookies to ensure functionality and convenience.