
English Русский
Български
Беларускі
Український
Српски
Hrvatski
Română
Polski
Slovenský
Magyar
  |  Articles  |  Sitemap  |  Contacts  |    |
Car maintenance Ford Car maintenance Hyundai Car maintenance Chevrolet Car maintenance BMW Car maintenance Audi Car maintenance Opel Car maintenance AvtoVAZ
VWmanual.ru


Main   Passat   Golf   Polo   Touareg   Tiguan   Sharan   Transporter   Others  
Polo 3 (1995-2003) Polo 4 (2001-2009)

Removal and installation the front door mechanism holder together with the POLO window lifter (VW Polo 4)

  • Main
  • Polo
  • Polo 4
  • Body
  • Exterior
  • Removal and installation the front door mechanism holder together with the POLO window lifter
            0


Contents: Removal ↓ Installation ↓
Note: removal and installation on the IBIZA vehicle are carried out, in principle, in a similar manner.


The door lock, window lifter and loudspeaker are fixed to the door mechanism holder. The window lifter and door mechanism holder can only be replaced together.

The door mechanism holder can only be removed when the door window glass is released from the window lifter clamps. To do this, the window glass must be lowered to the height of the mounting holes in the door mechanism holder and the clamps released.

Removal


Remove the door trim, see the relevant chapter above.

Remove the lock cylinder, see the relevant chapter above.

Unfasten the clamp from the door handle, see the relevant chapter above.
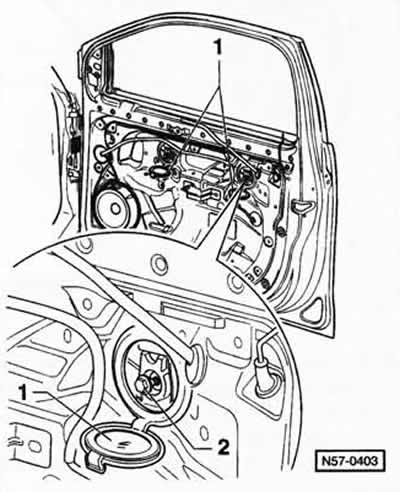
Unfasten the clamp from the door handle, see the relevant chapter above.


Press out the plugs "1".

Lower the window glass to a position where its mounting bolts "2" are accessible through the mounting holes.

Caution: If the window glass does not go down, for example due to a faulty electric window lift, unscrew the window lift motor mount and push the glass down by hand.


Loosen bolts "2" and release the window regulator clamps.


Lift the door window glass upwards and secure it securely, for example, using adhesive tape or a plastic wedge.

Note: To remove the door window glass, press the window glass shaft seal and tilt the window glass forward from the door frame.


With the ignition off, disconnect the ground (-) cable from the battery.

Attention: Follow the instructions given in the chapter "Removal and installation the battery".


Disconnect all plug connectors in the door.
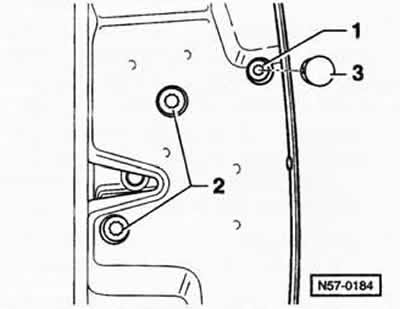
Disconnect all plug connectors in the door.


Remove bolts "2". 1 - lock bolt for door lock, 3 - plug.
Remove bolts «2». 1 - lock bolt for door lock, 3 - plug.


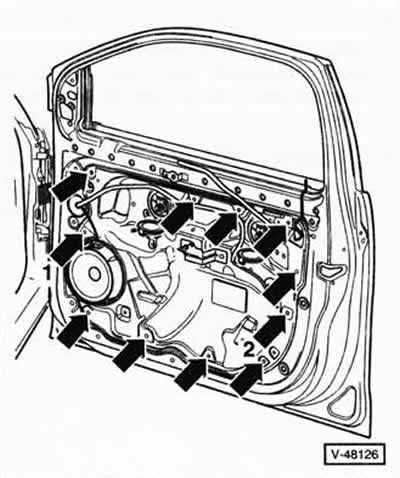
Unscrew the bolts "arrows", "1", "2". Remove the mechanism holder from the door at the top, lift it up and, tilting it towards the door hinge, remove it from the door.

Turn the mechanism holder and disconnect the door lock plug connector.


Unfasten the electrical wire clamps from the back of the door mechanism holder.

Installation


Attach the spring to the door lock lever, see Figure V-4863 to Chapter "Removal and installation the door lock".

Insert the mechanism holder into the door. Tighten the mounting bolts to 8 Nm. First tighten bolts "1" and "2". Tighten the remaining bolts in any order, see Figure V-48126.

Tighten the door lock mounting bolts to a torque of 20 Nm.

Adjust the door window glass. To do this, release the clamps, push the window glass down between the jaws of the clamps and press it into the rear window guide. In this position, tighten the clamp bolts to a torque of 10 Nm, see Figure N57-0403.

Further installation is carried out in reverse order.

With the ignition off, connect the ground (-) wire to the battery.

Attention: Follow the instructions given in the chapter "Removal and installation the battery".


If available, activate the electric window lifter, see chapter "Removal and installation the battery".

Check the operation of the window lifts, and also, with the door open, the operation of its locking mechanism.

This article is available at russian, bulgarian, belarusian, ukrainian, serbian, croatian, romanian, polish, slovak, hungarian
The text has been checked: Semenova Anna

Share information:

Previous articles
Removal and installation the POLO door lock
Removal and installation the lock cylinder
Removal and installation the door handle
Door handle and door lock
Door adjustment
Removal and installation the POLO door
Next articles
Removal and installation the rear door mechanism holder together with the POLO window lifter
Removal and installation the electric motor of the window lifter POLO
Removal and installation door trim
Removal and installation door trim IBIZA
Removal and installation the window lift handle
Removal and installation the POLO exterior rearview mirror housing


Similar articles from other manuals for VW cars:
Removal and installation the front door window regulator Passat B3 (1988-1993)
Front door Golf 2 (1984-1993, petrol)
Back door Touareg 1 (2002-2006)
Front door device Tiguan 1 (2007-2015)
Disassembly and assembly of the front wheel brake mechanism Sharan 1 (1995-2000)
Front door device Transporter T4 (1990-2003)
Front Door Inner Trim Panel — removal and installation LT 28 (1975-1991)
Link to this page in different formats


Visitor comments


No comments yet


How much will 45 + 19 =


Polo 4 
  • General information
  • User manual
  • Maintenance
  • Power unit
  • Engine repair
  • Cooling and lubrication system
  • Control system
  • Injection system (diesel)
  • Supply system
  • Exhaust system
  • Chassis
  • Front suspension
  • Rear suspension
  • Steering
  • Wheels and tires
  • Brake system
  • Body
  • Interior
  • Exterior
  • Electrical equipment
  • Equipment and devices
  • Wiper system
  • Lighting system
  • Electrical circuits
Polo 3 
  • General information
  • User manual
  • Maintenance
  • Power unit
  • Petrol engines 1.4 and 1.6
  • Petrol engines 1.4 (V16)
  • Petrol engines 1.6 and 1.8
  • Diesel engines 1.7 and 1.9
  • Diesel engines 1.9 D and TD
  • Transmission
  • Mechanical gearbox 085
  • Mechanical gearbox 020/02K
  • Chassis
  • Front suspension
  • Rear suspension
  • Steering
  • Brake system
  • Body
  • Exterior
  • Interior
  • Electrical equipment
  • Equipment and instruments (until 2000)
  • Equipment and instruments (after 2000)
  • Electrical circuits
  • Wiring diagrams (petrol)
  • Wiring diagrams (diesel)
VWmanual.ru © 2016-2026 | Mobile version | News and articles | Sitemap: EN BG BY UA RS HR RO PL SK HU | Write message | Site search
Passat B2 • Passat B3 • Passat B4 • Passat B5 • Passat B6 • Golf 1, diesel • Golf 1, petrol • Golf 2, petrol • Golf 2 • Golf 3 • Golf 4 • Golf 5 • Polo 3 • Polo 4 • Touareg 1 • Tiguan 1 • Sharan 1 • Transporter T3 • Transporter T4 • LT 28 • LT 2D • Beetle • Caddy 3 •
Our website uses cookies to ensure functionality and convenience.