
The gearbox is removed from the underside of the vehicle, so the vehicle must be raised to an appropriate height. Regardless of how the vehicle is raised, be sure to place supports under the vehicle frame. In addition, you will need a car jack to support the gearbox.
Remove the gearbox in the following order:
- disconnect the clamp from «–» output AB (Don't forget your radio's security code);
- while the car is still on wheels, unscrew the bolt securing the front left wheel hub and loosen all the wheel bolts a few turns;
- remove the air filter housing;
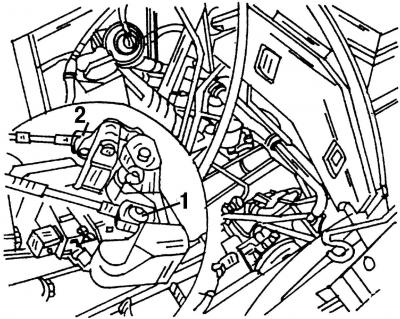
Pic. 239. Attaching cables to gear levers: 1 - gear selection lever; 2 - gear lever
- carefully press the first cable away from lever 1 with a screwdriver (pic. 239) gear selection and the second cable from the gear shift lever 2;
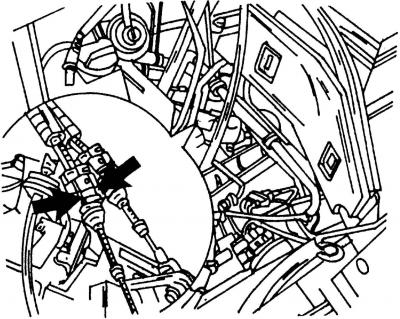
Pic. 240. Fastening of cables of a gear change on a transmission. To remove the cables, squeeze the latches in the direction of the arrows
- squeeze the latches (pic. 240) and remove both shift cables from the mount on the gearbox;
- using a screwdriver, remove the retaining spring clamp securing the pipeline of the clutch slave cylinder and install plugs in the openings of the pipeline;
- disconnect all pipelines leading to the gearbox;
- disconnect the plug connector of the reversing lamp;
- unscrew the upper bolts of the gearbox to the engine;
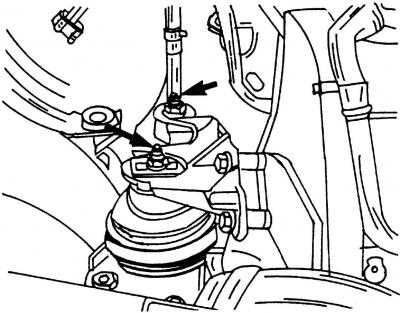
Pic. 241. Fastening nuts (shown by arrows) right engine mount
- unscrew the nuts (pic. 241) fixing the right support of the engine mount;
- tie the engine to the hoist with a rope and slightly raise the engine and transmission with the hoist. Make sure that the engine is well fixed;
- if installed, then remove the lower casing of the engine compartment;
- disconnect the wires from the starter and remove the starter;
- raise the front of the car, put the car on supports and remove both front wheels;
- unscrew the tie rod joint nut and, using a suitable puller, press the tie rod head off the steering arm. Remove the steering trapezoid rods and tie them with a wire to the body;
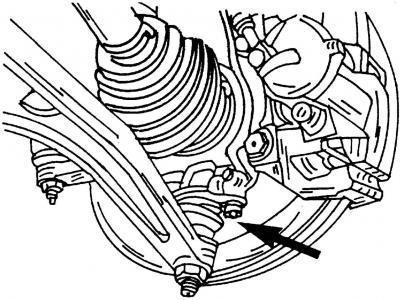
Pic. 242. The location of the attachment of the carrier suspension arm to the steering knuckle (shown by arrow)
- unscrew two bolts (pic. 242) fastening the carrier suspension arm to the steering knuckle;
- loosen the connecting rod nuts (connects the anti-roll bar and suspension strut);
- disconnect the brake hose and, if installed, the cable of the ABS speed sensor from the suspension strut mount;
- place a container under the gearbox to collect the oil that will flow out when the left drive shaft is removed;

Pic. 243. Removing the drive shaft
- mount the mount with a short push in the indicated direction (pic. 243, shown by arrow), slide the left drive shaft out of the transmission and remove the shaft from the wheel hub. To prevent transmission oil from leaking out of the gearbox, insert a sealing plug into the hole in the gearbox;
- remove the right drive shaft from the intermediate, thrust bearing and tie it up at the top with a piece of wire. In doing so, do not damage the colored paintwork on the drive shaft;
- unscrew the two bolts securing the middle intermediate bearing from the bracket on the engine crankcase and remove it together with the intermediate shaft from the gearbox. If necessary, press the shaft away from the gearbox;
- insert a sealing plug into the hole in the gearbox;
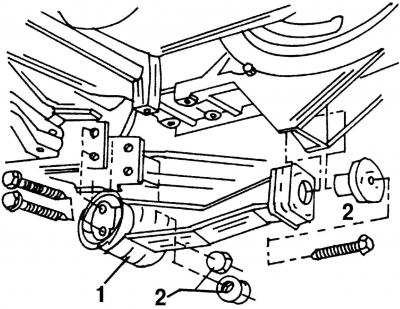
Pic. 244. Equalizer mount (pendulum) gearbox mounts: 1 - balancing suspension; 2 - bolts and nuts for fastening the balancing suspension
- unscrew the bolts of the balancing nut (pendulum) pendants 1 (pic. 244). The balance suspension can be attached at the base with one or three bolts and nuts;
- disconnect the connector from the speed sensor on the gearbox (near the drive shaft hole);
- unscrew the fastening of the protective metal cover of the flywheel;
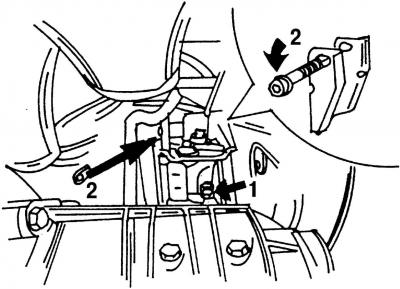
Pic. 245. Bolt locations (1 and 2) gearbox mounts
- remove bolts 1 and 2 (pic. 245) gearbox suspension (check again that the gearbox is securely fastened to the lift);
- move the engine and gearbox as far to the right as possible;
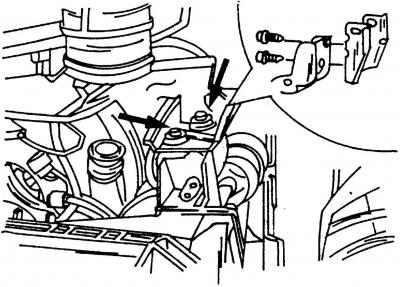
Pic. 246. The locations of the mounting bolts (shown by arrows) suspension bracket on gearbox
- tilt the power unit to the left to access the bracket mount (pic. 246) gear box hangers (the tilt of the power unit can be done using a jack) and unscrew the suspension bracket fastening;
- support the gearbox from below with a car jack. It is very important that the gearbox is well secured;
- turn out the lower bolts of fastening of a transmission to the engine;
- depress the gearbox from the guide bushings of the cylinder block and carefully lower it with a car jack. The gearbox needs to be tilted slightly so that when it is lowered, it does not catch on the suspension parts.
Visitor comments