



Contents: Setting and displaying the current…↓ Setting and displaying the current…↓ Outside air temperature indicator ↓ Setting and changing the day of the…↓ Turning on the heater (manual,…↓ Heat output regulation ↓ Long-term increase in working hours…↓ Remaining operating time of the…↓ Turning on the heater (automatic,…↓ Activating the heater ↓ Deactivating the heater ↓ Turning off the heater ↓
The independent heater operates independently of the vehicle's heating and ventilation system. The heater can be used while driving or when parked. The heater is supplied with fuel from the fuel tank, and current is supplied through an additional battery. The integrated time switch allows you to adjust up to three different switching periods. This allows you to leave the heater running without being in the car. The factory default setting for the heating time is 30 minutes. You can extend the heating time for a one-time or continuous period of up to two hours. On vehicles with a solid partition, only the cargo compartment is heated.
Setting and displaying the current time
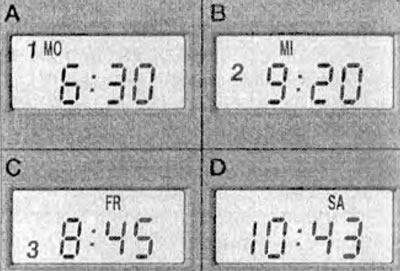
Press and hold button 3. Use buttons 6 or 7 to adjust the correct time. The current time is shown in field D only for a few seconds after pressing button 3.
Setting and displaying the current day of the week
Press and hold button 3. Use button 4 to set the correct day of the week. The current day and time are shown in field D only for a few seconds after pressing button 3.
Outside air temperature indicator
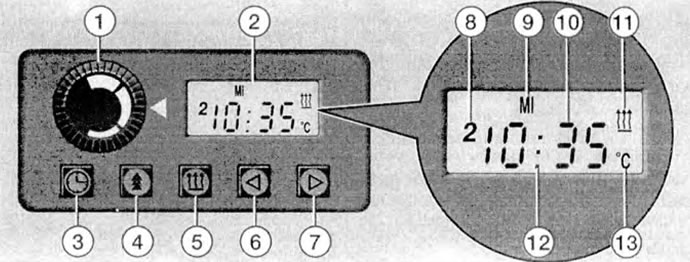
1 - Heat output regulator; 2 - Display; 3 - Button for setting the current time and current day of the week; 4 - Button for setting the hour and day of switching on, as well as for activating the heater; 5 - "On" or "Off" button; 6 - Button for setting back the clock or turning on time. Reduce heating time and query remaining operating time; 7 - Button for setting the clock forward or switching on time. Extended heating duration, pre-set day and outside air temperature indicator. Display: 8 - Signal lamp for three possible switching periods; 9 - Indicator light for the set day of the week; 10 - Indicator light for clock, time of switching on, malfunctions in the operation of the independent heater;11 - Indicator light "On" or "Off"; 12 - Heater operating status indicator light; 13 - Celsius degree indicator light 1).
1)The factory assembly does not provide for connection of a temperature sensor, therefore after pressing button 7, an incorrect temperature is shown.
The independent heater can show the outside air temperature outside. But for this, a temperature sensor must be installed. To view the outside air temperature with the sensor installed, press button 3 once with the ignition on and briefly twice in a row with the ignition off.
Setting and changing the day of the week and turn-on time
After pressing button 4, the following readings will appear on the display one after another: field A - the first switching period, field B - the second switching period, field C - the third switching period. There is no indication in field D. Only after pressing button 3 the current time and current day of the week appear. At the same time, each time the button is pressed, the day of the week set for the switch-on time is displayed. For the first entry and each time the previous parameter is changed, one of the switching periods named in fields A-C is called up first. Then, using buttons 6 or 7, you can set the desired switch-on time. If you enter a time earlier than the current time, the next day of the week will automatically appear on the display. If you need a different day of the week, then after setting the turn-on time, you must wait a few seconds until the day of the week indicator starts flashing. A new day of the week can be set by pressing button 7. If no further data is entered within 10 seconds after setting the switch-on time and day of the week, the setting is saved. Numbers 1, 2 or 3 (for the corresponding inclusion period) remain on and indicate that the heater is activated. Once set, the switching period remains saved and can be recalled by pressing button 4 so that the heater switches on again at the same time.
Turning on the heater (manual, without a switch with a clock mechanism)
Press button 5 - symbol 11 will appear on the display. After turning on the heater, heating will start after a while.
Heat output regulation
The heating output is regulated steplessly using regulator 1. When the set temperature is reached, it is then maintained thermostatically by the heater at an almost constant level.
Long-term increase in working hours (change preset)
Turn on the heater using button 5 and keep the button pressed. The heating duration can be reduced by pressing button 6 or increased by pressing button 7. Release button 5 and immediately after that turn the heater on again with this button and turn it off again. According to your setting, this time will be saved as the preset heating duration.
Remaining operating time of the independent heater
By briefly pressing button 6 you can query the remaining operating time. If button 6 is held down for more than one second, the operating time will decrease. The remaining operating time can only be requested when the heater is on.
Turning on the heater (automatic, using a clock mechanism)
Activating the heater
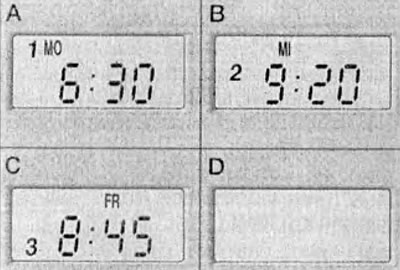
On the left side of the display, after setting the desired turn-on time or after pressing button 4, the number 1, 2, or 3 appears - see field A, B, or C. If the number remains visible on the display, it means the heater is activated and will start at the desired time.
Deactivating the heater
If you want to cancel activation (but not the turn-on time), press button 4 until the number and all readings disappear from field D on the display.
Turning off the heater
The heater was turned on by a clock mechanism
Once the heater is on, it can only be turned off by decreasing the remaining operating time using button 6. Symbol 11 will go out. The auxiliary heater fan will continue to run for a short time after being turned off.
Fault indication on the display
If one of the error codes below appears on the display, you can troubleshoot the problem yourself as described. If any other code appears, write it down, turn off the heater and contact a service station.
F13 - turn off the heater, open the air intake or outlet ducts and turn on the heater again.
F52, F53, F54, F55 or F56 - turn off the heater and wait until the fan stops working. Then turn the heater back on. Do not repeat this process more than twice. Then, still without turning on the heater, check the fuel supply.
Visitor comments