
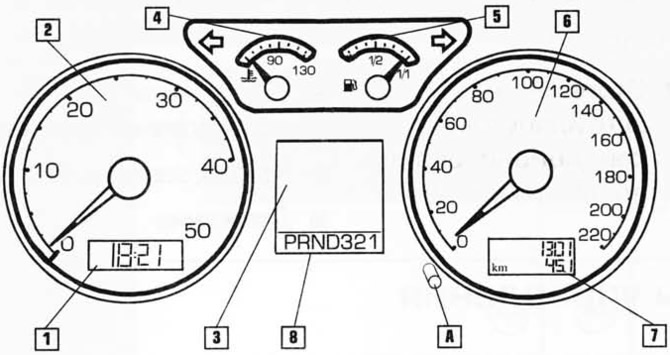
- 1. Clock
- 2. Tachometer
- 3. Multifunction indicator
- 4. Coolant temperature
- 5. Fuel gauge
- 6. Speedometer
- 7. Service interval display
- 8. Selector position indicator (operating mode selection lever)
- A. Control button
The location of the instruments on the panel depends on the model and engine installed on the vehicle.
1. Clock
To set the correct time, there is a button to the right below the tachometer.
- Turn the button to set the clock (A) to the left.
- Turn the button to set the minutes (A) to the right.
2. Tachometer
The tachometer shows the engine speed in hundreds of revolutions per minute. It is convenient for the driver to select the moment of gear shifting. Too high engine speeds lead to intensive engine wear and poor fuel economy.
NOTE: Do not accelerate the engine so that the tachometer needle enters the red zone. High engine speeds can cause engine malfunction or even breakdown.
If the engine speed drops to 1200 rpm, shift to a lower gear.
Avoid high engine speeds during the break-in period.
3. Multi-function indicator on the instrument panel
By choosing «Main menu», you can get a lot of useful information on the indicator. You can also disable the indicator.
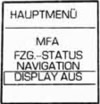
The main menu can be called up if there are no warnings on the indicator.
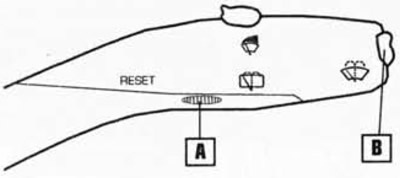
- Press button B on the wiper control for more than two seconds.
- Use the same button to select the desired menu item. The selected item will be highlighted.
- Press button A to confirm the selected item (RESET) on the wiper lever or wait approximately two seconds, the selected menu item will be automatically confirmed.
The menu items have the following meanings.
MFA (Multifunction indicator)
The indicator can be located in place of the clock at the bottom of the tachometer (1) or between tachometer and speedometer (2). To switch displays, briefly press button B on the wiper control with the ignition on.
The indicator allows you to get the following information:
- Outside temperature
- Current fuel consumption
- Average fuel consumption
- Distance that can be driven on the remaining fuel
- Distance traveled
- average speed
- Travel time
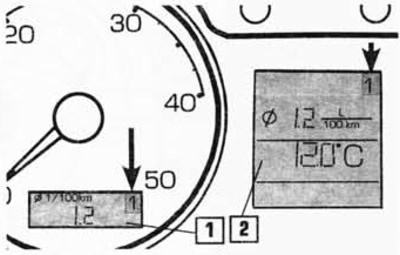
The indicator has two memory levels, labeled 1 and 2. The memory levels are shown in the upper right corner of the display (in the figure are shown by arrows).
- 1 - memory of a single trip
- 2 - long-term memory
To change the memory, briefly press button A with the ignition on.
Single trip memory 1 stores data from ignition on to ignition off: travel time, distance traveled and fuel used. Based on this data, the average driving speed, average fuel consumption and the distance that can be driven on the remaining fuel are calculated.
If the movement was stopped for more than two hours, the information from the memory is automatically erased.
Non-volatile memory 2 stores data on several single trips up to 99 hours and 59 minutes in total, distances up to 9999 km and fuel consumption up to 999 liters. Based on this data, the average speed and fuel consumption for all trips is calculated. If one of the above figures is exceeded, the data stored in the memory is erased and the accumulation of information starts from the beginning. Unlike single trip memory, long-term memory is not erased if a trip is interrupted for more than two hours.
Both memories can be erased if button A is pressed for more than two seconds. The same effect is obtained if the battery is disconnected.
Outside temperature
The sensor measures temperature in the range from -40 to +500°C. If the outside temperature is between +4 and -7°C, a snowflake symbol appears on the display (road icing warning). This symbol will flash for approximately 5 seconds and remain on until the outside temperature rises above +4°C or falls below -7°C.
Attention! Keep in mind that ice on the road can be even at temperatures above +4°C.
Travel time
Memory 1 stores the time of the last trip (from ignition on to ignition off).
Memory 2 stores the total travel time of all trips shown on the display, if it does not exceed 99 hours and 59 minutes. If this limit is exceeded, the calculation starts again from zero.
Distance traveled
Remarks on «travel time», refer to the distance travelled. The maximum distance the system can remember is 9999 km or 6214 miles.
Current fuel consumption
The display shows fuel consumption in liters/100 km. The calculation is carried out at intervals of 30 m. If the vehicle is at a standstill, the consumption is calculated in liters/hour. The display information is updated every two seconds.
With this information, you can adjust your driving style.
Average fuel consumption
After switching on the ignition, the average fuel consumption appears on the display after 300 m. When the vehicle is moving, the fuel consumption information is updated every 5 seconds.
Memory 1 contains the average fuel consumption of the last trip.
Memory 2 stores the average fuel consumption for all single trips. Note. The total fuel consumption is not shown on the display.
Distance that can be driven on the remaining fuel
This distance is calculated from the level of fuel in the tank and the total fuel consumption. Information is updated every 10 km.
average speed
Remarks on «average fuel consumption», apply to the average speed.
Fault messages
When the ignition is switched on, the condition and operability of the vehicle systems are automatically checked. If faults are found, a message appears on the display about the most serious of them. The message should be checked as soon as possible and the problem repaired. If more than one fault is detected, the messages about them will change on the display every two seconds. After 10 seconds or after pressing button B, the messages stop and are stored in memory under the general heading «Vehicle status» (car condition). If the main menu item «Vehicle status» flashes, there is at least one error message in the memory.
If more than one fault is stored in the memory, the display will show, for example, the message «STATUS 1/2». This message means that there are two faults in the memory, the first being shown on the display. To read individual messages, press the button on the lever.
4. Coolant temperature

The pointer starts working when the ignition is turned on.
After turning on the ignition, the system checks the health of the sensor and the circuit of the device. At this time, indicator C starts flashing, which means the test is in progress, then, after a few seconds, the indicator goes out. If the arrow is in zone A, then the engine has not warmed up yet. During this time, avoid driving at high speeds and do not load the engine.
It is recommended to start driving when the gauge needle is in sector B. If the engine is running normally, the gauge needle should be in the middle of sector B. If the engine is heavily loaded or the outside temperature is high, the needle may move to the right. This does not yet mean an emergency if signaling device C does not light up.
If the warning light comes on while driving, first check the coolant temperature on the display.
If the arrow has not moved out of zone B, add coolant to the cooling system as soon as possible.
If the arrow has moved to the right beyond zone B, then the engine has overheated. Switch off the ignition and try to determine the cause of overheating.
Attention! Do not open the hood if steam is coming out from under it. There is a risk of scalding! Wait until the steam stops coming out.
Attention! Do not touch the cooling fan. The fan may suddenly turn on even if the ignition is turned off.
5. Fuel gauge
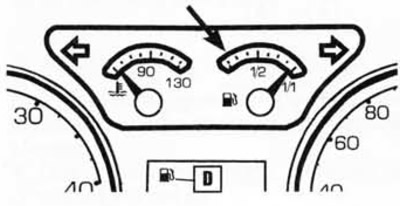
When the ignition is on, the gauge shows the approximate amount of fuel remaining in the tank. The tank has a capacity of about 45 liters of fuel. If the arrow enters the area indicated by the arrow and warning light D comes on, there are approximately 7 liters of fuel left in the tank. At the same time, the system beeps.
6. Speedometer
Shows vehicle speed in km/h. On some models, an audible signal sounds if the speed exceeds 120 km/h.
7. Odometer
At the bottom of the speedometer, the indicator shows two numbers.
The top number shows the total mileage of the vehicle since it left the factory.
The lower number is the mileage per trip, it starts counting the distance after resetting. To reset the single trip counter, press the button below the speedometer.
Visitor comments