
English Русский
Български
Беларускі
Український
Српски
Hrvatski
Română
Polski
Slovenský
Magyar
  |  Articles  |  Sitemap  |  Contacts  |    |
Car maintenance Ford Car maintenance Hyundai Car maintenance Chevrolet Car maintenance BMW Car maintenance Audi Car maintenance Opel Car maintenance AvtoVAZ
VWmanual.ru


Main   Passat   Golf   Polo   Touareg   Tiguan   Sharan   Transporter   Others  
Touareg 1 (2002-2006)

Disconnecting and connecting the battery, cars with one battery (VW Touareg 1)

  • Main
  • Touareg
  • Touareg 1
  • Electrical equipment
  • Battery
  • Disconnecting and connecting the battery, cars with one battery
            0


Contents: Disconnecting the battery ↓ Connecting the battery ↓

Disconnecting the battery


NOTE: To disconnect the battery, the anti-theft alarm must be deactivated. By unscrewing the negative terminal from the battery (cessation of current in a circuit) - make sure that work on electrical equipment is safe. The positive terminal should only be unscrewed to remove the battery. Turn off the ignition and all electrical consumers, remove the ignition key.


Removing the trim panels under the driver's seat.

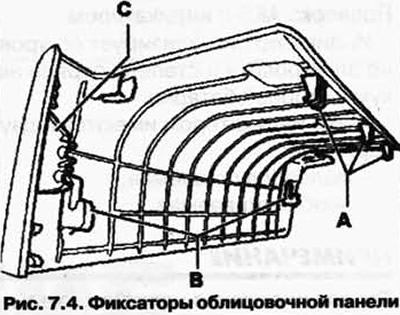
NOTE: The A fasteners hook onto the cross brace under the seat (Fig. 7.4).

NOTE: The A fasteners hook onto the cross brace under the seat (Fig. 7.4).


Press the trim panel lightly downwards and backwards at the same time. Hold the panel in this position and in the area of the locking tabs A. Pull it up to release.

The B latches will fit into the slots in the cross brace in front of the seat. You can also unlock them by pushing down and pulling them towards you.

The C-clamps are held by the side trim panel of the seat and can be released by pulling them towards you.

Set the seat to the rear, upper position.

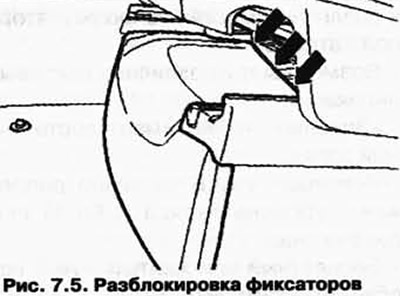
Unlock the locks by pressing downwards and backwards at the same time. In this position, lift the trim panel in the area of the locks (Fig. 7.5).


Unlock the locks by pressing downwards and backwards at the same time. In this position, lift the…


Press the trim panel down and pull it towards you at the same time.

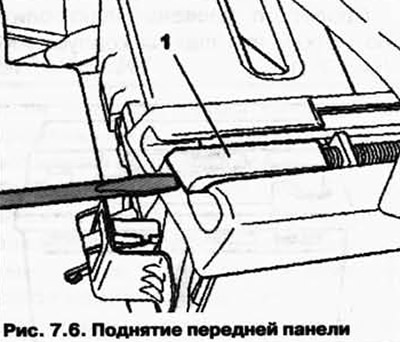
Carefully lift panel 1 using a screwdriver from the front trim panel of the seat adjustment axis (Fig. 7.6).
Carefully lift panel 1 using a screwdriver from the front trim panel of the seat adjustment axis…


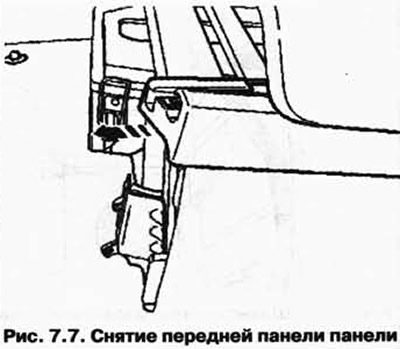
Remove the front seat adjustment axis panel from the seat slide (Fig. 7.7).
Remove the front seat adjustment axis panel from the seat slide (Fig. 7.7).


Set the seat to the forward, upper position.

NOTE: Installation and removal of the rear seat adjustment axle trim panels is the same on both sides.


Carefully lift panel 1 from the rear trim panel of the seat adjustment axis using a screwdriver (Fig. 7.8).
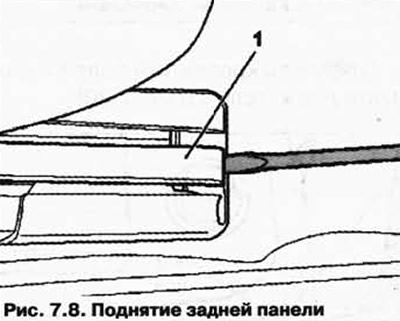
Carefully lift panel 1 from the rear trim panel of the seat adjustment axis using a screwdriver…


Remove the rear seat adjustment axis panel from the seat slide (Fig. 7.9).
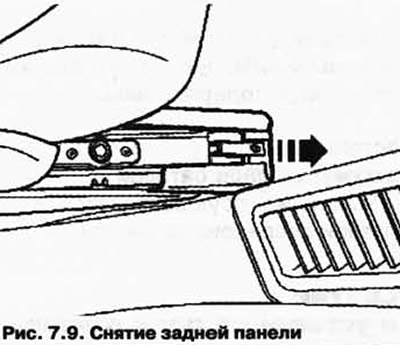
Remove the rear seat adjustment axis panel from the seat slide (Fig. 7.9).


Release the seat console side trim panel clips using a screwdriver and remove the panel by pulling it up.

Unlock the panels (Fig. 7.10).
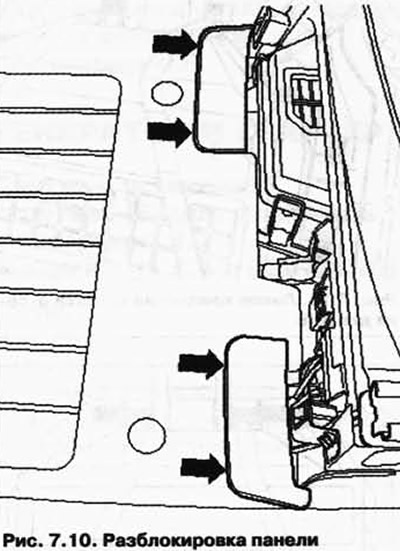
Unlock the panels (Fig. 7.10).


Unscrew the mounting bolts (Fig. 7.11).
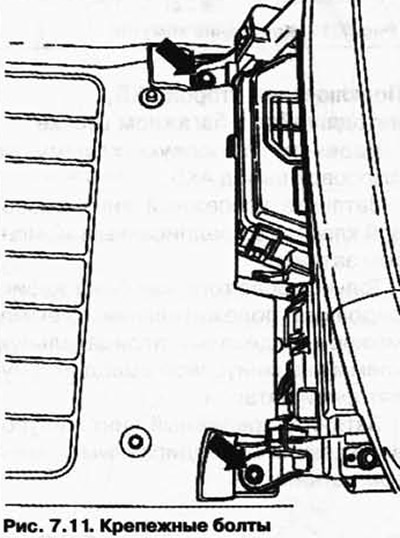
Unscrew the mounting bolts (Fig. 7.11).


Fold the seat base and seat back.

Unscrew bolt 1 and remove air duct 2 (Fig. 7.12).
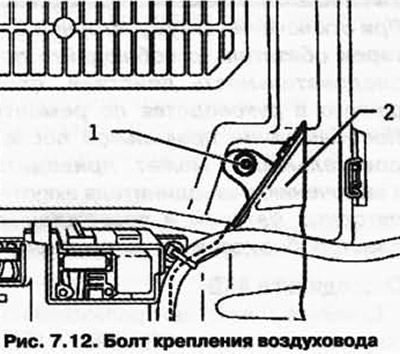
Unscrew bolt 1 and remove air duct 2 (Fig. 7.12).


Open the locks of the arrow battery box and remove the cover (Fig. 7.13).
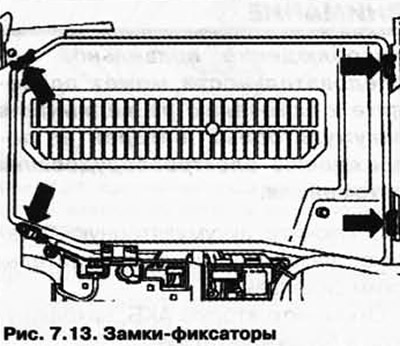
Open the locks of the arrow battery box and remove the cover (Fig. 7.13).


Unscrew the negative and positive terminals from the battery terminals.

Connecting the battery


CAUTION: Attach the terminals by hand without applying force to avoid damaging the battery case. Do not lubricate the battery terminals.


Place the positive terminal on the positive terminal of the battery.

Tighten the positive terminal retaining screw to the specified torque.

Only after the positive terminal has been secured can the negative terminal be placed on the corresponding battery terminal.

Tighten the negative terminal mounting screw to the specified torque.

Replace the seat base mounting bolts and tighten them to the specified torque.

This article is available at russian, bulgarian, belarusian, ukrainian, serbian, croatian, romanian, polish, slovak, hungarian
The text has been checked: Tarasov Ivan

Share information:

Previous articles
Checking the battery open circuit voltage
Checking the density of the electrolyte
Adding distilled water to the battery
Checking the battery
Types of batteries
General information about electrical equipment
Next articles
Disconnecting and connecting the battery, cars with two batteries
Removal and installation the battery located under the driver's seat
Removal and installation the battery disconnect relay


Similar articles from other manuals for VW cars:
Car battery Passat B3 (1988-1993)
Disconnecting the battery from the on-board network Golf 4 (1997-2004)
Starting the engine from an auxiliary battery Polo 3 (1995-2003)
Disconnecting and connecting the battery Tiguan 1 (2007-2015)
Checking the battery status Sharan 1 (1995-2000)
Checking the battery Transporter T4 (1990-2003)
Disconnecting and connecting terminals from the battery Caddy 3 (2003-2010)
Link to this page in different formats


Visitor comments


No comments yet


How much will 16 + 14 =


Touareg 1 
  • General information
  • Vehicle device
  • Controls and instruments
  • Seats and safety
  • Maintenance and management
  • Power unit
  • Engine checks
  • Petrol engine 3.2L
  • Petrol engine 4.2L
  • Diesel engine 5.0L
  • Cooling system
  • Lubrication system
  • Injection system
  • Exhaust system
  • Fuel supply system
  • Transmission
  • Automatic gearbox 09D
  • Mechanical gearbox 08D
  • Cardan shaft
  • Chassis
  • Wheels and tires
  • Front suspension
  • Rear suspension
  • Steering gear
  • Brake system
  • Body
  • Outdoor elements
  • Electrical equipment
  • Battery
  • Generator and starter
  • Instruments and wipers
VWmanual.ru © 2016-2026 | Mobile version | News and articles | Sitemap: EN BG BY UA RS HR RO PL SK HU | Write message | Site search
Passat B2 • Passat B3 • Passat B4 • Passat B5 • Passat B6 • Golf 1, diesel • Golf 1, petrol • Golf 2, petrol • Golf 2 • Golf 3 • Golf 4 • Golf 5 • Polo 3 • Polo 4 • Touareg 1 • Tiguan 1 • Sharan 1 • Transporter T3 • Transporter T4 • LT 28 • LT 2D • Beetle • Caddy 3 •
Our website uses cookies to ensure functionality and convenience.