
English Русский
Български
Беларускі
Український
Српски
Hrvatski
Română
Polski
Slovenský
Magyar
  |  Articles  |  Sitemap  |  Contacts  |    |
Car maintenance Ford Car maintenance Hyundai Car maintenance Chevrolet Car maintenance BMW Car maintenance Audi Car maintenance Opel Car maintenance AvtoVAZ
VWmanual.ru


Main   Passat   Golf   Polo   Touareg   Tiguan   Sharan   Transporter   Others  
Polo 3 (1995-2003) Polo 4 (2001-2009)

Removal and installation the windshield wiper arm (VW Polo 4)

  • Main
  • Polo
  • Polo 4
  • Electrical equipment
  • Wiper system
  • Removal and installation the windshield wiper arm
            0


Contents: Removal ↓ Installation ↓

Removal


Wet the windshield with water. Turn on the windshield wipers for a short time and turn them off using the steering column switch. The windshield wipers should stop in their original position.

Mark the initial position of the brushes on the glass with adhesive tape when the windshield wiper arms are correctly adjusted.
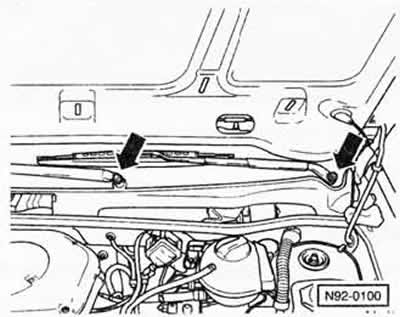
Mark the initial position of the brushes on the glass with adhesive tape when the windshield wiper…


Open the engine compartment hood. Using a screwdriver, press the protective cap and loosen the corresponding "arrow" nut by about 2 turns, but do not unscrew it completely.

Slide the windshield wiper arm off the shaft with gentle movements. Unscrew the nut completely and remove the windshield wiper arm. You can also use a suitable puller, such as HAZET 1966-05.

Installation


Make sure that the windscreen wiper motor is in its home position. If necessary, briefly switch the motor on and off using the steering column switch.

Place the windshield wiper arm on the shaft and align it according to the marks made before removal.

Screw on the fastening nut and tighten it by hand.

Make sure again that the windshield wiper arms are in their original position. To do this, close the engine compartment hood, wet the windshield with water and turn on the windshield wiper for a short time. The windshield wiper arms should return to the adjusted original position and should not extend beyond the edge of the window glass when cleaning. If necessary, loosen the fastening nuts again and install the arms in their original position.


The original text can be found at (www.VWmanual.ru)

Tighten the fastening nut to a torque of 20 Nm.

Press the protective cap.

This article is available at russian, bulgarian, belarusian, ukrainian, serbian, croatian, romanian, polish, slovak, hungarian
The text has been checked: Semenova Anna

Share information:

Previous articles
Removal and installation the washer reservoir
Removal and installation the washer pump
Removal and installation the rear window washer nozzle
Removal and installation the windshield washer nozzle
Replacing the rubber band of the windshield wiper blade
Next articles
Removal and installation the windshield wiper motor
Removal and installation the rear window wiper arm/motor
Diagnosing Wiper Blade Rubber Band Faults


Similar articles from other manuals for VW cars:
Replacing the rubber band of the windshield wiper blade Passat B3 (1988-1993)
Replacing windshield wiper blades Golf 2 (1984-1993, petrol)
Front windshield wiper Touareg 1 (2002-2006)
Front windshield wiper Tiguan 1 (2007-2015)
Replacing the windshield wiper arm Sharan 1 (1995-2000)
Windshield wiper and washer Transporter T4 (1990-2003)
Windshield wiper control Caddy 3 (2003-2010)
Link to this page in different formats


Visitor comments


No comments yet


How much will 47 + 46 =


Polo 4 
  • General information
  • User manual
  • Maintenance
  • Power unit
  • Engine repair
  • Cooling and lubrication system
  • Control system
  • Injection system (diesel)
  • Supply system
  • Exhaust system
  • Chassis
  • Front suspension
  • Rear suspension
  • Steering
  • Wheels and tires
  • Brake system
  • Body
  • Interior
  • Exterior
  • Electrical equipment
  • Equipment and devices
  • Wiper system
  • Lighting system
  • Electrical circuits
Polo 3 
  • General information
  • User manual
  • Maintenance
  • Power unit
  • Petrol engines 1.4 and 1.6
  • Petrol engines 1.4 (V16)
  • Petrol engines 1.6 and 1.8
  • Diesel engines 1.7 and 1.9
  • Diesel engines 1.9 D and TD
  • Transmission
  • Mechanical gearbox 085
  • Mechanical gearbox 020/02K
  • Chassis
  • Front suspension
  • Rear suspension
  • Steering
  • Brake system
  • Body
  • Exterior
  • Interior
  • Electrical equipment
  • Equipment and instruments (until 2000)
  • Equipment and instruments (after 2000)
  • Electrical circuits
  • Wiring diagrams (petrol)
  • Wiring diagrams (diesel)
VWmanual.ru © 2016-2026 | Mobile version | News and articles | Sitemap: EN BG BY UA RS HR RO PL SK HU | Write message | Site search
Passat B2 • Passat B3 • Passat B4 • Passat B5 • Passat B6 • Golf 1, diesel • Golf 1, petrol • Golf 2, petrol • Golf 2 • Golf 3 • Golf 4 • Golf 5 • Polo 3 • Polo 4 • Touareg 1 • Tiguan 1 • Sharan 1 • Transporter T3 • Transporter T4 • LT 28 • LT 2D • Beetle • Caddy 3 •
Our website uses cookies to ensure functionality and convenience.