



Contents: Removal the locking cylinder ↓ Removal the inclusion sleeve and pipe ↓ Installing the inclusion sleeve and…↓ Installing the locking cylinder ↓
The differential lock mechanism is shown in the figure 5.126a The locking cylinder is shown in the figure 5.126b.
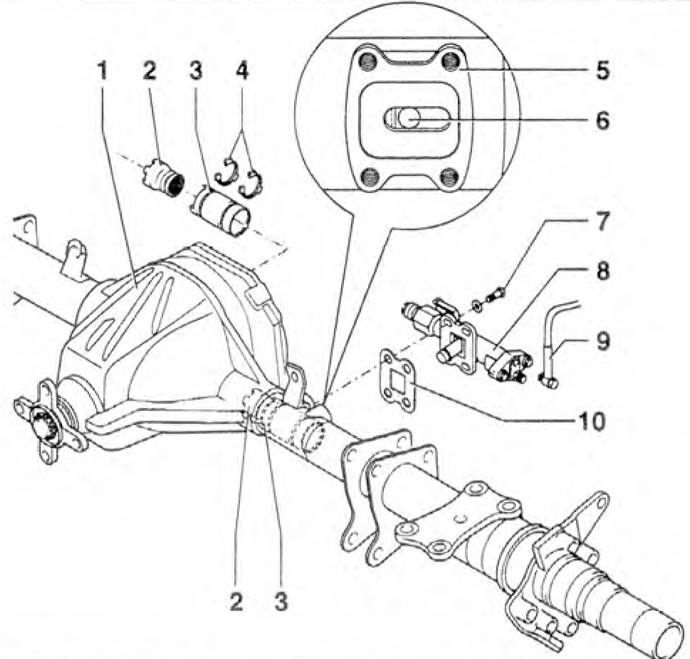
Figure 5.126a. Differential locking mechanism: 1 - Rear axle; 2 - Including sleeve; 3 - Switch pipe; 4 - Rings; 5 - Flange; 6 - Mounting hole; 7 - Bolt; 8 - Lock engagement cylinder; 9 - Hydraulic tube; 10 - Gasket.
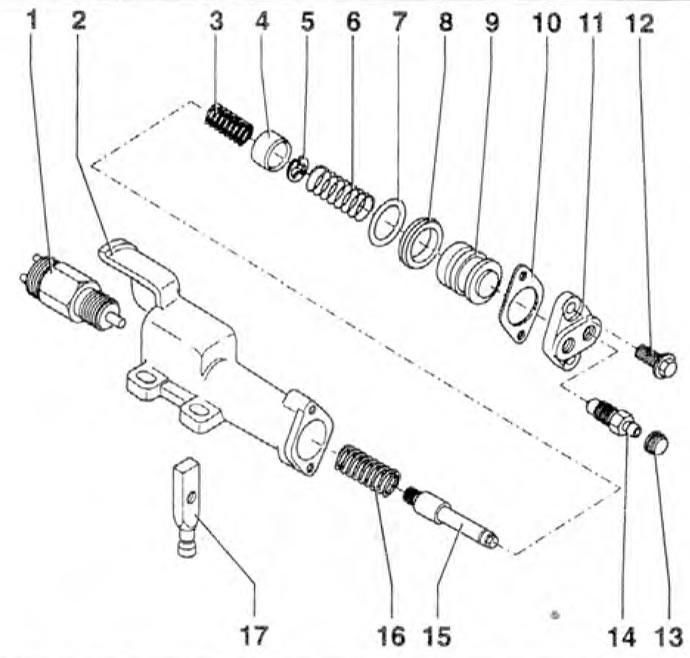
Figure 5.126b. Lock engagement cylinder: 1 - Differential lock switch; 2 - Cylinder body; 3, 6, 16 - Springs; 4 - Bushing; 5 - Locking ring; 7, 8 - Seals; 9 - Poryen; 10 - Gasket; 11 - Lid; 12 - Bolt; 13 - Lid; 14 - Ventilation valve; 15 - Engagement rod; 17 - Power lever.
Removal the locking cylinder
1. Drain the oil from the final drive gearbox.
2. Wipe the surface around bolt 1, unscrew the hydraulic tube and close it with a plug (figure 5.127). Loosen nut 3 and disconnect the wiring connector. Mark the position of cylinder 4 relative to the rear axle beam. Unscrew bolts 2 and remove cylinder 4.
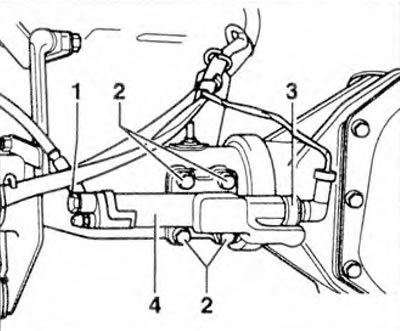
Figure 5.127. Wipe the surface around bolt 1, unscrew the hydraulic tube and close it with a plug. Loosen nut 3 and disconnect the wiring connector. Mark the position of cylinder 4 relative to the rear axle beam. Unscrew bolts 2 and remove cylinder 4.
Removal the inclusion sleeve and pipe
3. Remove the axle shafts.
4. Remove the differential.
5. Remove the engaging sleeve and pipe with rings from the rear axle beam.
Installing the inclusion sleeve and pipe
6. Install the engagement sleeve and the pipe with rings on the rear axle beam so that the mounting hole 1 is located in the center of the flange 2 for the engagement cylinder (figure 5.128).
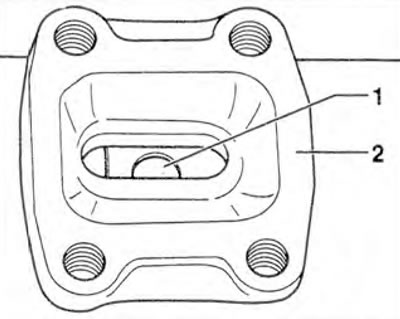
Figure 5.128. Install the engagement sleeve and the pipe with rings on the rear axle beam so that the mounting hole 1 is located in the center of the flange 2 for the engagement cylinder.
7. After inserting bolt 1 into the hole, make sure that the engagement tube does not rotate when installing the differential.
8. Install the differential.
Installing the locking cylinder
9. Installation of the locking cylinder is carried out in the reverse order of removal.
Visitor comments