
English Русский
Български
Беларускі
Український
Српски
Hrvatski
Română
Polski
Slovenský
Magyar
  |  Articles  |  Sitemap  |  Contacts  |    |
Car maintenance Ford Car maintenance Hyundai Car maintenance Chevrolet Car maintenance BMW Car maintenance Audi Car maintenance Opel Car maintenance AvtoVAZ
VWmanual.ru


Main   Passat   Golf   Polo   Touareg   Tiguan   Sharan   Transporter   Others  
Polo 3 (1995-2003) Polo 4 (2001-2009)

Preparing for self-diagnosis of the instrument panel (VW Polo 3)

  • Main
  • Polo
  • Polo 3
  • Electrical equipment
  • Equipment and instruments (after 2000)
  • Preparing for self-diagnosis of the instrument panel
            0


Contents: Determining the version of the…↓ Querying fault memory ↓ Clearing fault memory ↓
Connecting the VAG 1551 fault code reader and selecting functions (determining the version of the instrument cluster control unit).

1. Remove ashtray insert 1 and connect the VAG 1551 fault code reader using the VAG 1551/3 cable (fig. 12.33).
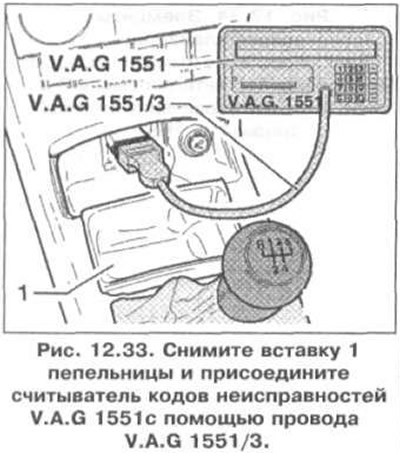
1. Remove ashtray insert 1 and connect the VAG 1551 fault code reader using the VAG 1551/3 cable…


2. The display should show the following information:
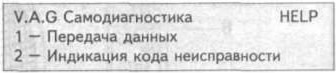
2. The display should show the following information:

3. Turn on the ignition.

4. Turn on the printer by pressing the "Print" button (the indicator light should come on).

5. Press "1" to select the "Fast Data Transfer" function.

Determining the version of the instrument cluster control unit


6. The display should show the following information:

6. The display should show the following information:

7. Press buttons "1" and "7" to select the "Instrument Cluster" function. The display should show the following information:



7. Press buttons «1» and «7» to select the «Instrument Cluster» function. The display should show…

8. Confirm by pressing the "Q" button. The display should show the following information:
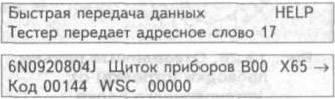
8. Confirm by pressing the «Q» button. The display should show the following information:

9. When indicated on the display:

9. When indicated on the display:

Press the "HELP" button to be able to print the fault codes. After receiving the fault code list, enter the address word "17" "Instrument cluster" and confirm by pressing the "Q" button. The following information should appear on the display:


Press the «HELP» button to be able to print the fault codes. After receiving the fault code list,…

10. Press "→". The display should show the following information:

10. Press «→». The display should show the following information:

11. After pressing the "HELP" button you will receive a printed list of possible functions.

01Poll the control unit version
02Querying fault memory
03Final diagnostics
05Erase fault memory
06Completing the output
07Control unit coding
08Reading a block of measured values
10Adaptation

Querying fault memory


12. Turn on the printer by pressing the "Print" button (the indicator light should come on). The display should show the following information:

12. Turn on the printer by pressing the «Print» button (the indicator light should come on). The…

13. Dial "02" to select the "Fault Memory Interrogation" function. The display should show the following information:

13. Dial «02» to select the «Fault Memory Interrogation» function. The display should show the…

14 Confirm by pressing the "Q" button. The display should show the following information:

14 Confirm by pressing the «Q» button. The display should show the following information:

The fault numbers are displayed on the screen and printed one after the other.

15. If there are no faults in the memory, the program will return to the starting point after pressing "→".

15. If there are no faults in the memory, the program will return to the starting point after…

The display should show the following information:

The display should show the following information:

16. Press "06" to select the "End diagnostics" function and confirm by pressing the "Q" button.

17. Turn off the ignition and disconnect the tester.

Clearing fault memory


18. Once the memory has been successfully read, dial "05" to select the "Clear Fault Memory" function and confirm by pressing the "Q" button. The display should show the following information:

18. Once the memory has been successfully read, dial «05» to select the «Clear Fault Memory»…

19. Confirm by pressing the "Q" button. The display should show the following information:

19. Confirm by pressing the «Q» button. The display should show the following information:

The fault memory is cleared. The display should show the following information:

The fault memory is cleared. The display should show the following information:

20. Press "06" to select the "End Output" function. The display should show the following information:

20. Press «06» to select the «End Output» function. The display should show the following…

21. Confirm by pressing the "Q" button. The display should show the following information:

21. Confirm by pressing the «Q» button. The display should show the following information:

22. Turn off the ignition and disconnect the tester.

This article is available at russian, bulgarian, belarusian, ukrainian, serbian, croatian, romanian, polish, slovak, hungarian
The text has been checked: Kolesnikov Artem

Share information:

Previous articles
Rear view of the instrument panel
Removal and installation the instrument panel
Next articles
Instrument cluster fault codes
Removal and installation the immobilizer control unit
Removal and installation the light switch
Removal and installation switches on the instrument panel
Heating and air conditioning system
Removal and installation dust and pollen filters


Similar articles from other manuals for VW cars:
Instrument panel Passat B3 (1988-1993)
Upper instrument panel trim driver side (Golf) Golf 5 (2003-2008)
Black and white display in the instrument cluster Touareg 1 (2002-2006)
Front support panel Tiguan 1 (2007-2015)
Instrument visor (dashboard) on the instrument panel Transporter T4 (1990-2003)
Instrument panel — removal and installation Beetle (1960-1986)
Link to this page in different formats


Visitor comments


No comments yet


How much will 38 + 46 =


Polo 4 
  • General information
  • User manual
  • Maintenance
  • Power unit
  • Engine repair
  • Cooling and lubrication system
  • Control system
  • Injection system (diesel)
  • Supply system
  • Exhaust system
  • Chassis
  • Front suspension
  • Rear suspension
  • Steering
  • Wheels and tires
  • Brake system
  • Body
  • Interior
  • Exterior
  • Electrical equipment
  • Equipment and devices
  • Wiper system
  • Lighting system
  • Electrical circuits
Polo 3 
  • General information
  • User manual
  • Maintenance
  • Power unit
  • Petrol engines 1.4 and 1.6
  • Petrol engines 1.4 (V16)
  • Petrol engines 1.6 and 1.8
  • Diesel engines 1.7 and 1.9
  • Diesel engines 1.9 D and TD
  • Transmission
  • Mechanical gearbox 085
  • Mechanical gearbox 020/02K
  • Chassis
  • Front suspension
  • Rear suspension
  • Steering
  • Brake system
  • Body
  • Exterior
  • Interior
  • Electrical equipment
  • Equipment and instruments (until 2000)
  • Equipment and instruments (after 2000)
  • Electrical circuits
  • Wiring diagrams (petrol)
  • Wiring diagrams (diesel)
VWmanual.ru © 2016-2026 | Mobile version | News and articles | Sitemap: EN BG BY UA RS HR RO PL SK HU | Write message | Site search
Passat B2 • Passat B3 • Passat B4 • Passat B5 • Passat B6 • Golf 1, diesel • Golf 1, petrol • Golf 2, petrol • Golf 2 • Golf 3 • Golf 4 • Golf 5 • Polo 3 • Polo 4 • Touareg 1 • Tiguan 1 • Sharan 1 • Transporter T3 • Transporter T4 • LT 28 • LT 2D • Beetle • Caddy 3 •
Our website uses cookies to ensure functionality and convenience.